
Owners Manual


8
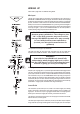
10 PEAK LED This is used to indicate that the signal is close to distorting (clipping) on a specific
channel.
11 INPUT CHANNEL FADER This is used to control the level fed to the Mix Bus and post-fade sends.
12 MIX OUTPUTS (XLR) Connect these to your analogue recording device, or to your amplification system.
13 MIX INSERTS (¼” Jack) This is a pre-fade break in the signal path which can be used to feed a dynamics or
mastering device. The signal is sent from the tip of the jack plug and the return path
comes back in on the ring of the jack plug.
14 MONITOR O/Ps (¼” Jack) These are used to feed your monitoring system. This can be directly connected to
powered monitors, or indirectly via an amplifier to standard monitors.
15 MASTER FADERS These faders control the overall level of the mix outputs.
16 MAIN METERS These show the level of the mix outputs. When the PFL ACTIVE LED is lit, the meters
show the level of the selected PFL signal.
17 MONITOR CONTROL This controls the level of the signal sent to your monitoring system.
18 PHONES CONTROL This controls the level of the signal sent to the headphones jack socket.
19 AUX OUTPUTS (¼” Jack) These two outputs can be used to send the channel signal to an FX unit or an artist’s
monitors (headphones/in-ear/stage monitors). Aux 1&2 are switchable pre/post fade.
20 AUX CONTROLS These two switches globally switch the AUX1 and AUX2 feeds respectively, on all the
input modules to be either pre or post-fade.
21 STEREO INPUTS (¼” Jack) These two inputs can be used to connect line level stereo inputs from keyboards, sound
modules, samplers, computer based audio cards etc. These inputs pass through a normal
channel strip, with EQ, Auxes and a Balance control.
22 2-TRACK INPUTS
(RCA Phono)
Here you can connect the playback from your recording device.
23 2-TRACK CONTROLS Use these to control the 2 Track signal. The MONITOR switch sends the signal to the
monitor outputs and phones, whilst the TO MIX switch sends it to the main mix.
24 RECORD OUTPUTS
(RCA Phono)
Here you can connect the input to your recording device.
25 PHANTOM POWER Press this to switch the phantom power (48V) on for condenser microphones.
WARNING: Do Not apply Phantom Power before connecting a microphone.
26 HEADPHONES (¼” Jack) Plug your headphones into this socket. Recommended headphones impedance is 200
ohms or greater.