Safety Information 10. Protect the power cord from being walked on or pinched particularly at plugs, convenience receptacles, and the point where they exit from the apparatus. 11. Only use attachments/accessories specified by the manufacturer. 12. Use only with the cart, stand, tripod, bracket or table specified by the manufacturer, or sold with the apparatus. When a cart is used, use caution when moving the cart/apparatus combination to avoid injury from tip-over.
FCC and IC Information: This device complies with Part 15 of the FCC Rules and RSS-210 of the IC Rules. Operation is subject to the following two conditions: (1) This device may not cause harmful interference, and (2) this device must accept any interference received, including interference that may cause undesired operation. Warnings: The device meets the exemption from the routine evaluation limits in section 2.
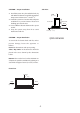
CAUTION - Proper Installation Side View: Install the system in a place which is level, dry and neither too hot nor too cold. The appropriate temperature is between 5 oC and 35 oC. Install the system in a location with adequate ventilation to prevent internal heat from building up inside the unit. Leave sufficient distance between the system and TV. Keep the system away from TV to avoid interference with TV.
Contents Getting Started 5 Package Contents 5 Installing/Replacing the Batteries 5 Connecting the AC Adapter 6 Using the Remote Control 7 System Overview 8 Front View Back View Remote Control 8 Selecting the Sound Source 9 Playing back from iPhone/iPod 10 Setting an iPhone/iPod on the Unit 10 Listening to an iPhone/iPod Charging an iPhone/iPod 10 Playing back via Bluetooth/from iPad 12 Downloading the SoundFreaq App 12 Using multiple Bluetooth devices 13 Playing back from Macbook
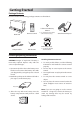
Getting Started Package Contents Examine whether the following package contents are all included : + CR2025 3V Lithium Coin Battery CR2025 Remote Control Main Unit It is loaded on the remote control at the factory. Switch Power Adapter Dock Adapters(2) Adapter Cable FM Antenna For iPhone 3G/3GS and iPod Touch Installing/Replacing the Batteries Handling the Remote Control CAUTION: Danger of explosion if battery is incorrectly replaced. Replace only with the same or equivalent type. 1.
Warning - When Using the Battery Store the battery in a place where children cannot reach. If a child accidentally swallows the battery, consult a doctor immediately. Do not recharge, short circuit, disassemble, heat the battery, or dispose the battery in fire. Doing any of these things may cause the battery to give off heat, crack, or start a fire. Do not leave the battery with other metallic materials. Doing this may cause the battery to give off heat, crack, or start a fire.
Using the Remote Control Using the remote control Storing the remote control Remove the insulation sheet before using for the first time. Aim the remote control at the IR Sensor on the front lens within an approximate distance of 7m (23 feet) away. A remote control storage compartment is designed on the right side of system. The remote control can be magnetized into the compartment easily for your quick and convenient use. Push here. IR Sensor Remote control magnet Open the door. .7.
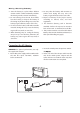
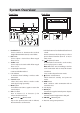
System Overview Back View Front View 5 13 4 10 9 1 2 17 3 14 6 7 8 11 15 16 12 1. U-Cubed knob Turn to activate or deactivate the U-Cubed (High Definition Wide Stereo) sound effect. 2. Bass knob Turn to adjust a desired bass effect ranged from +3 to -3. 3. Treble knob Turn to adjust a desired treble effect ranged from +3 to -3. 4. 30-pin Apple connector Connect with iPhone/iPod. 5. Pair indicator To indicate when building a wireless audio connection. 6.
Remote Control 1. 2. 1 2 3 4 5 6 3. 7 4. 5. 6. 7. (Power) button Switch between power-on and standby modes. (Previous) / (Next) button Skip to the previous/next track in iPhone/ iPod and wireless audio modes. Hold the button to fast-backward/fast-forward a track. Decrease/increase the frequency or select a preset channel number (from 01 to 20) in tuner mode. (Play/Pause) button Play/pause a track when listening to iPhone/ iPod or wireless audio source. Hold to switch the iPod to sleep mode.
Playing back from iPhone/iPod Setting an iPhone/iPod on the Unit Compatible iPod Players: Most Apple iPod models with 30-pin dock connectors as follows: iPod nano 5th generation (video camera), iPod nano 4th generation (video), iPod nano 3rd generation (video), iPod nano 2nd generation (aluminum), iPod nano 1st generation, iPod 4th generation (color display), iPhone 3G/3GS, iPhone 4, iPod classic, iPod 5th generation (video), iPod 4th generation, iPod touch 1st generation, iPod touch 2nd generation, iPhone,
Press the Button / Unit Remote Control Functions Start/Pause playback. Hold this button to switch the iPod to sleep mode. Next track/fast forward (press and hold). Previous track/rewind (press and hold). Charging an iPhone/iPod The iPhone/iPod is charged while it is set on the unit when the unit is powered on. The unit does not support iPod 3G (10/15/20/ 30/40GB) charging mode. Make sure the AC adapter is connected to the unit.
Playing back via Bluetooth/from iPad Downloading the SoundFreaq App We have developed an App to give you full control from your iPhone/iPad while playing audio over the Bluetooth wireless connection, please download the "SoundFreaq Remote" App for FREE. After you build a Bluetooth connection between your iPhone/iPad and the Sound Platform, a prompt will be displayed on your iPhone/iPad asking you if you would like to install our App, click "Yes" to install the APP.
Please check the user manual of the iPad or Bluetooth-enabled device with which you are initiating pair to learn about Bluetooth connection with any other devices. 4. Once the unit is detected and its name "Sound Platform" appears on the display of your iPad or Bluetooth-enabled device, key in the default password "1234" if a prompt requests it. You may change the device name on your Bluetooth-enabled device after the pair is successfully set up.
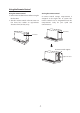
Upgrading Wireless Connection Mode 3. Set a new "receiver" into the storage compartment as shown. You can purchas a 2.4G wireless receiver to upgrade the connection mode by replacing the receiver located in the storage compartment on the back of unit. If you have any question, please consult your dealer. "THIS SIDE UP" is marked on the receiver. 1. Open the cover of receiver storage compartment located on the back of unit. 2. Remove the "receiver" from the storage compartment.
Listening to Tuner Press the Button Unit / Functions Remote Control Switch between the frequency display and channel number display. Tune the desired frequency or channel number based on the different display. Hold this button to enter saving mode. Press to save a channel. (see "Presetting a station”) Select a channel (from 01 to 20). Frequency display Channel number display Change frequency from 87.5MHz to 108.0MHz in FM mode.
A. Manual Tuning - Briefly press " "/ " " button repeatedly to move frequency to frequency (from 87.5 MHz to 108.0 MHz) until you find the desired station. LCD Display B. Auto Scanning - Hold " "/ " " button until the frequency display starts flashing. The frequency will be scanned automatically until a station is found. 4. Hold " " button to start storing a station. The channel number shows on the display. 5.
Activating "U-Cubed" Sound Effect "U-Cubed" is an proprietary technology designed to create an ultra wide stereo sound field in digital music systems. With exceptional natural sound reproduction of high definition and fidelity, we create a listening experience where you feel like your speakers are separated much more than they are. To activate UQ3 on: The unit, turn the " " knob once to activate, turn again to deactivate. On the remote or remote App, press the " " button to activate and deactivate.
Troubleshooting Check this list for a possible troubleshooting solution before calling for service. In These Cases Power does not come on. Cannot set the iPhone/iPod. Cannot operate iPhone/iPod. Check the following points • AC adapter is not inserted securely. Plug in securely. • Is the selected dock adapter compatible to your iPhone/iPod? • Is the dock adapter properly mounted on the unit? Make sure to mount the dock adapter properly.
Technical Specifications SFQ-01 Model Type Sound Platform Support Bluetooth Bluetooth 1.2, 2.0 and 2.1 compliant Support Profile A2DP Input Sensitivity/Impedance AUX Input 1200 mV Band Tuner FM Tuning Range 87.5 ~ 108.0 MHz Frequency Step 100 KHz Preset Stations 20 Input Terminal External DC IN (for AC adapter), AUX IN Power Source DC 18 V AC Adapter 3.3 A (External DC IN) Input: AC 100-240V, 50/60Hz Output: DC 18 V 3.3 A Dimensions (Approx.
Save this manual