
Instructions


FUR100 / English Instruction Manual
3
ENVIRONMENTAL RECEPTION EFFECTS
Your radio controlled clock obtains the accurate time with wireless technology. Same as
all wireless devices, the receiving ability maybe affected by, but not limited to, the following
circumstances:
Long transmitting distance
Inside concrete buildings
Nearby mountains and valleys
Near electrical appliances
Among tall buildings
Near computer and TV´s
Near railway, high voltage cable etc.
Inside moving vehicles
Near freeway, airport, etc.
Near metallic structures
Near construction site
Place your clock at a location with optimal signal, i.e. close to a window and away from metal
surface or electrical appliances.
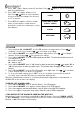
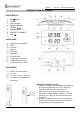
CLOCK (DCF SIGNAL RECEPTION AND SIGNAL INDICATOR)
After your clock is powered up, it starts to receive DCF signal. The icon flashes.
Receiving DCF signal icon flashing
Successful Reception icon becomes static
Failed Reception icon disappear
AUTOMATIC RECEPTION
Your clock starts automatic reception every day at 1:00, 2:00, and 3:00. If it fails to receive the
DCF time signal at 3:00, it will start reception at 4:00. If it fails again, it will start reception at
5:00. If it fails again, it will start automatic reception at 1:00 again in the next day.
MANUAL RECEPTION
Simply press and hold the / WAVE button. Your clock will start manual reception. Press and
hold the / WAVE button to stop DCF reception.
When your weather station is receiving the radio controlled time signal, the display will turn
dimmer. It will resume to the brightness level which you originally selected after the radio
controlled time reception is completed.
During RCC reception, all buttons do not function and it does not take temperature
measurement.
Remark: turning on the FM radio during the DCF reception will affect the result of DCF time
reception. It is recommended to temporarily turn off the FM radio (by one press the ) when
the clock radio is receiving the DCF time.
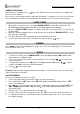
MANUAL SETTINGS
1. Press and hold “SET”, 00 flash, press / to set the time zone: -01 or 00 or 01.
“00” = GMT +1 hour (e.g. Germany)
“01” = GMT +2 hours (e.g. Finland)
“-01” = GMT 00 hour (e.g. U.K.)
2. Press “SET” again, hour digits flash. Press / to set hours. Press and hold / to
accelerate setting at fast speed.
3. Press “SET” again, the minute digits flash. Press / to set minutes. Press and hold /
to accelerate setting at fast speed.
4. Press “SET” again, the display shows “24Hr” flash. Press / to select 12Hr 24Hr. In
12Hr mode, P (PM) will appear on the display to indicate afternoon time. There is no AM
indicator.