PDB-9090 Bitte vor Inbetriebnahme durchlesen, um Fehlbedienungen zu vermeiden ! Read manual carefully before using the unit, to avoid wrong handling ! Avant de metre en service votre appareil, lisez attentivement ce instructions !
Cautions to use the player 1. When using in the car, please do NOT connect power exceeding +15V to the player (some buses’ and trucks’ is DC+24V). 2. To extend the life of the player, please switch to power OFF when the player is not used. 3. Voltage of battery charging is +11V ~ +15V, working voltage is +7V ~ +15V. 4. When reading capacity gets worse, please use optical lens paper or cleaning disc to clean the lens, please do NOT use your fingers to touch the lens.
Disc Type Disc Logo VCD 12CM (Dynamic Image) SVCD 8CM Audio+Video 12CM (Dynamic Image) Audio+Video 12CM (Dynamic Image) 8CM CD Audio MP3 Audio WMA Audio MP4 Disc Size Audio+Video DVD Super VCD Memorized Content About 4 hours(Double Layer) About 80mins(Single Layer) About 160mins(Double Layers) About 2 hours(Single Layer) About 45 mins About 74 mins 8CM About 20 mins 12CM About 600 mins 8CM Unlimited (Dynamic Image) About 2 hours(Single Layer) 12CM 12CM Audio+Video Play T
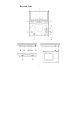
Keys and Jacks 3
1. TFT LCD 2. SPEAKER 3. REMOTE CONTROL RECEIVING WINDOW 4. STOP 5.CH-/ 6.MODE 7.CH+/ 8.PLAY/PAUSE 9. FINE+/ 10. FINE-/ 11. CH-/ 12. CH+/ 13.UP 14.
19. STOP 20. RETURN 21. MENU 22.RECORD 23. OPEN 24. VOLUME 25. MEMORY CARD SLOT 26. EARPHONE PORT 27. AUDIO IN 28. VIDEO IN/OUT 29. ANTENNA PORT/CHARGING INDICATE LIGHT 30. POWER (DC-IN) 31. POWER ON/OFF 32.GAME PORT 33. USB PORT 34.
Introductions to the functions of remote controller 6
1. CHARGE 2. OSD 3. ZOOM 4. SWITCH KEY 4:3/16:9 5. ANGLE ADJUST 6. SLOW/FAV 7. REPEAT/TTX 8. A-B REPEAT/EPG 9. PLAY/PAUSE 10.EXIT/ STOP 11.MENU 12.TITLE 13.FINE-/ 14.FINE+/ 15.SUBTITLE 16.UP 17.DOWN 18.LEFT 19.RIGHT 20.ENTER 21.PREVIOUS/CH22.NEXT/CH+ 23. RECORD 24.AUDIO 25.MENU SETUP 26.NUMBER 27.RETURN 28.NO FUNCTION 29.ON/OFF LCD 30.CLEAR 31.GOTO 32.DVB 33. TV 34. DVD 35. AV 36. RED 37. GREEN 38. YELLOW 39.
MAIN MENU SETUP Press SETUP key on the remote controller or press ENTER key on the player for a long time to open MAIN MENU, including PICTURE SUBMENU and SYSTEM SUBMENU. In PICTURE SUBMENU, including BRIGHT, HUE,CONTRAST and SCALER, among which the BRIGHT, HUE and CONTRAST, the three items are defaulted at 50 when the goods leave the factory. You could adjust them according to your requirements. The SCALER could help to finish the switch between 16:9 and 4:3.
In SYSTEM SUBMENU, including the setup of LANGUAGE, you could setup the type of the language of the MAIN MENU. C.SYS means the current screen is color system. POWER, means that using the battery to play could show the playing time left. VER: Software version number.
User Guide Safety Notice * Do not disassemble the player. This player has laser system; open the cabinet will cause laser radiation. Staring at laser beam will cause harm to your eyes. The non- professional please do not disassemble the player. * Please use wide pin plug to match wide groove socket to avoid electric shock. * Do not leave the player in the rain or wet to avoid catching fire or electric shock. * Do not repair the player by yourself.
* Low battery: When using the player, the player will check battery’s remaining power level. When battery level is low, it will display the red sign of “LOW BATTERY” on the right corner of the screen; if you continue to use, the screen will be off automatically after period of time (there may be still sound output), then the player will power off automatically.
Using of the memory card and USB device in DVD status The player could read the media files in the memory card directly in DVD status or be connected with Pen Drive, Mobile HDD, MP3 Player through the USB to play MP3 and WMA music files, JPG image files, 8-bit NES Games, and some VCD, MP4 A/V files. Instructions to users: 1.
unit or remote controller to move to the left window, you can choose the folders which have the different style. What’s more, the player will automatically read the files of MP3, JPG, NES Games or other files orderly. 3. If there are Music files MP3 inside the USB device, the player will read the files automatically, and start automatically from the first music of the first file. At this time you could use direction keys on the unit or the remote controller to choose the music that you like to play.
At this time press “Right” direction key on the unit or the remote controller to go to image preview mode, image preview is on the left of the screen, contents of the images are on the right. Press “ENTER” key to go to image view mode. You can use direction keys on the player or remote controller adjust view mode. “UP” direction key is to replace the image up or down, “DOWN” is to replace the image left or right, “LEFT” & “RIGHT” are to revolve the image clockwise or anticlockwise at 90 degree.
6. If there is no MP3 file, JPG file or NES game file, the player will read other format files automatically. You can use direction keys on the unit or remote controller to select VCD, MP4 A/V files whichever you like. PLAY DISC CHOOSE SOUND CHANNEL * When playing multi-language DVD, SVCD, you may choose an appropriate language. * You may choose left channel, right channel or stereo when playing multi-channel CD or VCD.
FAST PLAY When playing disc, you may fast forward, fast reverse in order to find a specific target. 1. Press to enter fast forward status. Press every one time to display in cycle: FORWARD X 2 → FORWARD X 4→ FORWARD X 8→ FORWARD X 20→PLAY 2. Press to enter fast backward. Press every one time to display in cycle: BACKWARD X 2→ BACKWARD X4 → BACKWARD X 8 → BACKWARD X 20→ PLAY SLOW PLAY May enjoy slow motions by following steps: * Press SLOW key on the remote controller to go to slow forward.
REPEAT DVD Disc May repeat chapter or title: 1. Repeat Chapter * Press REPEAT several times till REP: [CHAPTER] displays on the screen. 2. Repeat Title * Press REPEAT several times till REP: [TITLE] displays on the screen. 3. Repeat Off * Press REPEAT several times till REP: [OFF] displays on the screen. * SVCD, VCD, CD Disc Follow below steps; you may repeat single program or the whole disc. For SVCD, VCD2.0, may repeat under PBC Off, for VCD1.1、CD, may repeat directly.
PBC Off * At stop mode, press any number key directly to choose program. * Press MENU key, "PBC: [OFF]" displays on the screen. 1. Repeat Single Press REPEAT till "REP: [REP 1]" displays on the screen, repeat the program being played. 2. Repeat All Press REPEAT till "REP: [REP ALL]" displays on the screen, repeat all the programs on the disc. 3.
ZOOM Press ZOOM key on the remote controller to enlarge image. There are 7 kinds of zooms to be chosen, they are 2 times, 3 times, 4 times, 1/2 times, 1/3 times, 1/4 times, off. GOTO Directly input time, program, title or chapter, may search quickly on the disc and play from that place. For DVD disc, press GOTO, screen displays: Press or key to choose Title Search, Chapter Search or Time Search, press number keys to input title, chapter or time, then press ENTER key to play.
Play MPEG4, MP3, JPEG, etc This player can play MP3 files, JPEG image as well as other A/V files through menu, like VCD, DVD, WMA, MPEG4, MP3 and JPEG files. GAME This player supports NES 8-bit games. Connect the game joystick to the player, the player will read the game menu, and then you can use direction keys on the unit, the joystick or the remote controller to choose games, and then press ENTER key to play.
Play JPEG image This player can play JPEG image with baseline format at largest resolution 5120x3840 or with progressive format at resolution 2048x1536, press direction keys to revolve image when playing JPEG image, press key to adjust the image up or down, press key to adjust the image left or right, press key to revolve the image to the right at 90 degree, press ZOOM key to open ZOOM control.
DVD SETUP In DVD mode, press “MENU” key on the player to display MAIN MENU, press direction key “Left”, “Right” to choose SETUP type that you want to change. There are 3 kinds of SETUP; they are SYSTEM SETUP, LANGUAGE SETUP and AUDIO SETUP as below: SYSTEM SETUP * TV SYSTEM: There are three kinds of systems, NTSC, PAL and AUTO. * AUTO PLAY: Could choose ON or OFF. * TV TYPE: There are three kinds of ratios, “4:3PS” 、“4:3LB”、 “16:9”. * Password: The defaulted is 0000.
* Default: Reset all the status to the defaulted status. LANGUAGE SETUP * OSD LANGUAGE: could setup the language of the DVD menu. * AUDIO LANGUAGE: could setup the audio language when playing the disc. * SUBTITLE LANGUAGE: could setup the language of the subtitle when playing the disc. * MENU LANGUAGE: could setup the language of the menu of playing DVD. * DIVX[R] VOD,input the authorized code of the VOD edition.
AUDIO SETUP * DOWNMIX: Could choose “LT/RT” or “STEREO” in this mode. DVB-T Receiving Connect to the antenna, switch on the power adapter. Press the DVB-T key on the remote controller directly to go into the DVB-T status. If it is the first time for you to use the DVB, the screen will appear the Init Install menu. In the item of OSD language, you could set up the language of the DVB-T menu; what showed in the Area item is the Area Setup of the current Area search.
If the Area setup doesn’t match with that of your local place, please press the ENTER key to select NO to exit the Init Install menu. Press the SETUP key to open the Main Menu of DVB-T, select the Digital TV, and press the ENTER key to go into the submenu of Digital TV. Choose Configuration, and press the ENTER key to go into the submenu of Configuration.
Choose System Setup, press the ENTER key to go into the submenu of System Setup. Choose Area, pressing the direction key left or right could go into the Area Select, select the area that matches with that of your local place, press the ENTER key to finish the Area Setup. Continuously press the EXIT key to return to the Digital TV menu, select Installation, and press the ENTER key to go into the Installation submenu.
Select Area Search, press the ENTER key to start area search, after finishing searching, it will store the searched channels automatically. Press the CH+ or CH- on the remote controller or on the player to carry out CH+ or CH-, and circumvolve the volume knob to adjust the volume. Recording of the DVB-T receiving programs IMPORTANT !!!!! Memorizer USB / Card must formated to FAT32 ! Memorizer speed must be USB 2.
When it starts to broadcast the DVB-T program, press the RECORD key on the player or on the remote controller to start recording, and the recorded programs will store in the PVR file of the root catalogue of the memorizer (If there is no such file in the memorizer, the player will create one automatically.) During recording the DVB-T programs, you could not carry on the operation to the DVB-T main menu, pressing the STOP key on the player or on the remote controller could stop recording.
Set up the Wakeup Mode as the Recorder, and other settings being set up according to the reserved time to broadcast (There is an instruction in the DVB-T menu setup below), when it reaches the enactment time, the player will start to record automatically. Caution: The player just could identify one kind of memorizer once, and the memory card has precedence over the USB device, so when you need to record the DVB-T programs to the USB device, please take out the memory card first.
Caution: The document format of the memorizer must be FAT32 Caution: After completing the recording, you must press STOP key and exit normally, otherwise, it will destroy the data in the memorizer and cause the recording failed. Caution: The player doesn’t support inserting and pulling out of the memorizer when the power is on, so when you need to connect or take out the memory device, please switch off the power of the player first.
Play/Pause, Fast Forward /Fast Reverse, Previous/Next to carry on the operation of broadcasting. And please adjust the volume knob to adjust the volume. Press the STOP key on the player or on the remote controller to choose YES, and pressing the ENTER key could stop the replay. After stop replaying, the player will return to the DVB-T receiving status. DVB-T Menu Setup Press the SETUP key on the panel of the player or on the remote controller to select DVB, press the ENTER key to go into DVB menu.
Select the Digital TV and press ENTER to go into Digital TV submenu. Channel Manager,channel manager submenu. Installation,channel search submenu. Configuration,DVB-T setup submenu. Factory Default,DVB-T menu setup to recover to the default. Version,information of the software version of the DVB-T menu.
Channel Organizer 、 Channel Sorting 、 Channel Grouping 、 Edit Channel and Delete All.
That shown in the Channel Sorting submenu is the information of the channel storage, including the S. No., Channel Name, Freq and Bandwidth.
channel, then pressing the Number key 1-8 could classify the channels as None, News, Scien, Sport, Movi, Kids, Music and Fashi. After finishing setup, continuously press the EXIT key to exit the menu and the player will store the setup having done automatically. In the Edit Channel submenu, pressing the RED key on the remote controller could add the TV channels; pressing the YELLOW Key on the remote controller could edit the channel.
There are three searching modes in the Installation: Area search, Manual search and Auto search. Select the Area search, press the ENTER key, and the player starts the area search according to the area setup. Choose manual search, press the ENTER key to go into the manual search submenu. Select Freq, pressing the Number key 0-9 could setup the Freq; select BandWidth, pressing the direction left or right could set up the BandWidth. After finishing setup, press the Enter Key to start the manual search.
Select the auto search, press the ENTER key to go into the auto search submenu. Choose StartFreq, pressing the Number key 0-9 could set up the Startfreq of search. Select EndFreq,pressing the Number key 0-9 could set up the endFreq of search. Select BandWidth, pressing the direction key left or right could set up BandWidth, after finishing setup, press the ENTER key to start auto search. There are 5 setups in the Configuration submenu as OSD、TV、 System Setup、Time、Wakeup Timer and Parental Lock.
OSD Timeout item, you could set up the waiting time of closing automatically shown on the screen in the DVD status. In the item of the OSD Trans, could set up the transparency of the menu. In the item of the OSD Language, you could set up the language of the menu. In the item of the 1st Audio Language, you could set up the 1st audio Language. And in the item of the 2nd Audio Language, you could set up the 2nd audio Language.
in DVB status, pressing the direction key left or right could change the setup; Aspect Ratios is the scale of the screen in DVB status, pressing the direction key left or right could switch between 4:3PS and 16:9. In System Setup submenu,EQ Setup is the EQ setup of language, pressing the direction key left or right could change the setup; Surround is the surrounding effect setup of the sound, pressing the direction key left or right could change the setup.
In Time submenu, Timer Mode is the time mode, selecting AUTO could set up the time difference and the summer time; selecting Manual could set up the time and the date; DATE is the date setup, you could input it with the Number key 0-9 directly; Time is the time setup, you could also input it with the Number key 0-9 directly; GMT Offset is the setup of the time difference relative to the Greenwich Time, pressing the direction key left or right could change the setup.
the mode of sending the suggestive news or switch to a certain channel etc.; The Wakeup Channel/Message is the channel being switched to when being waken up or the suggestive news being sent out; The Wakeup Date is the date of being waken up, pressing the direction key left or right could open the calendar to carry on the enactment; On Time is the time of waking up, pressing the number key could set up directly; The Duration is the duration of being waken up according to the channel mode.
Software Upgrade is the software update of the DVB-T, select Download from USB, and then the player starts to read the update files from the USB device and updates automatically. Factory Default will recover the setup of the DVB-T menu to the default when the player leaves the factory. After inputting the correct password of the parental lock, selecting YES and pressing the ENTER key, all the setup of the DVB-T menu will recover to the defaulted status when the player leaves the factory.
In the Main Menu, selecting Movie could enter the interface of movie play, in this interface, you could play the movie files in the memorizer (USB device or memory card), but other files (like music and photo files) could not be identified. In the Main Menu, choosing Music could enter the interface of the music play, in this interface, it could play the music files in the memorizer (USB device or the memory card), but other files (like the movie and photo files) could not be identified.
Box Man, select the New Game, press the ENTER key and then start the game, using the direction key up, down, left and right to control the movement, using the ENTER key to pause the game and open the menu, in the menu, you could select continue or exit the game.
Press the RED key on the remote controller could set up the operation as play, after select the movie file and press the ENTER key to start play (but it only could be viewed in the form of preview, it could not play with full screen); pressing the GREEN key on the remote controller could set up the operation as delete, choose the movie file and press the ENTER key to complete the operation of delete; Pressing the GREEN key on the remote controller again could set up the operation as all delete, press the EN
Analog TV Receiving Step: 1.Connect external antenna or cable TV. 2. Power on the player. When switch on the power in the beginning, the player is in DVD status. 3. Press MODE or TV key, switch to Analog TV mode. Auto Search Step: 1. Go to system submenu in the main menu to choose sound system (D/K, I, B/G or M) and Color system C.SYS (default is AUTO). 2. Open the TV setup submenu to select “AUTO SEARCH” and press key to start.
3. After searching finish, Channels will be stored in memory. 4. When using antenna, adjust antenna’s length, direction and angel to achieve the best receiving effect. MANUAL SEARCH Go to Preset sub menu to choose “SEARCH”, then press 、 key to manual search backward or forward, searching is over automatically after receiving the programs. FINE TUNE Go to Preset sub menu to choose “FINE TUNE”, press 、 key to fine tune backward or forward.
6 to channel 10 is as the following: Press key to choose SWAP, press 、 key to change the channel on the left of the arrow to 6, press key, the current channel 10 is changed to red color, at this moment press or key to finish swap, press or key again, channel 10 and channel 6 will be swapped back. In TV mode, the system submenu in the main menu has more than one choice than that in other modes. S.SYS What showed in this item is the sound system of current TV status.
Auto System AV MONITOR Step: 1. Connect Audio and Video (NTSC or PAL System) signal sources. 2. Power on the player 3. Switch to VIDEO mode by pressing MODE or AV key 4. Set up the auto system electro circuit inside, and the PAL or NTSC system is available 5. Adjust volume Solutions to possible problems: Please refer below if you come across the following questions * NO SOUND 1. Check whether the player is well connected. 2.
* CAN NOT READ USB 1. Make sure you have taken out the disc from the CD tray 2. Make sure the USB device is well connected. * IMAGE ROLLING OR NO COLOR (When connected with TV) The color system of the player does not match with the system of TV. Please choose suitable color system to your TV. * DO NOT PLAY DISC 1. Well load the disc. 2. Make sure the disc’s printing side should be upside. 3. There is dust on the disc, clean it and try again. * REMOTE CONTROLLER DOES NOT WORK 1.
* Recording failed 1. Please check whether the memorizer is formated into FAT32 2. Check if memorizer is correct plugged & insert into USB or Slot. 3. Please check whether the memory card is high speed (150X) and the USB device is USB 2.0 device or not. 4. Please check if memorizer is written protection or not. 5. Please check whether there has enough saving space in the memorizer. 6. Please check whether there exists virus in the memorizer, if exists, please kill the virus first.
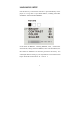
Specification DVD Specification Laser Wave Length 650NM/780NM Video System PAL/AUTO/NTSC Audio Response 20Hz-20KHz Audio S/N ≥85dB Audio Distortion + Noise ≤-70dB Channel Insulation ≥75dB Dynamic Range ≥85dB Audio Output(Analog Audio) Output:1v, Load Impedance:10kΩ Video Output Output: lVp-p, Load Impedance:75Ω Power Adapter Input:AC100-240V; Output: 12V, 1.5A Accepted working temp. Power consumption 0~40°C < 15W Build-in battery type Li-Polymer 7,4V 2600mA RELIABILITY PARAMETER a.
Accessories 1 2 3 4 Standard Accessories 5 6 7 8 9 10 Joystick 1pcs Game Disc 1pcs Remote Controller 1pcs Switching Power Adapter 1pcs Polymer Lithium Batteries(7.
1 2 3 6 7 8 4 9 5 10 Changing of technical specification without further notice.