Function Features This unit incorporates analog TV and portable DVB receiver in one system. It provides more entertainment. DVB receiving function Support movable DVB signal receiving. TV receiving function Can be connected to the TV antenna for receiving TV signal. Radiovision receiving function Receiving DVB radio signal via the external antenna. EPG function Support EPG function. High Resolution Provide high-resolution image.
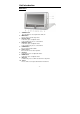
Unit Introduction Main Panel 1. 2. 3. 4. 5. . 6. . 7. . SOURCE button Press this button to select signal mode: DVB, TV. MENU button Press to enter or exit the setup menu. LEFT/CH- button In the menu, press to adjust the value. In TV or DVB mode, press to select channel. RIGHT/CH + button In the menu, press to adjust the value. In TV or DVB mode, press to select channel. POWER button Press to turn Power On or OFF. Remote sensor IR receiver for remote control operation.
Unit Introduction 11. Speakers Provides high quality Audio outputs. 12. TV Antenna jack Used to connect a analog TV antenna (not incl.) by adaptor cable (included) 13. DVB antenna jack Used to connect to the DVB-T antenna. 14. LCD screen 7" color TFT LCD screen clearly display the data. Left Panel 1. 2. 3. 4. 5. 6. Headphone jack When the headphone is plugged, the internal speakers output will turn off automatically. Volume Control knob Used to adjust the volume of the headphone and speaker.
Remote Control Remote Control 1. PWR Button Press to turn Power On or OFF. 2. INFO Press to display the status information. 3. MENU button In DVB mode, press to enter or exit the setup menu. 4. Direction button (▲▼◄►) Used to select different items in the menu. 5. OK button Press to confirm the selection in setup menu.
Remote Control 6. EXIT button In the DVB mode, during setting, press to return to the previous menu. 7. 0-9 number buttons Select numbers by pressing these buttons. 8. Channel+/- button Press to select the channel forward or backward. 9. FAV button In the DVB mode, press to enter the favorite list, and then use the direction button to select, then Press the OK button to confirm and start playback. 10. PIC button Press to change the current picture mode among STANDRAD, MEMORY, SOFT and LIGHT. 11.
Preparation of Remote Control Preparation of remote control • refer to the drawing below, take off • • Usage of remote control For best results, please aim the remote control directly at the unit’s remote sensor. Please operate the remote control within angles about 60 degrees and distance about 5 meters without obstructions between the remote control and the unit. the battery receptacle. Insert the battery with the correct polarities facing up according to the mark on the battery holder.
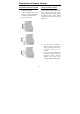
Rechargeable Battery About Rechargeable Battery Pack Your portable DVB receiver can be connected with a lithium polymer rechargeable battery that attaches to the bottom of the unit. Your new battery should be fully charged before initial use. Charging time is normally about 4 hours. A fully charged battery delivers about 2.5-3 hours of use. If the battery will not be used for a long period of time, first fully charge the battery prior to storage.
Rechargeable Battery Battery Pack Attaching and Placement The unit’s power supply is the AC power adapter or the battery pack. The battery pack also can be used as a stand. Refer to the following steps for attaching the Battery Pack: 1. Place the unit on a soft and smooth surface with its back cover facing UP (to avoid scratching the screen). 2. Position the Battery Pack directly toward the battery slot on the back cover of the unit. 3.
Rechargeable Battery Charging the Battery Pack The battery must be attached to the unit to charge it. Plug the Power Adapter into the unit’s DC 9.5V IN Jack, which is located on left Side of the unit. Plug the other end of the Power Cord into a wall Outlet. Detaching the Battery Pack If the unit is not going to be used for long periods of time, the Battery Pack should be detached. Make sure the power is turned OFF before detaching the Battery Pack.
System Connections • • Before plugging the power cord into an AC outlet, make sure that all other connections have been made as described below. Always ensure that the unit, TV and any other electrical components are switched OFF before connecting to the unit. Power Supply Connection Connect the supplied adapter to the side of the unit in the jack marked “DC 9.5V IN”. Plug the two-prong end of the power cord to an AC100-240V outlet. If you have difficulty inserting the plug, turn it over and reinsert it.
System Connections Connecting to an Amplifier The unit can be connected to an amplifier. Plug the A/V cable into the audio jack on the left side of the unit and plug the other end into an audio input on the amplifier. Please refer to the equipment’s manual before connecting. Connecting to a Digital Amplifier This Player can be connected to an amplifier with a digital optical input. The cable is not supplied, but can be purchased at most home electronics retailer.
System Connections Connecting to External AV Source The player supports an AV signal input function. Use the audio/video cable to connect the unit to an external AV signal source such as a DVD, VCR etc. After connecting, switch the AV IN / OUT to AV IN. Connecting to a DC Adapter Connect one end of the specific DC adapter to the “DC 9.
System Connections Connecting to a Headphone Connect the headphone to the headphone jack on left side of the unit. When headphones are connected to this jack, the speaker will be turned off automatically Connecting to DVB Antenna The unit is designed with an antenna input jack.
System Connections Connecting to TV antenna Connect one end of the provided connecting line to the TV signal input jack on the right panel of the unit, and the other end to the TV cable, then presss the Source button to enter TV status,, as shown below: - 14 -
TV Setup Preparation 1. 2. 3. 4. 5. Connect the unit to the external antenna or TV connecting cord. connecting to power supply。 Turn on the power of the unit. Press the Source button on the panel or the remote control to enter TV status. Press the Menu button on the panel or the Setup button on the remote control to enter the setup menu.
TV Setup 3. Fine Tuning When the effect is not very good, you can go on with fine tuning. Press the Up and Down on the panel or button on the remote control to select FINE, use the Left or Right button on the panel or or button on the remote control to start fine tuning, when the video and audio effects effect are best, stop the fine tuning and the program will be stored automatically. 4.
TV Setup 2. Time Off Press the Up and Down on the panel or button on the remote control to select TIME OFF, use the Left or Right button on the panel or or button on the remote control to select the time. 3. Blue Screen Press the Up and Down on the panel or button on the remote control to select BLUE SCREEN, use the Left or Right button on the panel or or button on the remote control to select the ON or OFF. 4.
DVB Setup Preparation 1. Connect the unit to the power. 2. Press the Source button on the panel or the remote control to enter DVB status. 3. Press the MENU button on the remote control or the panel to enter the DVB setup menu. 4. You can take below steps to go on with the setup: Main Menu Press the MENU button, the screen will display as below: In the main menu, press the direction buttons to select the item you want to set up. Press the OK button to enter the item.
DVB Setup Time Setting Press the button to select Time Setting, press the OK button to enter, the screen will display as below: There are three items for setting: TimeZone Setting, and DisplayTimer Setting. Press the button to select item, press the OK button to enter, press the Exit button to return. 1.
DVB Setup A/V Setting This item is used to set the audio and video items. Press the button to select A/V Setting, press the OK button to enter, the screen will display as below: In the menu, press the button to select items, press the to adjust or enter. Press the EXIT button to return. 1. Bright&Contrast Select the Bright&Contrast, press the 2. Saturation Select the Saturation, press the button to adjust the value. button to adjust the value. 3.
DVB Setup When input the PIN code, press the OK button to enter the menu shown on the below: In the menu, press the button to select item. Press the EXIT button to return. 1. Change Pin Code In the menu, press the button to select Change Pin Code, press the OK button to enter the menu shown on the below: In the menu, according to the indication to input the pin code. Press the EXIT button to return. 2.
DVB Setup Channel Search Use the direction buttons to select Channel Search, press the OK button to confirm, the screen will display as below: In the channel search menu, press the direction buttons to select the item you want to set up, press the button to enter the item. Press the EXIT button to return to the previous menu. 1. Search Type Select the Search Type, press the button to enter, then press the direction buttons to select Automatic, Manual or By NIT. Press the EXIT or button to return. 2.
DVB Setup Sort Channel Select Sort Channel, press the button to enter, the screen will display as below: In the menu, press the direction buttons to select the desired item, press the OK button to confirm. Press the EXIT button to return to the previous menu. This setting is used to name up or down or encrypt the selected channel.
DVB Setup Press the direction buttons to select the desired item, press the button to enter, or use the number buttons to input, press the button to delete the input, press the EDIT button to enter the character or number list, in the list, press the direction buttons to select character or number, press the OK button to confirm input, press the EXIT button to return. Repeat the above procedure, you can set many programs. In the channel list, the set program will be display with the name and Index.
DVB Setup Favorites List Select the Favorites List, press the button to enter, the screen will display as below: In the menu, press the number button 1 to select favorite group, press the direction buttons to select channel, press the OK button to confirm. Press the EXIT button to return to the previous menu. Add Favorite Press the button to enter, press the Ok button, During initial setting, you should set the channel list at first.
Troubleshooting Problem How To Check There is no sound. • • Make sure the system connection is correct. If wired headphones are plugged in, unplug them. There is no picture. • • • Make sure your system connection is correct. Make sure the DVB antenna is connected. Make sure the unit is turned on. • Make sure there is no obstruction between the remote control and the unit. Make sure you are pointing the remote control towards the unit. Make sure battery is inserted correctly (check polarity).