
Instruction Manual

3000 SERIES MAGNET KIT
3000MAKT
WARNING: High Voltage, Wait 15 Minutes after shutting beacon OFF before
converting.
1. Remove the Beacon Lens and Dress Ring (four screws).
2. Loosen the Strobe Tube Socket Assembly (two screws). Note: Do NOT touch
the glass part of the Strobe Tube.
3. Remove the Strobe Circuit Board from the base (three screws).
4. Remove the Red, Black, and Yellow wire harness by unplugging it from the
Strobe Circuit Board.
5. Drill a 5/16” hole in the Beacon Base near the outer edge. Note – make sure it
clears the magnet.
6. Install the magnet into the center hole of the Beacon base. Insert the ¼ x 20
bolt through the magnet and up into the beacon base. Put the ¼ x 20 nut on
the bolt and tighten.
7. Insert the terminated ends of the Cigarette Plug wire and the Yellow wire
through the 5/16 hole, you drilled, into the Beacon Base so that the terminals
end up inside the beacon.
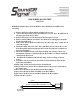
8. Assemble the terminated ends into the Amp. Connector Plug as shown
below.
9. Attach the wire tie to the new wire harness about 4 inches down from the
Amp. Plug and tighten.
10. Plug Amp. Connector into the Strobe Circuit Board
11. Please refer to the Strobe Beacon Instructions for the proper connecting of
the Yellow wire.
12. Reconnect the Strobe Circuit Board to the Beacon Base.
13. Reconnect the Strobe Tube Assembly to the Beacon Base.
14. Reconnect the Beacon Lens and Dress Ring to the Beacon Base.
15. Plug unit in to operate.
Ground or Negative Wire ( With Ribs on it )
Power or Positive Wire ( No Ribs on it ).
To Cigatette
Lighter Plug
Yellow
2
1
3