
Power Amplifier Owner's Manual and Installation Guide
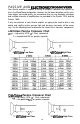


mEQ
80Hz
2 Ohms
4 Ohms
Ll
Cl
Ll
Cl
5.5mH
68Oj.lF
IlmH
33OpF
8 Ohms
Ll
Cl
22mH
18O)lF
IOOHz
4.7mH
56OpF
9.lmH
27OpF
18mH
15OpF
130Hz
3.3mH
4OOcF
6.8mH
2OOpF
15mH
1OObF
200Hz
2.2mH
3OOpF
4.7mH
15OpF
9.lmH
75pF
260Hz
1.8mH
2OOpF
3.6mH
1OOpF
6.8mH
5OpF
400Hz
l.lmH
15OpF
2.2mH
68pF
4.7mH
33pF
600Hz
0.75mH
1oopF
1.5mH 47~F
3.0mH
26pF
800Hz
0.5mH
68pF
l.OmH
33lF
2.0mH
15pF
IOOOHz
0.47mH
5OpF
0.9lmH
27pF
1.8mH
13~F
1200Hz.
0.33mH
44pF 0.75mH
22pF
1.5mH
IlpF
1800Hz 0.27mH
3OpF
0.50mH
15pF
l.OmH
6.8pF
4000Hz
O.lOmH
15pF
0.22mH
6.8pF
0.47mH
3.3pF
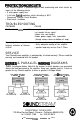
AMPLIFIER
LOCATiON
AND MOUNTING
Soundstream Granite amplifiers employ highly efficient circuitry and a unique
ChassisinkTM
design to maintain lower operating temperatures. When mounting the
amplifier, it should be securely attached to either a panel or to an amp board or
rack that is securely fastened to the vehicle, away from moisture, stray or moving
objects, and major electrical components (electrical motors, fuel pumps, etc.). To
provide adequate ventilation, mount the amplifier so that there are at least two
inches of freelycirculating air above and to the sides of it.
A. Using the amplifier as a template, mark the mounting surface.
B. Remove the amplifier and drill the holes.
C. Mount the amplifier to the surface using the provided hardware.
WIRING
You will need the following tools for the wiring of the amplifier: Phillips or slotted
screwdriver, wire strippers and wire crimpers.
When baring wires for connection to the amplifier, remove
3/8”
to
l/2”
of the
insulation. For the speaker leads, use the supplied
l/4”
insulated female crimp
connectors and slide the connector onto the terminal on the amplifier. On the
power, ground and remote connections, loosen the screws on the terminal block,
slide the bared wire into the connector-and tighten the screw. Determine from the
chart below the minimum gauge power and ground wire required. Be sure to fuse
the amplifier positive power lead within 18” of the battery.
Amplifier
up
to
5’
up to
70’
up to 75’
up to 20’
Granite 60.2
12 ga or larger 12 ga or larger
10 ga or larger 10 ga or larger
Granite 120.4
12 ga or larger
12 ga or larger
10 ga or larger
10
ga or larger
Granite 160.6
10 ga or larger
8 ga or larger
8 ga or larger 8 ga or larger
A. Carefully
run
the audio and remote
turn-on
cabIss
to the
amplifier.
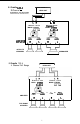
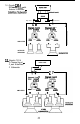
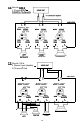
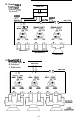
B.
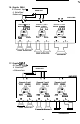
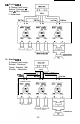
Connect the speakers
as shown in “Speaker Wiring Configurations.” Use at
17