
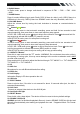
Owners Manual

9
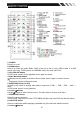
Press menu button to go into home page.
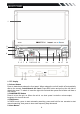
6. BAND Button
In Radio mode, press to change radio band in sequence of FM1 → FM2 → FM3 →AM1
→AM2 .
7. MODE Button
Press it to select different input mode: Radio, DISC (if there is a disc in unit), USB (if there is a
USB device in the unit), CARD (if there is a SD/MMC card in the unit), Bluetooth, and AV IN.
8. VOLUME Button
Adjust the volume level by turning the knob clockwise to increase or counterclockwise to
decrease.
9. Button/ Button
In Radio mode, press to start automatic searching, press and hold for two seconds to start
manual searching, then press them to tune each frequency step upward.
In DVD / SD / USB mode, press button to skip to the next track. Press button and hold for
two seconds to activate fast forward (FF) search in a track.
In BLUETOOTH mode, press it to accept an incoming call.
10. Button/ Button
In RADIO mode, press to start automatic searching, press and hold for two seconds to start
manual searching, then press to tune each frequency step downward.
In DVD / SD / USB mode, press button to skip to the previous track. Press button and
hold for two seconds to activate fast reverse (REW) search in a track.
In BLUETOOTH mode, press to reject a coming call or hang up while calling.
11. OPEN/TILT Button
Press this to open and close the TFT monitor. WARNING: Do not obstruct the monitor while in
the opening or closing cycle, this may cause damage to the monitor mechanism and is NOT
covered under warranty.
Press and hold for 2 second to adjust the Monitor tilt angle: TILT ANGLE 1 => TILT ANGLE 2 =>
TILT ANGLE 3 => TILT ANGLE 4.
12. IR
13. MIC slot
Microphone for use with Bluetooth hands free calling.
14. DISC slot
15. Info Display
Information Display LCD when operation the unit.
16. USB slot
17. EJECT Button
Press to eject a disc. If the disc is not removed for about 10 seconds after eject, the disc is
reinserted automatically.
18. AUX Jack
Connect an external video device to the AUX-IN jack.
18. Anti-theft LED light
19. RESET Button
Press it with a thin, sharp object. The device will then be reset to factory default settings.
20. SD/MMC CARD slot
SD/MMC card slot, for Multimedia playback files only. Insert a SD/MMC CARD into this slot and
the unit will automatically start reading and playback the card. * Supported Music File Format:
MP3 Files.