AV Center 2-DIN Head Unit 2 DIN 10.
Content 1. Appearance --------------------------------------------- 3 2. Accessories and Installation --------------------------------- 3 3. Wiring Connection --------------------------------- 5 4. Front panel Description --------------------------------- 7 5. Remote Control --------------------------------- 8 6. Main Menu --------------------------------- 9 7. Settings --------------------------------- 9 8. Apple CarPlay & Android auto --------------------------------- 12 9.
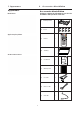
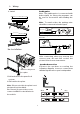
1. Appearance 2. Accessories & Installation Appearance Accessories & Installation Main Menu Package contains the following accessories for installation and operation of the unit. (1) Mounting bracket 2 (2) Screw 8 Apple Carplay Menu (3) (4) Remote Trim Ring 1 CP/AA SXM Radio DISC BT USB EJECT / EQ 1 2 3 4 5 6 7 8 9 /0 # 1 Android Auto Menu AV Center 2-DIN DVD Head Unit (5) User Manual 2 DIN 10.
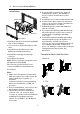
2. Accessories & Installation Installation Dashboard Bracket Trim Ring Faceplate 1.Put the 2 brackets to the left and right side of the headunit. 2.Use screws to fix the brackets to the unit. 3.Install the body chassis into the dashboard via the 2 brackets. 4.Install the trim ring to the body chassis. 5.Install the faceplate. Note: Please note this faceplate is not designed for detachable. Disconnect / Connect the screen connector ONLY for installation in the vehicle. Note: 1.
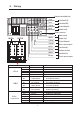
3. Wiring Parking wire Note: The parking wire is connected with brake signal; for safety, the programs can be seen on the monitor after braking the car.. 3. Swivel Note: To watch video the parking wire should be connected to brake signal.
3.
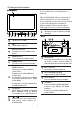
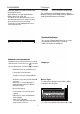
4.Front panel Description Front panel Press and hold to seek downward or upward. 1 VRCPAA-106F [Disc/USB/SD Music] Press repeatedly to shift track previous or next for playback. Press and hold to active various fast rewind or fast forward speeds for playback. [Bluetooth Music] Press repeatedly to shift track previous or next for playback. 10 MODE 2 3 4 5 6 7 8 9 10 IR Sensor of Remote IR remote control signal receiving window. Base: 11 1 10.6 inch TFT LCD 2 Mic Build in Microphone.
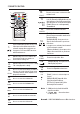
5.REMOTE CONTROL 2 1 4 5 7 CP/AA SXM Radio DISC BT USB 10 14 10. 3 6 8 9 11 VOL+/- 11. 13 12 ENTER 15 16 EJECT / EQ 1 2 3 12. 4 5 6 ENTER 7 8 9 /0 # 17 13. 1. 2. 3. Press and hold to power it on or off. Short press this button mute the volume output when unit turn on. Long press is Power OFF function when unit turn on. 14. [Bluetooth ]: Press it to make a call after inputted a phone number or answer an incoming call.
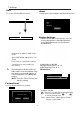
7.Settings 6.MAIN MENU Touch the icon to enter the Setup menu. The Setup menu is included System Settings, Display Settings, Audio & EQ Settings, Bluetooth Settings and Rear Camera Settings VRCPAA-106M is a 2-DIN car audio with following functions: Apple CarPlay, Google Android Auto, Radio, Bluetooth, USB, SD. The Mode icon in gray means the corresponding function is not ready or proper device have not been connected. Touch the corresponding Mode icon to enter playing mode.
7.Settings SWC: About To display the Unit Hardware and Firmware version. To set the Steering Wheel Control ON MCU: SOC: Hardware: Update 1 Display Settings : Below is the Display setting menu, user can select Lighting Detect, Daylight Dimming Level, Night Dimming Level, Illumination and Wallpaper. Click Custom SWC to SWC study mode. Click SWC Default Switch to be "on" status.
7.Settings Wallpaper User can select the preset wallpaper or select the picture in USB driver as the wallpaper. Touch the corresponding picture to select the prefer background. Touch “ + “, the head unit will search the USB photo file for wallpaper. Select a picture and touch OK to add the wallpaper. 10-Band Equalizer : 10 band of EQ tuning, slide the EQ bar to tune each band frequency level according to user preference. Touch Reset to set all Band to 0.
7.Settings 8.CarPlay & Android Auto Device Name: shown the connected phone or device Clear Records: (To clear the device list records) Rear Camera Setting: Touch Rear View Camera in the Setting Menu to enter rear camera setting interface as follow: 8.1 Apple Carplay Plug the iPhone (iPhone 5 or latter models, and IOS 7.1 or above) through the lightening cable to the USB port of the source unit. The iPhone will be shown the “CarPlay”.
9.Radio mode 8.CarPlay & Android Auto 8.2 Android auto Operations Android Auto enables you to use functions of your Androd device convenient for driving. You can easily access route guidance, make calls, listen to music, etc. For details about Android Auto, visit https://www.android.com/auto or https://support.google.com/androidauto., Radio mode Touch the Radio mode icon to enter Radio. Compatible Android devices You can use Android Auto with Android devices of Android version 5.0 or later.
10.USB Store a Station 1 . Tune radio to desired station. 2. Touch and hold the one of the preset station for more than 3 seconds, then the preset button will be highlighted on the screen,and the preset station will be stored. Press to go to the next folder. Press to search Audio, Video or Picture files. Press to go to the previous folder. Short press to skip previous track, Long press to fast reverse. Radio Setting Play or pause button.
11.Bluetooth Audio Picture Playback Press to go to the next folder. Press to search Audio, Video or Picture files. Press to go to the previous folder. Short press to skip next track, Long press to fast forward. Touch to rotate the picture anticlockwise for 90 degree (for picture playback) Touch to rotate the picture clockwise for 90 degree (for picture playback) Vdieo Playback Play or pause button. Short press to skip next track, Long press to fast forward.
12.Bluetooth Phone Bluetooth Phone Touch the Phone icon in main menu to go to Phone mode. After the mobile phone is connected with the source unit via Bluetooth (HFP), user can through the source unit to make a phone call. Please note it needs to connect the microphone for phone call. 4. To end the call, touch the icon on the screen. 106M R Receive an incoming call If the Phone is connected with the source unit via Bluetooth, when an incoming call, below screen will be shown: 106M 106M 01-02....
12.Bluetooth Phone Contacts 106M Touch the icon to access the phone book of the connected mobile phone. To make a call from the phonebook, simply touch the contact name. VRCPAA-7DR 106M Contacts 106M Ray Interchange between phone and source unit BT Setup ON/OFF the Microphone function Display the Keypad. Call History Touch the icon combined list.
13. Specification General Power Supply ………………………….………………………………….……..…………. DC10~16Volts Grounding System …………………………………..……..……….………..…….. Negative Ground Current Drain ………………………………….…………………………...……..….……..……. 15A(Max.) Max Power Output …………………………………………….………………..……. ..4×75W/channel RMS Power Output …………………………………………………………………….... 4x25w/channel Speaker Impedance ……………………………………....…..…………….. 4~8ohms per channel Frequency Response……………………………………..……….………………………. 20Hz~20KHz Operating Temperature …………………………………..
14.AV IN 15.Camera AV IN The Audio/Video source with RCA cable can through the source unit to play the Audio/ Video. Plug the RCA to the corresponding A/Vsocket. Touch the to pop up the function bars and touch to view the playing Audio/Video. Touch the to pop up the function bars and touch to view the playing Rear camera. Rear Camera Setting: Touch Rear View Camera in the Setting Menu to enter rear camera setting interface as follow: The Audi and Video will via the RCA cable to the source unit.
FCC Notes WARNING! Changes or modifications to this unit not expressly approved by the party responsible for compliance could void the userʼs authority to operate the equipment. NOTE: This equipment has been tested and found to comply with the limits for a Class B digital device, pursuant to Part 15 of the FCC Rules. These limits are designed to provide reasonable protection against harmful interference in a residential installation.