
Owner's Manual

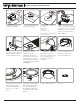


3. Use Rotozip or other tool
to cut hole.
4. Run signal wires through
conduit connector, then through
cover plate. Connect to ceramic
terminal strip. Two + and two -
connectors are provided for
daisy chaining.
10. Press grille into place.
5. Tighten screw on terminal
plate, and push conduit
connector into knockout.
6. If required, a sheet-metal
tab located on the rear
panel of the speaker serves
as a secondary point of
attachment (cable not
included).
Hole Diameters
CM42-EZs-II
165.1 mm (6.50 in)
All other CMEZ, FS and BGM models
266.7 mm (10.50 in)
1.
2.
9. Attach grille safety clip by
placing the large end of the
clip over snap-t post (1),
then sliding clip until small
end snaps into place around
post (2).
Pre-Construction Bracket Instructions
1. Nail or screw bracket to
joists. Secure conduit/signal
wire away from hole in
bracket.
2. Complete Finish work.
7. Insert speaker into
mounting hole with
installation aid in place.
Screw down both bolts on
the bafe face to actuate
the mounting wings. Firmly
secure both bolts – do not
over-tighten.
8. Once all painting and
nish work is completed,
remove the paint mask.
9. Select the tap position
by adjusting rotary switch
to desired high impedance
value or voice coil direct
mode.
11. Done!
CM-EZ / BGM SeriesCM-EZ / BGM Series
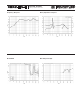
EQ settings required for the EN54-24 specic installations
Model
CM62-BGM
CM62-EZ-II
CM62-EZs-II
CM42-EZs-II
EQ-1
-3dB @ 125Hz
-6dB @ 200Hz
-6dB @ 200Hz
-4dB @ 200Hz
Bandwidth
.5 Octave
1.0 Octave
1.0 Octave
1.0 Octave
Bandwidth
1.0 Octave
0.7 Octave
0.7 Octave
EQ-2
-3dB @ 175Hz
+2dB @ 4800Hz
+3dB @ 4800Hz