
User Manual
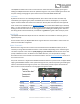
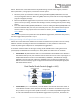
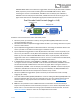
Table Of Contents
- Welcome
- Overview
- Quick Start
- Connections
- Reverb Engines
- Extended Reverb Engines
- Controls
- Preset Storage and Recall
- Recalling Presets
- Recalling MIDI Presets
- Editing and Saving a Single Engine Preset to Reverb A
- Editing and Saving a Dual Engine Preset to Reverb A+B
- Copying a Preset to a New Location Using the Select/(Hold) Save Button
- Copying a Preset to a New Location Using an External MIDI Controller
- Copying a Preset to a New Location Using the Neuro App
- Clearing all Presets
- Universal Bypass
- Stereo Operation & Signal Routing
- Mono In, Mono Out (1)
- Toggle = A Toggle = B
- Toggle = A+B, Dual Parallel
- Toggle = A+B, Dual Cascade
- Stereo In, Mono Out (2)
- Toggle = A Toggle = B
- Toggle = A+B, Dual Parallel
- Toggle = A+B, Dual Cascade
- Mono In, Stereo Out (3)
- Toggle = A Toggle = B
- Toggle = A+B, Dual Parallel
- Stereo In, Dependent Stereo Out (4)
- Toggle Switch = Reverb A Toggle Switch = Reverb B
- Toggle = Reverb A+B, Dual Cascade
- Mono In, Mono Out, Dry Out 2 (5)
- Toggle Switch = Reverb A Toggle Switch = Reverb B
- Toggle = Reverb A+B, Dual Cascade
- Stereo In, Wet Sum to Mono (6)
- Toggle Switch = Reverb A Toggle Switch = Reverb B
- Toggle = Reverb A+B, Dual Cascade
- Dual Mono, (Independent Stereo) (7)
- Toggle Switch = Reverb A Toggle Switch = Reverb B
- Mono In, Independent Stereo Out (8)
- Toggle Switch = Reverb A Toggle Switch = Reverb B
- Pre Processing External Loop (9)
- Toggle Switch = Reverb A Toggle Switch = Reverb B
- Toggle = Reverb A+B, Dual Cascade
- External Loop Cable Connection Instructions
- External Control
- Neuro Desktop and Mobile Editors
- The Neuro Desktop Editor
- Downloading and Connecting the Neuro Desktop Editor
- Neuro Desktop Editor User Interface
- Connections
- Hardware Options
- Sound Editor
- Dual/Single Mode
- I/O Routing Option
- Reverb Engine A Controls
- Option Footswitch Assign
- Tapping or holding the Ventris Dual Reverb’s OPTION footswitch accesses specific default functions, depending on the selected reverb engine (see the Reverb Engines section for the default functions of each engine). In addition, it is possible to reass...
- Reverb Engine B Controls
- Dual Mode Controls
- Spillover Controls
- On/Off Status (MIDI Recall)
- External Control
- Presets
- The Neuro Mobile App
- Neuro Hub
- MIDI
- USB
- Specifications
- Troubleshooting
- Frequently Asked Questions
- How can I access the extended reverb engines without the app?
- What kind of instruments can I connect to the Ventris’s inputs?
- Can I power the Ventris directly over USB, without using the 9 Volt supply?
- When connecting the Ventris to a recording interface or mixer, should I used a Lo-Z (microphone) or Hi-Z (line / instrument) input?
- Why doesn’t the Ventris respond to MIDI messages being sent to it?
- Can I use the Ventris in my amp’s effects loop?
- How do I update the firmware?
- Rubber Feet
- Waste Disposal Notes
- Warranty
- Version History

SA262 Ventris Dual Reverb Owner’s Manual
22
Effect Engine Selector Encoder
This is the reverb engine selector. It determines the overall engine and sets the function of the
CONTROL knobs and OPTION footswitch.
Effect Engine Selector LEDs
The REVERB ENGINE LEDS that encircle the ENGINE SELECTOR indicate which engine is currently active.
This works for the first 12 effect engines. If a user has activated one of the extended engines then
none of these REVERB ENGINE LEDS will be lit. If the Reverb Selector toggle switch is set to A+B, both
of the selected engine LEDs will illuminate. If reverbs A and B are both programmed with the same
reverb engine and the Reverb Selector is set to A + B, the appropriate single LED will illuminate with a
double blinking pattern.
It is possible, using the Neuro App, to replace one of the default engines on the engine selector
wheel with another engine. If the user has done this, the corresponding LED will blink to show that
the engine does not match the name written in ink on the face of the Ventris. This is also true in A + B
mode.
A/B Reverb Toggle Switch
The Ventris Dual Reverb features two completely independent 56-bit signal processors. The two
processors give the Ventris the ability to simultaneously save two reverb sounds in each of the
pedal’s 8 onboard or 128 MIDI accessible presets. The A/B Reverb Toggle Switch provides easy access
to each of the individual Reverbs (A or B) as well as a combination of the two (A+B).
Selecting positions A or B enables the reverb effect that was programmed to the corresponding
toggle position. Selecting position A+B enables both reverbs simultaneously. By default the A+B
toggle position will run the reverbs in parallel and mix them together (in stereo) to the Outputs. It is
also possible to run the reverbs in Cascade Mode, one into the other. To cascade the reverb engines,
first flip the toggle switch to either the A or B position, hold down the CONTROL INPUT button (at the
top of the pedal), and switch the toggle back to the A + B position – now Reverb A will cascade into
Reverb B. To switch back to Parallel mode, repeat the process WITHOUT holding down the CONTROL
INPUT button.
When the A+B toggle position has been selected certain knob functions are altered. When running
the reverbs in Parallel Mode, CONTROL 1 sets the wet level of Reverb A, CONTROL 2 sets the wet
level of Reverb B, and MIX sets the level of the dry signal. When running the reverbs in Series Mode,
CONTROL 1 sets the wet/dry mix of Reverb A, CONTROL 2 sets the wet/dry mix of Reverb B, and MIX
sets the level of the dry signal. See the Editing and Saving Dual Engine Presets section for complete
instructions on dual reverb presets.
Any of the three toggle switch positions can be individually assigned as the initially engage position
for each of the 128 presets. Note: if the A+B toggle position is used during preset switching (in either
the former or later preset), the Spillover function is not available.
On/Off Footswitch
Enables or bypasses the reverb effect. By default the Ventris uses a True/Hard Bypass Mode, but it is
also possible to switch to a Buffered Bypass (see the Universal Bypass section for more information)
or Trails Mode Bypass (see the Trails Mode section).