
User Manual
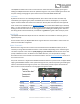
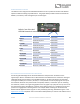
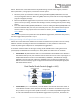
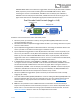
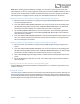
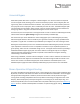
Table Of Contents
- Welcome
- Overview
- Quick Start
- Connections
- Reverb Engines
- Extended Reverb Engines
- Controls
- Preset Storage and Recall
- Recalling Presets
- Recalling MIDI Presets
- Editing and Saving a Single Engine Preset to Reverb A
- Editing and Saving a Dual Engine Preset to Reverb A+B
- Copying a Preset to a New Location Using the Select/(Hold) Save Button
- Copying a Preset to a New Location Using an External MIDI Controller
- Copying a Preset to a New Location Using the Neuro App
- Clearing all Presets
- Universal Bypass
- Stereo Operation & Signal Routing
- Mono In, Mono Out (1)
- Toggle = A Toggle = B
- Toggle = A+B, Dual Parallel
- Toggle = A+B, Dual Cascade
- Stereo In, Mono Out (2)
- Toggle = A Toggle = B
- Toggle = A+B, Dual Parallel
- Toggle = A+B, Dual Cascade
- Mono In, Stereo Out (3)
- Toggle = A Toggle = B
- Toggle = A+B, Dual Parallel
- Stereo In, Dependent Stereo Out (4)
- Toggle Switch = Reverb A Toggle Switch = Reverb B
- Toggle = Reverb A+B, Dual Cascade
- Mono In, Mono Out, Dry Out 2 (5)
- Toggle Switch = Reverb A Toggle Switch = Reverb B
- Toggle = Reverb A+B, Dual Cascade
- Stereo In, Wet Sum to Mono (6)
- Toggle Switch = Reverb A Toggle Switch = Reverb B
- Toggle = Reverb A+B, Dual Cascade
- Dual Mono, (Independent Stereo) (7)
- Toggle Switch = Reverb A Toggle Switch = Reverb B
- Mono In, Independent Stereo Out (8)
- Toggle Switch = Reverb A Toggle Switch = Reverb B
- Pre Processing External Loop (9)
- Toggle Switch = Reverb A Toggle Switch = Reverb B
- Toggle = Reverb A+B, Dual Cascade
- External Loop Cable Connection Instructions
- External Control
- Neuro Desktop and Mobile Editors
- The Neuro Desktop Editor
- Downloading and Connecting the Neuro Desktop Editor
- Neuro Desktop Editor User Interface
- Connections
- Hardware Options
- Sound Editor
- Dual/Single Mode
- I/O Routing Option
- Reverb Engine A Controls
- Option Footswitch Assign
- Tapping or holding the Ventris Dual Reverb’s OPTION footswitch accesses specific default functions, depending on the selected reverb engine (see the Reverb Engines section for the default functions of each engine). In addition, it is possible to reass...
- Reverb Engine B Controls
- Dual Mode Controls
- Spillover Controls
- On/Off Status (MIDI Recall)
- External Control
- Presets
- The Neuro Mobile App
- Neuro Hub
- MIDI
- USB
- Specifications
- Troubleshooting
- Frequently Asked Questions
- How can I access the extended reverb engines without the app?
- What kind of instruments can I connect to the Ventris’s inputs?
- Can I power the Ventris directly over USB, without using the 9 Volt supply?
- When connecting the Ventris to a recording interface or mixer, should I used a Lo-Z (microphone) or Hi-Z (line / instrument) input?
- Why doesn’t the Ventris respond to MIDI messages being sent to it?
- Can I use the Ventris in my amp’s effects loop?
- How do I update the firmware?
- Rubber Feet
- Waste Disposal Notes
- Warranty
- Version History

SA262 Ventris Dual Reverb Owner’s Manual
25
the Reverb not currently in use. For example, you can play through Reverb A, the press the OPTION
switch to summon and hold the trail of Reverb B – all the while maintaining the undisturbed
reflections of Reverb A (See the illustration below for additional clarity).
“Hold Other Engine” Function (Holding Reverb B)
Option LED
The OPTION LED (located above the OPTION Footswitch) indicates the Pre-Delay time or LFO rate when
using the OPTION Footswitch as a Tap Tempo control. When the OPTION footswitch controls Tap
Tempo of Pre-Delay, the LED will blink in time. When Tap Tempo controls the rate of modulation
effects, the LED will employ a smooth pulsing illumination. The LED also illuminates solidly when the
HOLD or BUILD functions are engaged.
Control Input Button
This small button located at the top of the pedal is used when configuring external control. See the
External Control section for more details.
External Control LED
The small LED located to the left of the MIX KNOB is the CONTROL/ACTIVITY LED. When lit, it indicates
that external control mode (expression or MIDI) is active or that incoming data is being received via
MIDI or a Neuro connection. For more information, see the External Control section.
Preset Select/(Hold) Save Button and LEDs
Press the SELECT button to scroll through and select saved user presets. The four PRESET LEDS next to
the PRESET BUTTON indicate which preset is active for presets 1 through 4. If a preset has been
modified, the corresponding PRESET LED will blink slowly. To save a preset, press and hold this button
– the associated preset LED will blink for a few seconds. When the LED stops blinking, the updated
preset will be saved to the current preset position.
Preset Extension Mode: Allows for easy access to an additional 4 presets for a total of 8 onboard
presets. To enable Preset Extension Mode, go to the Hardware Options sections of the Neuro Mobile
or Desktop Editor (see Neuro Hardware Options) and select the appropriate option. The illumination
patterns of the Preset Select LEDs indicate which Preset has been selected (see the figure below).