
Instructions / Assembly

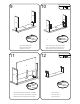


- Tourner -158-(2) à droite
little more than a half turn
un poco màs que una media vuelta
sur N et N1 pour les barrer ensemble.
un peu plus qu'un demi tour
16
- Insert N and N1 into C.
- Tighten right -158-(2)
on N and N1 to lock them together.
- Insertar N y N1 en C.
- Girar -158-(2)
hacia la derecha sobre N y N1 para trancarlos juntos.
- Insérer N et N1 dans C.
-158-
correct/
correcto
incorrect/
incorrecto
C
N1
N
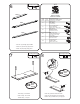
15
X4
-92-
Required/Requis/Requerido
-208-
X1
Pairs
Paires
Pares
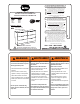
-Position -208-(L/R) against S and S1and against R and R1, then screw
-208-(L/R) to S and to S1 with -92-(4) in the indicated holes.
-Positionner -208-(G/D) contre S et S1 et contre R et R1, puis visser
-208-(G/D) à S et S1 avec -92-(4) dans les trous désignés.
-Situar -208-(I/D) contra S y S1 y contra R y R1, luego atornillar -208-(I/D)
en S y en S1 con -92-(4) en los agujeros designados.
(L/G/I)
(R/D)
R/R1
-208-
-208-
S6
S7
-92-
-92-
-92-
-92-
-208-
-92-
-92-
#111
#242
13
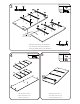
Required/Requis/Requerido
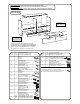
- Insert T between S and S1
- Insertar T entre S y S1
- Insérer T entre S et S1.
- Visser -111-(4) à travers de S et S1 dans T.
With care
Con precaución
Avec précaution
S6
S7
T
X4
-111-
-111-
-111-
- Screw -111-(4) through S and S1 into T.
- Atornillar -111(4) a través de S y S1 en T.
U
S1
T
14
-106-
X6
-109-
Required/Requis/Requerido
X2
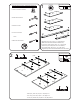
- Align U with T.
- Nail U to T with -106-(6).
- Stick -109-(2) on R and R1.
- Alinear U con T.
- Clavar U a T con -106-(6).
- Pegar -109-(2) sobre R y R1.
- Aligner U avec T.
- Clouer U à T avec -106-(6).
- Coller -109-(2) sur R et R1.
T
U
30mm
T
U
Each side
Chaque côté
Cada lado
S7
-106-
6x
Drawers
Tiroirs
Cajones
6x
Drawers
Tiroirs
Cajones
S6
6x
Drawers
Tiroirs
Cajones