
Salamander Broilers User Manual


OWNER’S MANUAL 1186527 REV 6 (8/14)
PAGE
11
OF 21
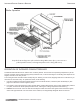
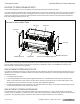
INFRARED/RADIANT COMPACT BROILER
STEP 5: CHECK THE INSTALLATION
Check the installation of the broiler, as follows:
1. Check that all screws and bolts are tightened.
2. Check that the gas connection has been made correctly.
3. With the broiler in the position that it will be operated, check that the broiler is level (both front-to-back and side-to-
side).
4. Check that the appropriate minimum clearances are satised (see page 4), including adequate clearance for
combustion air to enter the sides of the broiler.
5. Check that there is sufcient clearance in front of the broiler to pull out the broiler rack and bottom drip pan.
6. Check that adequate ventilation (fresh air supply and hood exhaust) is available to the room in which the broiler will
operate.
7. Wipe clean all surfaces.
STEP 6: CHECK BROILER OPERATION
Check the operation of the broiler, as follows:
1. Turn gas supply on. Immediately check all gas connections for leaks using soapy water.
2. Light the pilots. Check that the pilot ames are large enough to extend along the ame carrier to the burner surface.
If not, adjust the pilots.
3. Infrared: Turn on the broiler burners and check for correct ame appearance and height at both the HIGH and LOW
settings. When the burners ignite, a blue haze-type ame will cover the surface of the ceramics, but will gradually
disappear within two minutes. When the burner control is set to HIGH, the ceramics should glow red and the ame
on the surface of the ceramics should be barely visible, with little or no blue haze. When the burner control is
set to LOW, the surface of the ceramics should glow very dull red and the ame should have a blue-haze color. The
ame should not utter or “pop.” If necessary, adjust the burners.
Radiant: Turn the burner control to HIGH and visually check that the burners have ignited. Flames from the tube
burner will spread over the stainless steel radiants. The stainless steel radiants will glow red within 3 minutes.
4. Check that gas supply is adequate by simultaneously turning on all burners of all appliances connected to the same
gas supply to their highest setting, then again checking that the broiler’s pilot and burner ames have correct
appearance and height.
5. Turn off all burners and allow the broiler to cool.
1. Wipe clean all surfaces.
2. Unless the broiler is to be placed in service immediately, shut off the gas and electricity supplies.
3. Make sure that a copy of this manual will be available to the people who will operate and maintain the broiler.
INSTALLATION
STEP 10: SHUT-DOWN AND WIPE-CLEAN