
Salamander Broilers User Manual


INFRARED/RADIANT COMPACT BROILER
OWNER’S MANUAL 1186527 REV 6 (8/14)
PAGE
14
OF 21
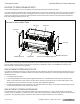
OPERATION
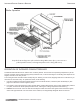
4. If searing the food to mark it with grid marks is desired, before placing food on the grid move the broiler rack to its
highest position and allow the burners to operate on HIGH for ve minutes.
5. Turn the burner control to HIGH or LOW (as appropriate for the food to be cooked).
6. Raise or lower the broiler rack to the height appropriate for the food to be cooked. To raise or lower the rack, move
the lever arm to the right, raise or lower it, then move it to the left into a notch.
7. Pull out the rack, place food on the grid, and slide the rack back into the broiler. (It is recommended the rack be in the
lowest position for loading food.)
8. Cook the food for the appropriate time, turning it when appropriate. Periodically check the broiler grease drawer and
empty it when necessary.
9. When done broiling, turn the burner control to OFF. (To keep the broiler grid hot in order to mark food with sear marks
without preheating, turn the burner controls to LOW and move the broiler rack to its highest position.)
LIGHTING BROILER PILOTS
The pilots should burn continuously unless the broiler is to be completely shut down. The broiler cavity has two or three
pilots, each near the front of a pair of burners. If the pilots are extinguished, the pilot gas supply is NOT automatically
interrupted (unless the ame-failure option was ordered).
To light the pilots on a broiler WITHOUT the ame failure option, do the following:
1. Turn the control valves on the front of the broiler to OFF.
2. Turn on the gas supply to the broiler (if not already on).
3. Light the pilots.
To light the pilots on a broiler WITH the ame failure option, do the following:
1. Turn the control valves on the front of the broiler to OFF.
2. Turn on the gas supply to the broiler (if not already on).
3. Turn one of the burner control knobs to the PILOT position and push the knob inward and hold it in place. While
continuing to hold the knob in, light the corresponding pilot and allow it to burn for 30 to 45 seconds. Release the knob
and check that the pilot remains lit. Repeat this step for the remaining burner control knobs and pilots.
SHUTDOWN OF BROILER
To place the broiler in a standby state (ready for use), turn the burner control valves to OFF (or to PILOT on units with the
ame-failure option). The pilots will remain lit.
To completely shut down the broiler for an extended period (or prior to disconnecting the gas supply), turn the burner
control valves to OFF, then turn off the manual shutoff valves of all gas supply connections. (This will extinguish all pilots.)
Whethe burner control is set to HIGH, the ceramics will glow red and the ame on the surface of the ceramics should
be barely visible, with little or no blue haze. When the burner control is set to LOW, the surface of the ceramics
will glow very dull red and the ame will have a blue-haze color. (If the ame utters or “pops” the broiler requires
adjustment by a service technician.)
Radiant: Turn the burner control to HIGH and visually check that the burners have ignited. Flames from the tube
burner will spread over the stainless steel radiants. The stainless steel radiants will glow red within 3 minutes