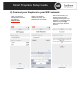
Smart Fireplace Setup Guide Setting up your Smart Fireplace In order to control your new fireplace via Alexa voice commands, you must connect the fireplace to your wireless network (WiFi) and then link the fireplace to your Amazon account.
Smart Fireplace Setup Guide 2) Connect your fireplace to your WiFi network Open your phone’s web browser and enter the address: http://10.9.8.7 Select your wireless network and enter your password for the network. After a few seconds, you should see the success message showing that your fireplace is connected to the network. Tap the Login button to link your Amazon account.
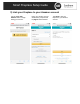
Smart Fireplace Setup Guide 3) Link your fireplace to your Amazon account Tap the Login with Amazon button to begin linking your account. Enter your Amazon account details when prompted and tap Sign-In when finished. Tap Allow to link your fireplace to your Amazon account.
Smart Fireplace Setup Guide 4) Name your fireplace and enable the Alexa skill Choose a name for your fireplace. This is how you will identify the device when using Alexa voice commands. Configure the Alexa skill by tapping the link to launch the Alexa app. You will be prompted to enable the Alexa skill. Tap Enable to Use.
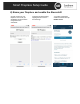
Smart Fireplace Setup Guide 5) Link the Alexa skill to your Amazon account Login with the same Amazon account that you used to set up the fireplace. Once you have logged in with your Amazon account, close the window to begin the device discovery process. Alexa should find 5 devices – these are the different functions of your fireplace. *Note: To remove a fireplace from your Amazon account, visit http://seismartfireplace.com and login with your account details.
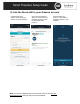
Smart Fireplace Setup Guide List of Alexa Commands Use the following phrases to control your fireplace via Alexa. Simply replace “Fireplace” with the name you chose for your fireplace during setup.
FA4723
Assembly Help | Ayuda de montaje | Aide à l’assemblage Item # Número de artículo Numéro de l’article Scan Here Escanee aquí Balayez ici Safety | Seguridad | Sécurité Note! | Nota: | Remarque!
00 . 63 3. 5 096 Electric Firebox Insert User’s Operating Manual Consumer safety information: Please read this manual before installing and operating this appliance. WARNING!!! If the information in this manual is not followed correctly, an electric shock or fire may result in property damage, personal injury, or loss of life. Do not store or use gasoline or other flammable vapors or liquids near this appliance.
00 . 63 3. 5 096 Important Operating and Safety Instructions: Instrucciones importantes de operación y seguridad: Directives importantes concernant la sécurité et l'utilisation : CAUTION: PRECAUCIÓN: MISE EN GARDE : High Temperatures! Keep draperies, electrical cords, and other furnishings at least 3 feet (.9 meters) from the front and away from the front, sides, and rear of the heater.
00 . 63 3. 5 096 Important Operating and Safety Information: When using electrical appliances, the following basic precautions should always be followed to reduce the risk of fire, electric shock, and injury. Read all instructions before using this heater. Use this heater only as described in this manual. Any other use not recommended by the manufacturer may cause fire, electric shock, or injury.
00 . 63 3. 5 096 Información importante de operación y seguridad: Cuando use artefactos eléctricos, siempre debe respetar las siguientes precauciones básicas para reducir el riesgo de incendio, descarga eléctrica y lesiones. Lea todas las instrucciones antes de usar este calefactor. Use este calefactor de la manera exacta que se describe en este manual.
00 . 63 3. 5 096 Information importante concernant la sécurité et l'utilisation: Lorsque vous utilisez des appareils électriques, respectez toujours les précautions de base afin de réduire les risques d'incendie, de chocs électriques et de blessures. Lisez toutes les directives avant d'utiliser la fournaise. Utilisez cette fournaise conformément aux directives du présent guide.
00 . 63 3. 5 096 Maintenance: 1. Cleaning your fireplace: You may clean exterior of unit with a soft, damp, lint-free cloth. WARNING: Before cleaning the exterior of the appliance, disconnect the unit from the power supply. Clean unit only after it is cool to the touch. 2. Cleaning the front glass: The front glass panel may become dirty or dusty. Dust can be removed by lightly rubbing the glass surface with a clean, lint-free cloth or paper towel.
00 . 63 3. 5 096 Installation Instructions: Directives d'installation : Instrucciones de instalación: Once the location has been prepared, the fireplace insert can be installed. Une fois que vous avez préparé l'emplacement, vous pouvez installer le foyer encastrable. Después de preparar el lugar de colocación, podrá instalar la chimenea insertable. 1. Make sure the unit is turned off (refer to the operating instructions). 2. Place the fireplace insert on the floor, directly behind your mantle.
00 . 63 3. 5 096 Operating Instructions: Control Panel on the Front of Unit: 1. Power 2. Heater 3. Flame 4. Log 5. Timer 1. On/Off Main Power Button a. Press to switch the unit ON/OFF. b. The unit will turn on to its default factory settings. 2. On/Off Heater Button a. This allows programming of the thermostat. The fireplace can be used without the heater if desired. b. Adjust the temperature rating from 62°F - 82°F - ON (17°C - 27°C). Note: °F is the default unit.
00 . 63 3. 5 096 Instrucciones de operación: Panel de control en la parte delantera de la unidad: 1. Encendido/apagado 2. Calefactor 3. Llama 4. Leños 5. Temporizador 1. Botón de encendido/apagado principal a. Presiónelo para encender/apagar la unidad. b. La unidad se encenderá en su configuración predeterminada de fábrica. 2. Botón de encendido/apagado del calefactor a. Esto permite programar el termostato. Si lo desea, puede usar la chimenea sin el calefactory. b.
00 . 63 3. 5 096 Directives d'utilisation: Panneau de commande à l'avant de l'unité: 1. Alimentation 2. Fournaise 3. Flamme 4. Bûche 5. Minuterie 1. Bouton marche/arrêt de l'alimentation principale a. Appuyez pour allumer ou éteindre l'unité. b. L'unité se mettra en marche avec les paramètres par défaut de l'usine. 2. Bouton marche arrêt de la fournaise a. Cette commande vous permet de programmer le thermostat. Vous pouvez utiliser le foyer sans la fournaise, si vous le souhaitez. b.
00 . 63 3. 5 096 Remote Control Operating Procedures: (1) (4) (2) (5) (3) (6) (1) Power: Press to turn the unit ON/OFF (2) Flame: Press to adjust the level of brightness of the flame: F5- F4- F3- F2- F1- OFF. (F5 being the brightest and F1 the dimmest) : raise the level of flame brightness, : lower the level of flame brightness. (3) Timer: Press to adjust the duration of the heater: 30 min- 1H- 2H- 3H- 4H- 5H- 6H- 7H- 8H- 9H- OFF (4) Down Light: Turn the down light ON and OFF.
00 . 63 3. 5 096 Procedimientos de Operacion con el Control Remoto: (1) (2) (3) (4) (5) (6) (1) Encendido/apagado: Presiónelo para encender/apagar la unidad. (2) Llama: Presiónelo para ajustar el nivel de intensidad de la llama: F5- F4- F3- F2- F1- Apagado. (F5 es la mayor intensidad y F1, la menor) : eleva el nivel de intensidad de la llama, : reduce el nivel de intensidad de la llama.
00 . 63 3. 5 096 Mode d'Emploi du Contrôle a Distance: (1) (4) (2) (5) (3) (6) (1) Alimentation: Appuyez pour allumer ou éteindre l'unité. (2) Flamme: Appuyez pour ajuster la luminosité des flammes :F5 - F4 - F3 - F2 - F1 - OFF (ARRÊT). (F5 étant le niveau le plus clair et F1, le plus sombre) : augmente la luminosité des flammes, : réduit la luminosité des flammes.
00 . 63 3. 5 096 Troubleshooting Problem Cause Main power supply switch is off. Solution Turn on the main power supply switch. Too many appliances on this Circuit breaker has tripped. circuit. Be sure that the electrical supply for this unit is an individual circuit. Heater is unplugged from wall outlet. Plug the cord into an outlet. Power cord or power plug are damaged. Contact a SEI customer service.
00 . 63 3. 5 096 Problem Cause Solution Flame adjusting knob is at low setting. Turn the knob to maximum setting. Loose wiring at the wall power outlet. Contact a qualified electrician. Heater is on but no flame or low flame intensity. Check all wiring for loose Loose wiring at the wall power outlet. connections. Contact a qualified electrician. Flames are frozen. Flame element is not attached to the motor. Contact SEI customer service Rotation motor is defective.
00 . 63 3. 5 096 Solución de Problemas Problema El calefactor no se enciende cuando presiono el interruptor de encendido/apagado. Sale un olor del calefactor. Causa Solución El interruptor de suministro de energía principal está apagado. Enciéndalo. El disyuntor del circuito se disparó. Hay demasiados artefactos conectados a este circuito. Asegúrese de que el suministro eléctrico para esta unidad provenga de un circuito individual. El calefactor está desconectado del tomacorriente.
00 . 63 3. 5 096 Problema El calefactor está encendido pero no tiene llama o la intensidad de la llama es baja. Causa Solución La perilla de ajuste de intensidad de la llama está en un ajuste bajo. Gírela hasta el ajuste máximo. Hay cableado suelto en el tomacorriente de la pared. Solicite el servicio de un electricista profesional. Cableado suelto en el tomacorriente de la pared. Revise todo el cableado para comprobar que no haya conexiones sueltas.
00 . 63 3. 5 096 Dépannage Problème La fournaise ne s'allume pas à l'aide de l'interrupteur de l'alimentation. Une odeur s'échappe de la fournaise. Cause Solution L'interrupteur de l'alimentation principale est en mode arrêt. Allumez l'interrupteur d'alimentation principale. Le disjoncteur s'est déclenché. Il y a trop d'appareils sur ce circuit. Assurez-vous que l'alimentation électrique de cette unité est un circuit individuel. La fournaise n'est pas branchée dans la prise murale.
00 . 63 3. 5 096 Problème La fournaise est en marche, mais il n'y a aucune flamme ou les flammes sont sombres. Cause Solution Le bouton d'ajustement des flammes est réglé à faible. Tournez le bouton au réglage maximal. Câblage lâche près de la prise électrique murale. Prenez contact avec un électricien qualifié. Câblage lâche près de la prise électrique murale. Vérifiez tout le câblage pour vous assurer qu'il n'y a pas de connexion lâche. Prenez contact avec un électricien qualifié.
00 . 63 3. 5 096 GROUNDING INSTRUCTIONS This product must be grounded. If it should malfunction or breakdown, grounding provides a path of least resistance for electric current to reduce the risk of electric shock. This product is equipped with a cord having an equipment-grounding conductor and a grounding plug. The plug must be plugged into an appropriate outlet that is properly installed and grounded in accordance with all local codes and ordinances.
00 . 63 3. 5 096 FCC STATEMENT DECLARACIÓN DE LA FCC ÉNONCÉ DE LA FCC NOTE: This equipment has been tested and found to comply with the limits for Class B digital device, pursuant to Part 15 of the FCC Rules. These limits are designed to provide reasonable protection against harmful interference in a residential installation.
Assembly||Asamblea Assembly Armado ||Assemblage Assemblage Congratulations! | ¡Felicitaciones! | Félicitations! Share Your Thoughts | Queremos conocer su opinión | Partagez vos impressions Scan Here Escanee aquí Balayez ici
Assembly||Asamblea Assembly Armado ||Assemblage Assemblage May We Help You? ¿Podemos ayudarle? Pouvons-nous vous aider? 800.633.5096 800.633.5096 800.633.5096 Have these ready when you call: • Item Number • PO # • Purchaser Name • Place of Purchase Cuando llame, tenga a mano lo siguiente: • Número de artículo • N.º de orden de compra • Nombre del comprador • Lugar de compra Please immediately examine this product carefully.
FA1009659
2|
3|
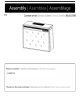
A x1 B Right front panel Panel frontal derecho Panneau avant droit D x1 Left front panel Panel frontal izquierdo Panneau avant gauche E Right side panel Panel lateral derecho Panneau latéral droit G Left side panel Panel lateral izquierdo Panneau latéral gauche x1 H Top panel Panel superior Panneau du haut J Bottom panel Panel inferior Panneau du bas x1 K Left middle panel Panel central izquierdo Panneau central gauche M Left back panel Panel trasero derecho Panneau arrière droit 4| x1 x1 C
P x1 Firebox (separate carton) Caja de fuego (caja separada) Foyer (carton séparé) 1 x27 Cam bolt Tornillo de leva Boulon à came x23 Wood dowel Taco de madera Cheville de bois ∅8*30mm x4 Bracket Soporte Support 10 Screw Tornillo Vis 5| x27 3 Cam lock Bloqueo de leva Serrure à came 4 7 2 5 Screw Tornillo Vis 8 Screw Tornillo Vis x4 ø1/4”x1-1/2”L 11 Tie Correa Sangle x27 Cover Tapa Couverture x37 ø1/4”x1”L 6 Wood dowel Taco de madera Cheville de bois x4 9 ø3x14mm x2 Plastic anchor A
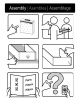
(1) (2) (4) (3) (5) 3 6 x11 x2 x2 x2 6 3 C B 6 A (1) x2 E D 6|
(2) (1) (3) x2 x2 x2 (4) 3 E 3 F D x6 (1) G 7|
(2) (1) (3) (4) x6 x6 x5 (4) x9 x9 x6 G 3 3 2 (1) 2 3 3 2 (2) (3) 4 4 4 3 2 4 4 3 2 4 8|
(1) (2) (3) x4 x4 x4 x2 x2 (5) (4) 3 3 2 2 1 2 4 6 3 1 1 2 3 4 6 1 9| H
x4 (1) 6 6 x2 (1) 6 6 10 |
x17 (1) 5 5 5 5 5 5 5 5 5 5 5 5 5 5 5 (1) (3) (2) 1 4 14 4 11 | 3 (5) (4) 4 3 x2 x2 x2 x4
(2) (1) 4 4 1 4 2 1 x2 x2 x2 x4 (4) (3) 4 2 3 3 x16 5 5 5 5 5 5 5 5 5 5 5 5 5 12 | 5
P P x4 x2 x4 7 7 8 O O P O 13 | 5 8 5 5
Wall Pared Mur 9 9 Wall Pared Mur 9 9 14 | x4
x2 x4 7 10 Wall Pared Mur 7 10 Wall 11 Wall Pared Mur 7 Furniture Mueble Muebles Wall 7 11 x2 11 7 Anti-tipping hardware must be used for this product to avoid tipping and injury. El hardware antivuelco debe usarse para este producto para evitar vuelcos y lesiones. Le matériel anti-basculement doit être utilisé pour ce produit afin d'éviter le basculement et les blessu.
16 |
17 |