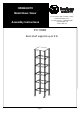
HZ886500TX Metal/Glass Tower Assembly Instructions For assistance with assembly, contact: Southern Enterprises Inc. Customer Service: 1-800-633-5096 service@seidal.com www.seidal.com PO:13588 Each shelf supports up to 5 lb.
Metal/Glass Tower Parts List Please review all parts and hardware before disposing of any packaging. Before beginning assembly, separate each type of hardware. Carefully study the diagrams below and check that you have all parts indicated. Call Customer Service if missing hardware. Using the incorrect hardware will cause damage.
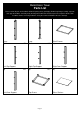
A) 28PCS Bolts D) B) 28PCS 1/4”x1/2” Spring Washers 20PCS E) Glass Pads G) 2PCS L Metal Chips H) Screws J) 4x16mm Wrench 2PCS Screws 4x38mm C) 4PCS Flat Washers F) 1PC Plastic Straps I) 28PCS 2PCS 2PCS Plastic Anchors Care and Cleaning Instructions: Before using, wipe with a clean, dry cloth. Avoid rubbing or scratching the surface with rough or abrasive objects. For replacement parts or questions, please call Customer Service at 1-800-633-5096. Assembly Tool Required: No.
Metal/Glass Tower Assembly Instructions Note: Do not fully tighten bolts until step 4 is complete. Step 1: Unit assembly should begin with parts turned upside down for Step 1. Attach Legs (1) and Legs (2) to Shelf Frames (3) using Bolts (A), Spring Washers (B), and Flat Washers (C). Figure 1 Step 2: Attach Left Top Support (4), Right Top Support (5), Right Rear Support (6), and Left Rear Support (7) to Shelf Frames (3) using Bolts (A), Spring Washers (B) and Flat Washers (C).
Step 3 Attach assembled unit from Figure 2 to Top Frame (8) using Bolts (A), Spring Washers (B) and Flat Washers (C). Figure 3 Step 4 Turn assembled parts upright. Attach assembled unit from Figure 3 on top of assembled unit from Figure 1 using Bolts (A), Spring Washers (B) and Flat Washers (C). Completely tighten all bolts with Wrench (G).
Step 5 Attach Glass Pads (D) onto brackets of Shelf Frames (3). Insert Glass Shelves (9) onto Shelf Frames (3). Your Metal/Glass Tower is now complete! Figure 5 Anti-tipping Hardware (E) Screw (I) Tip: At least one screw must be directly mounted into a wall stud. Wall anchor is not needed when mounting into a wall stud. Find ideal location on wall and mark center location of the mounting hole. (H) Using a power drill and a 3/16″ drill bit, drill one 3/16″ hole on wall.
Parts Replacement Form Customer Information Name Address City/State/Zip Code Phone Number Please indicate where you purchased this item: Store/Website/Catalog Please indicate color/size/style number: Style No Parts Letter Parts Description Quantity Needed Please immediately examine this product carefully. Any request for missing parts or damage replacement must be received within 90 days of your receipt of the product. Replacement, if available, will be honored within this time frame.