Operator’s Manual GASOLINE POWERED CULTIVATOR 43cc, 2 Cycle MODEL No.S SCV43.1 Look inside for: Safety Definitions Important Safety Information Product Specifications Parts & Features Assembly Operation Maintenance Storage Troubleshooting Technical Service Warranty Page 2 3-4 5 5 6-7 8-9 10 10 11 11 12-17 IMPORTANT: Thank you for purchasing this Southland® Cultivator. Read and understand all warnings and instructions in this manual before using this machine.
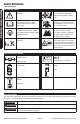
Safety Definitions • Save all instructions Important Safety Information Safety Warning Symbols: Indicates WARNING, DANGER, or CAUTION. Keep hands, feet, and clothing away from rotating tines. Contact with rotating tines may result in serious injury. Read operator’s manual before operating this machine. Failure to follow directions could result in serious injury. Engine exhaust contains carbon monoxide, an odorless and deadly gas. NEVER run unit indoors or in a poorly ventilated area.
Important Safety Information • Save all instructions BEFORE OPERATING CULTIVATOR 1. READ AND UNDERSTAND ALL INSTRUCTIONS BEFORE OPERATING CULTIVATOR. Be thoroughly familiar with the controls and the proper use of the equipment. Know how to stop the unit and disengage the controls quickly. 2. Avoid Dangerous Environments a. Do not operate cultivator while under the influence of alcohol, medications, or drugs. b. Do not operate cultivator when you are tired. c.
Important Safety Information (Continued) • Save all instructions CAUTION Prolonged exposure to vibrations through use of gasoline powered hand tools could cause blood vessel or nerve damage in fingers, hands, and joints of people prone to circulation disorders or abnormal swellings. Extensive use in cold weather has been linked to blood vessel damage in otherwise healthy people.
Product Specifications • Save all instructions Engine . . . . . . . . . . . . . . . . . . . . . . 43 cc, 2 cycle, Full-Crank Idle Speed . . . . . . . . . . . . . . . . . . . . . . . . . 2,800-3,000 RPM Tilling Width . . . . . . . . . . . . . . . . . . . . . . . . . . . . . . . . . 7”-10” Tilling Depth . . . . . . . . . . . . . . . . . . . . . . . . . . . . . . . . Up to 5” Fuel Tank Capacity . . . . . . . . . . . . . . . . . . . . . 28 oz (840 ml) Fuel Type . . . . . . . . .
Assembly If you need assistance or find any parts missing, CALL TOLL FREE: 1-800–737-2112 • Save all instructions Parts Included with Cultivator • • • • Middle Handle (1) Upper Handles (2) Wing nuts and bolts (4 ea.) Spark Plug Wrench & Rod (1) • • • • Cable Ties (3) Operator’s Manual (1) 3.2 fl. oz US bottle of 2-Cycle engine oil (1) Wrench (1) WARNING Do not operate cultivator if it is damaged or not securely and fully assembled. How to Unpack Cultivator from Carton 1.
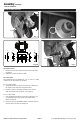
Assembly (Continued) • Save all instructions How to Assemble the Tines Pin Fig. 4a Fig. 3 D C B A Pin Fig. 4b Fig. 5 To Remove Tines 1. Remove the pins from each end of the tine shaft. Refer to Figure 3. 2. Slide the four tines off the tine shaft. To Install Tines The 4 different tines are labeled “A”, “B”, “C”, and “D”. Refer to Figure 4a for the location of the label. For a 10” tilling width: 1. Assemble the tines as shown in Figure 4b. Make sure the collars of the tines are facing each other.
Operation • Save all instructions A Before Starting the Engine Mixing Fuel / 2-Cycle Oil CAUTION WARNING Use of incorrect gasoline such as diesel fuel or gasoline containing more than 10% ethanol or methanol will damage the cultivator engine and void your warranty. Do not smoke or allow smoking near fuel or the cultivator. Mix and pour fuel outdoors WHERE THERE ARE NO SPARKS OR FLAMES.
Operation (Continued) • Save all instructions C Starting the Engine (Continued) Starting a Flooded Engine 1. Place the cultivator on a flat surface. 2. Move the ignition switch to the ON position. 3. Move the choke lever to the ‘run/ warm start’ position. (see Figure 7) 4. Hold the throttle trigger fully depressed in fast position. (See Figure 10) 5. Pull the recoil starter handle repeatedly until engine starts and runs.
Maintenance • Save all instructions WARNING Turn off ignition switch, and disconnect the spark plug before performing maintenance except for carburetor adjustments. Reconnect the spark plug wire after the service is done. A Before Starting the Engine Your cultivator has been equipped with two (2) foam air filters inside the air filter housing to prevent dirt and debris from entering the engine.
Troubleshooting • Save all instructions PROBLEM POSSIBLE CAUSE(S) SOLLUTION(S) Engine will not start. 1. Ignition Switch in the “OFF” position. 2. Engine flooded. 6. Carburetor requires adjustment. 1. Move ignition switch to the ON position. 2. See Starting a Flooded Engine in OPERATION section. 3. Fill tank with correct fuel mixture. 4. Replace Spark Plug. 5. Check for kinked or split fuel line; repair or replace. 6. Contact a qualified service center. 2. Air filter dirty. 3. Spark plug fouled. 4.
Warranty • Save all instructions A Southland® CULTIVATOR Limited Warranty Always specify model number when contacting the factory. We reserve the right to amend these specifications at any time without notice. The only warranty applicable is our standard written warranty. We make no other warranty, expressed or implied.
Warranty (Continued) • Save all instructions Other U.S States / Territories: In other areas of the Unites States, your outdoor power equipment engine must be designed, built and equipped so as to conform at the time of sale to U.S. EPA emissions standards for small off-road spark ignition engines at or below 19 kilowatts. All of the United States: Your emission control system may include parts such as the carburetor or fuel-injection system, fuel lines, the ignition system, and catalytic converter.
Warranty (Continued) • Save all instructions Defects Warranty Coverage METL warrants to the original purchaser and each subsequent purchaser that the small off-road engine (SORE) (1) has been designed, built and equipped so as to conform with all applicable regulations; and (2) is free from defects in materials and workmanship that cause the failure of a warranted part to conform with those regulations as may be applicable to the terms and conditions stated below.
Warranty (Continued) • Save all instructions Emission Warranty Parts List The repair or replacement of any warranted part otherwise eligible for warranty coverage may be excluded from such warranty coverage if METL demonstrates that the engine has been abused, neglected, or improperly maintained, and that such abuse, neglect, or improper maintenance was the direct cause of the need for repair or replacement of the part.
Warranty (Continued) • Save all instructions A California Evaporative Emission Control Warranty Statement YOUR WARRANTY RIGHTS AND OBLIGATIONS The California Air Resources Board and METL are pleased to explain the evaporative emission control system’s warranty on your model year small off-road engine (SORE). In California, new SOREs must be designed, built and equipped to meet the State’s stringent anti-smog standards.
Warranty (Continued) • Save all instructions Defects Warranty Coverage (a) The warranty period begins on the date the engine is purchased. (b) General Evaporative Emissions Warranty Coverage.
Manuel de l’usager MOTOBINEUSE À ESSENCE 43 cc, 2 temps Modèles N° SCV43.
Définitions de sécurité • Conservez ces directives Importante information de sécurité Symboles d’avertissement de sécurité Signale un AVERTISSEMENT, un DANGER ou une MISE EN GARDE. Maintenir les mains, les pieds et les vêtements à l’écart des dents rotatives. Un contact avec dents rotatives pourrait se solder par de sérieuses blessures. Veuillez lire le manuel de l’usager, avant de faire fonctionner cet appareil. Le défaut de suivre les directives pourrait provoquer de sérieuses blessures.
Importante information de sécurité • Conservez ces directives 1. LISEZ ET COMPRENEZ BIEN TOUTES LES DIRECTIVES, AVANT DE FAIRE FONCTIONNER LA MOTOBINEUSE. Familiarisez-vous complètement avec les contrôles et l’usage approprié de l’appareil. Apprenez à arrêter l’unité et désengagez les contrôles rapidement. AVERTISSEMENT Lisez et suivez tous les avertissements et les directives de sécurité. Le défaut de suivre cette procédure pourrait provoquer de sérieuses blessures à vous-même et aux spectateurs. 2.
Importante information de sécurité (Suite) • Conservez ces directives Importante information de sécurité 15. Faites preuve d’extrême précaution, en faisant fonctionner et en traversant des entrées, passages ou chemins de gravillons. Demeurez vigilants pour reconnaître les dangers cachés ou le trafic. 16. Soyez vigilants pour éviter de glisser ou de tomber 17. Si l’unité commence à vibrer de façon anormale, arrêtez le moteur et vérifiez immédiatement la cause.
Spécifications du produit • Conservez ces directives Moteur . . .
Assemblage Si vous avez besoin d’assistance ou devez trouver des pièces manquantes, APPELEZ SANS FRAIS : 1-800-737-2112. • Conservez ces directives Pièces incluses avec la motobineuse • • • • Guidon intermédiaire (1) Guidons supérieurs (2) Boulons et écrous à ailettes (4 de chaque) Clé pour bougie d’allumage avec tige (1) • Attaches en plastique pour câbles (3) • Manuel de l’usager (1) • Bouteille d’huile à moteur à 2 temps - (94 ml / 3.
Assemblage (Suite) • Conservez ces directives Comment assembler les dents Goupille fendue Fig. 4a Fig. 3 D C B A Goupille fendue Fig. 4b Fig. 5 Pour retirer les dents 1. Retirez les goupilles fendues, chacune située aux extrémités de l’arbre des dents. Voir la Figure 3. 2. En les glissant, retirez les quatre dents de l’arbre des dents. Pour installer les dents Les 4 unités de dents sont différentes et sont identifiées “A”, “B”, “C” et “D”.
Fonctionnement • Conservez ces directives A Avant de démarrer le moteur Mélange essence / huile à 2 temps MISE EN GARDE AVERTISSEMENT L’usage de carburant inapproprié comme le combustible diesel ou de l’essence contenant plus de 10% d’éthanol ou de méthanol endommagera le moteur de la motobineuse et annulera la garantie. Assurez-vous de ne pas fumer, ni de permettre de fumer près de carburants ou de la motobineuse.
Fonctionnement (Suite) • Conservez ces directives C Démarrage du moteur (suite) Démarrage de moteur noyé 1. Placez la motobineuse sur une surface unie. 2. Déplacez l’interrupteur d’allumage, en position de marche (ON) 3. Déplacez le levier de l’étrangleur en position de “marche / démarrage à chaud“ (run/warm start) (Voir Figure 9) 4. Maintenez une pression complète sur le levier de l’accélérateur en position rapide (Voir Figure 10) 5.
Entretien • Conservez ces directives AVERTISSEMENT Placez l’interrupteur d’allumage en position d’arrêt (OFF) et débranchez la bougie d’allumage avant de procéder à l’entretien, sauf pour les réglages de carburateur. Rebranchez la bougie d’allumage après avoir complété l’entretien. A Avant de démarrer le moteur Pour prévenir l’entrée de poussière et de débris entrent dans le moteur, votre motobineuse est équipée de deux (2) filtres à air en mousse, à l’intérieur du boîtier du filtre à air.
Dépannage • Conservez ces directives PROBLÈME CAUSE(S) POSSIBLE(S) SOLUTION(S) Le moteur ne démarre pas. 1. L’interrupteur d’allumage est en position d’arrêt (OFF). 2. Moteur noyé. 1. Déplacez l’interrupteur d’allumage vers la position de marche (ON). 2. Consultez le démarrage de moteur noyé à la section FONCTIONNEMENT. 3. Remplissez le réservoir avec le mélange approprié de carburant. 4. Remplacez la bougie d’allumage. 5.
Garantie • Conservez ces directives A Garantie limitée pour motobineuse Southland® Spécifiez toujours le numéro de modèle en contactant l’usine. Nous nous réservons le droit de modifier ces spécifications en tout temps sans préavis. La seule garantie applicable est notre garantie régulière écrite. Nous n’offrons aucune autre garantie, expresse ou implicite.
Garantie (Suite) • Conservez ces directives Autres états / territoires É.-U. : Dans d’autres régions des États-Unis votre moteur de votre unité extérieure motorisée doit être conçue, fabriquée et équipée pour répondre aux normes d’émissions de l’Agence de protection de l’environnement des É.-U. (“U.S. EPA”), pour les moteurs hors-route à allumage par étincelle de 19 kilowatts ou moins.
Garantie (Suite) • Conservez ces directives Defects Warranty Coverage METL warrants to the original purchaser and each subsequent purchaser that the small off-road engine (SORE) (1) has been designed, built and equipped so as to conform with all applicable regulations; and (2) is free from defects in materials and workmanship that cause the failure of a warranted part to conform with those regulations as may be applicable to the terms and conditions stated below.
Garantie (Suite) • Conservez ces directives Emission Warranty Parts List The repair or replacement of any warranted part otherwise eligible for warranty coverage may be excluded from such warranty coverage if METL demonstrates that the engine has been abused, neglected, or improperly maintained, and that such abuse, neglect, or improper maintenance was the direct cause of the need for repair or replacement of the part.
Garantie (Suite) • Conservez ces directives A California Evaporative Emission Control Warranty Statement YOUR WARRANTY RIGHTS AND OBLIGATIONS The California Air Resources Board and METL are pleased to explain the evaporative emission control system’s warranty on your model year small off-road engine (SORE). In California, new SOREs must be designed, built and equipped to meet the State’s stringent anti-smog standards.
Garantie (Suite) • Conservez ces directives Couverture de garantie relative aux défauts (a) La période de garantie commence à la date à laquelle le moteur est acheté. (b) Couverture générale de garantie du contrôle des émissions par évaporation.
Manual de operación MOTOAZADA A GASOLINA Cilindrada: 43 cm³, 2 ciclos Contenido: Definiciones de seguridad Información importante sobre seguridad Especificaciones del producto Piezas y características Montaje Operación Mantenimiento Almacenamiento Diagnóstico y resolución de problemas Servicio técnico Garantía No. de modelo SCV43.1 Página 2 3-4 5 5 6-7 8-9 10 10 11 11 12-17 IMPORTANTE: Gracias por comprar esta motoazada Southland®.
Definiciones de seguridad • Guarde todas las instrucciones Información importante sobre seguridad Símbolos de advertencia sobre seguridad: Indica ADVERTENCIA, PELIGRO o CUIDADO. Mantener las manos, los pies y la indumentaria alejados de las azadas rotativas. El contacto con las azadas rotativas puede causar lesiones graves. Leer el manual de operación antes de utilizar esta máquina. El no seguir las directrices podría conducir a lesiones graves.
Información importante sobre seguridad 1. LEER Y ENTENDER TODAS LAS INSTRUCCIONES ANTES DE OPERAR LA MOTOAZADA. Familiarizarse completamente con los controles y el uso apropiado del equipo. Saber cómo parar la unidad y desengranar los controles rápidamente. ADVERTENCIA Leer y seguir todas las advertencias e instrucciones de seguridad. El hacer caso omiso de esta directriz puede conducir a lesiones graves del operador o de circunstantes. 2. Evitar entornos peligrosos a.
Información importante sobre seguridad (Continuación) • Guarde todas las instrucciones Información importante sobre seguridad 19. Jamás operar la motoazada a velocidades altas de transporte sobre superficies duras o resbaladizas. 20. Arrancar el motor cuidadosamente según las instrucciones y con los pies alejados de las azadas. 21. Jamás levantar o cargar una máquina mientras el motor esté en marcha.
Especificaciones del producto • Guarde todas las instrucciones Motor . . . . . . . . . . . . .
Montaje Si se necesita ayuda o hacen falta piezas, LLAMAR GRATUITAMENTE AL: 1-800-737-2112 • Guarde todas las instrucciones Piezas incluidas con la motoazada • Asidero intermedio (1) • Asideros superiores (2) • Tuercas de orejetas y pernos (4 de c/u) • Llave de bujía y varilla (1) • Ataduras para cables (3) • Manual de operación (1) • Envase de aceite para motores de dos tiempos, 3.2 onzas (1) • Llave (1) ADVERTENCIA No operar la motoazada si ésta está dañada o no montada de manera segura o completa.
Montaje (Continuación) • Guarde todas las instrucciones Cómo montar las azadas El pasador Fig. 4a Fig. 3 D C B A El pasador Fig. 4b Fig. 5 Para sacar las azadas 1. Retirar los pasadores de cada extremo del eje de azadas. Véase la Figura 3. 2. Deslizar las cuatro azadas para sacarlas del eje de azadas. Para instalar las azadas Las cuatro azadas están rotuladas «A», «B», «C» y «D». Véase la Figura 4a para determinar la ubicación de la etiqueta. Para una anchura de labrado de 254 mm (10”): 1.
Operación • Guarde todas las instrucciones A Antes de arrancar el motor CUIDADO Mezcla de combustible con aceite para motores de dos tiempos El uso de gasolina incorrecta, tal como combustible diesel o gasolina que contenga más de un 10% de etanol o metanol, dañará el motor de la motoazada y anulará la garantía de ésta. ADVERTENCIA No fumar ni permitir fumar cerca del combustible o de la motoazada. Mezclar y verter el combustible en espacios exteriores DONDE NO HAYAN CHISPAS NI LLAMAS.
Operación (Continuación) • Guarde todas las instrucciones C Arranque del motor (Continued) Cómo arrancar un motor ahogado 1. Colocar la motoazada sobre una superficie plana. 2. Mover el interruptor de encendido a la posición de encendido («ON»). 3. Mover la palanca del estrangulador a la posición «Marcha / Arranque en caliente». (Véase la Figura 7) 4. Mantener el gatillo completamente accionado en la posición FAST («RÁPIDA»). (Véase la Figura 10) 5.
Mantenimiento • Guarde todas las instrucciones ADVERTENCIA Colocar el interruptor en la posición de apagado («OFF») y desconectar la bujía antes de efectuar labores de mantenimiento, excepto por ajustes al carburador. Reconectar el cable de la bujía al completarse el servicio. A Filtro de aire La motoazada está equipada con dos (2) filtros de aire alveolares dentro de la carcasa del filtro de aire para evitar que suciedad y despojos entren al motor.
Diagnóstico y resolución de problemas • Guarde todas las instrucciones PROBLEMA CAUSA/S POSIBLE/S SOLUCIÓN / SOLUCIONES El motor no arranca. 1. Interruptor de encendido en la posición de apagado («OFF»). 2. Motor ahogado. 1. Mover el interruptor de encendido a la posición de encendido («ON»). 2. Véase Cómo arrancar un motor ahogado en la sección OPERACIÓN. 3. Llenar el tanque con la mezcla de combustible correcta. 4. Cambiar la bujía. 5.
Garantía • Guarde todas las instrucciones A Garantía limitada de la MOTOAZADA Southland® Siempre especificar el número del modelo al ponerse en contacto con la fábrica. Nos reservamos el derecho de enmendar estas especificaciones en cualquier momento y sin aviso previo. La única garantía pertinente es nuestra garantía estándar por escrito. No ofrecemos ninguna otra garantía, expresa o implícita.
Garantía (Continuación) • Guarde todas las instrucciones Otros estados o territorios de los Estados Unidos: En otras áreas de los Estados Unidos, se ha de diseñar, construir y equipar este motor para equipo motorizado para espacios exteriores, a fin de que cumpla, en el momento de la venta, las normas de la Agencia de Protección Ambiental de Estados Unidos sobre emisiones contaminantes para motores pequeños de encendido por chispa, para uso no vial, de 19 kilovatios o menos.
Garantía (Continuación) • Guarde todas las instrucciones Cobertura de defectos al amparo de la garantía METL garantiza al comprador original y a cada comprador subsiguiente que el motor pequeño para uso no vial (SORE) (1) ha sido diseñado, construido y equipado para cumplir todo reglamento pertinente; y (2) carece de defectos en materiales y mano de obra que causen que una pieza garantizada no cumpla dichos reglamentos como pudiera ser pertinente a los términos y condiciones estipulados a continuación.
Garantía (Continuación) • Guarde todas las instrucciones Lista de piezas bajo garantía de emisiones contaminantes La reparación o reemplazo de cualquier pieza garantizada, de otro modo elegible para cobertura de garantía se podrá excluir de dicha cobertura de garantía si METL demuestra que se ha hecho uso indebido del motor, se lo ha descuidado o mantenido inadecuadamente, y que dicho uso indebido, descuido o mantenimiento inadecuado fue la causa directa de la necesidad de reparar o reemplazar la pieza.
Garantía (Continuación) • Guarde todas las instrucciones A Declaración de garantía de control de emisiones contaminantes evaporativas del Estado de California SUS DERECHOS Y OBLIGACIONES CONFORME A LA GARANTÍA El California Air Resources Board (Consejo de Recursos Atmosféricos del Estado de California) y MAT Engine Technologies, LLC (METL) se complacen en explicar la garantía sobre el sistema de control de emisiones contaminantes de este motor pequeño para uso no vial (SORE, por sus siglas en inglés).
Garantía (Continuación) • Guarde todas las instrucciones Cobertura de defectos al amparo de la garantía (a) El período de garantía comienza en la fecha en que se compra el motor. (b) Cobertura general de la garantía por emisiones contaminantes evaporativas.