Contents Safety ................................................................................................................ 3 Environment .................................................................................................... 4 1 Getting Started .............................................................................................. 5 1.1 Getting to know your touch phone................................................... 5 1.2 Installing the SIM card, battery, and storage card ......
9.1 Calendar ........................................................................................ 33 9.2 Alarm Clock .................................................................................. 34 9.3 Calculator...................................................................................... 35 10 Play Store* ................................................................................................
Safety Never attempt to disassemble your phone. You alone are responsible for how you use your phone and any consequences of its use. As a general rule, always switch off your phone wherever the use of a phone is prohibited. Use of your phone is subject to safety measures designed to protect users and their environment. Do not use your phone in damp areas (bathroom, swimming pool…). Protect it from liquids and other moisture.
manufacturers of such equipment will be able to give you any advice you may need in this area. Hospitals: Always make sure that your phone is switched off in hospitals when so instructed by warning signs or by medical staff. Road safety: Do not use your phone when driving. In order to give your full attention to driving, stop and park safely before making a call. You must comply with any current legislation.
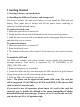
1 Getting Started 1.1 Getting to know your touch phone 1.2 Installing the SIM card, battery, and storage card You need to remove the back cover before you can install the SIM card and battery. Also, make sure to always turn off the power before installing or replacing the SIM card and battery. To remove the back cover 1. Make sure your device is turned off. 2. Firmly hold the device with both hands and the front panel facing down. 3.
• Some legacy SIM cards may not function with your device. You should consult with your service provider for a replacement SIM card. There may be fees for this service. To install a memory card To have additional storage for your images, videos, music, and files, you can purchase a memory card and install it into your device. 1. Make sure that your device is turned off, and then remove the back cover. 2. Locate the memory card slot on the upper part of the exposed right panel. 3.
be used to charge the device. Connect the USB connector of the AC adapter to the sync connector on your device, and then plug in the AC adapter to an electrical outlet to start charging the battery. As the battery is being charged while the device is on, a charging icon appears in the title bar of the Home screen. After the battery has been fully charged, a full battery icon appears in the title bar of the Home screen.
touch activation, press POWER. You can increase the security of your phone by setting ‘Screen lock’ pattern. Once set, in order to unlock your screen, you’ll have to draw the correct unlock pattern. You can set your screen unlock pattern as follows: 1. On the Home screen, touch and select Settings. 2. Select Security and then scroll down to ‘Screen lock’ pattern. 3. Set or change your unlock pattern by selecting ‘Screen lock’ pattern, as applicable. 4. Follow the prompts to define your pattern.
4. To remove a shortcut or widget from your Home screen, touch & hold the item to enter ‘Remove mode’. Drag the item to ‘Remove’ button and release. You’ll know when your item is in ‘Remove’ because the item and the tab will turn gray. 5. Move objects on the Home screen • To move an icon or other item on the Home screen, you must first touch & hold it to enter ‘Remove mode’. The object will magnify when it’s ready to be moved.
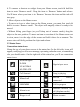
Bluetooth is on Battery is low Connected the PC Battery is very low! Connected the Battery is charging earphone Read your notifications When you see a notification in the status bar, touch the bar and slide your finger down the screen to open the list of notifications displayed in the sliding window. Ongoing notifications report activities such as call forwarding ON, current call status, song playing. Notifications report the arrival of new messages, calendar events, and alarms.
2 Using phone features 2.1 Turning the phone function on and off To enable or disable Airplane Mode In many countries, you are required by law to turn off the phone while on board an aircraft. Another way to turn off the phone function is to switch your device to Airplane Mode. When you enable Airplane Mode, all wireless radios on your device are turned off, including the phone function, Bluetooth, and WLAN. 1. Touch > Settings > More > Airplane mode. 2. Touch ‘Airplane mode’ to enable or disable.
2. To reject a call, slide ‘REJECT’ button (Red icon) button leftward. 2.4 In-call options While on a call, reveal the in-call options: Speaker, Mute, Hold, End. Note that if Bluetooth services are on and you are connected to a hands-free device, the more menu indicator will show Bluetooth on. 1. Speaker: To use the speaker, select ‘Speaker’ so it shows a green bar. To turn it off, select it again so the bar is unfilled. The status bar will display this icon when the speaker is on. 2.
2. Use ‘Call history’ tab to check who the caller was, or view all your dialed numbers, and received calls. To open ‘Call history’ tab, touch ‘Call history’ button in the phone screen to enter the call history list. 3. Scroll to select the contact or number you want to dial, touch ‘Call back’ button. 4. Tap and hold the selected contact you want to call, and then you can make to do the following options of call, edit number before call, send text message or remove from call log phone on the shortcut menu.
Callular network • Select data roaming capability. • Select a wireless operator network - Scan for all available networks, or select a network automatically. • Add or edit network Access Point Names (APNs) - Do not change this setting unless advised to do so by your wireless operator! 3.2 Device Display Brightness: Select to open the brightness control, and then slide your finger along the brightness bar to set the level. In sunlight, increase the level.
uninstall it from this screen. Select a specific application to: 1. Clear your user data (if you have any associated with a particular application). 2. Disassociate the application with any actions. 3. Uninstall - If you’ve downloaded an application from Android Market, you will be able to uninstall it from this screen by selecting Uninstall. Storage & USB View and manage the data storage on your phone. 3.3 Personal Location Select a source for determining your location.
network values. Time format: Select from 12 or 24 hour formats. Date format: Select from a variety of formats. Developer options If you are an application developer, you may be interested in these settings: USB debugging: If you want be able to communicate with your phone directly via USB, select ‘USB debugging’ check box. Stay awake: To prevent your phone from sleeping while charging (via power adapter or USB), select ‘Stay awake’ check box.
allow you to control data sync. Sync by application To control synchronization Contacts, you can do the following: 1. On the Home screen, then touch and select Settings. 2. Select Accounts. When any of the applications are synchronizing, you will see the “sync” icon . You will also see the last time your data was synchronized. 3. By default, the personal information in Contacts will sync whenever you make a change or receive a new message.
this device. 3. Type the name for your device in the dialog box, and then select ‘OK’. 4. Your new device name appears on the Bluetooth settings screen. Pair & connect with Bluetooth devices Before your phone can communicate with a Bluetooth headset or hands-free car kit, the devices must “pair”, then “connect”: 1. Make sure you have turned Bluetooth on. 2. Your phone starts scanning for Bluetooth devices within range. As they are found, the devices appear in the list of Bluetooth devices. 3.
5 Contacts The contacts on your phone are synced with your account contacts stored on the Web. To view the contacts on your phone, touch and select Contacts. Contacts belonging to a specific group (you can choose which group) are listed in the Contacts tab. Only those contacts you star as “favorites” are listed in the Favorites tab. Browse through your contacts by sliding your fingertip up and down on the screen.
will be assigned. 5. To save your contact, press BACK, or touch ‘Done’ icon. Edit contact details You can always make changes to the information you’ve stored for a contact: 1 From Contacts, touch the contact you want to open the Contact details screen. 2. Select ‘Edit’ icon. The Edit contact screen appears. 3. Make your edits, then press ‘Done’ icon. Communicate with a contact From Contacts you can quickly call or text a contact’s default number, as displayed below their name on the screen.
SIM contacts importer If you have stored names and phone numbers on your SIM card, you can add these to the Contacts stored on your phone by selecting this settings option. From the contact list, press MENU to select ‘Import/export’, you can select to import from SIM card or memory card, once the list of names and numbers appears you can: Import only certain names/numbers in the list - Select the name/number you want to import, then repeat for others as you wish.
If you have selected to auto-retrieve your multimedia messages, then both the message header and body will download. If you are downloading only the headers, then you must first select the Download button to retrieve the message body. If you are concerned about the size of your data downloads, you can check the message size before you download. Once the message has downloaded, select ‘Play’ button to view the message. From a message read view, you can do the following: 1.
to a multimedia message. 3. To add a subject, press MENU and select ‘Add subject’. If you add a subject, the message will convert to a multimedia message. 4. To add an attachment, touch ‘+’ icon. Adding an attachment will always convert the message to a multimedia message. Select from audio or picture files. You can select to take a new picture if you want, or record an audio file. Any recordings you make will be stored automatically in Music application in a play list named “My recordings”.
If you have a popular email account, the application will set everything up for you! Before you go to your Inbox, you can name the account (if you don’t, your email address will be used). You are also asked to type your name as you want it to display on outgoing messages. You must complete this field before you can select ‘Next’ and go to your Inbox. For less popular accounts, follow the prompts to type the email server, protocol, and other account information yourself.
‘Folders’ to enter the Trash. Note that the message is only deleted from your phone, not from the account server. 7. Remove an email account: You can always remove a POP3 or IMAP email account from your phone. Go to your Inbox, press MENU and select ‘Accounts’. Your Accounts screen opens. Touch & hold the account you want to remove to open the context menu. Select ‘Remove account’. You will be asked to confirm before the account is removed.
7 Internet 7.1 Ways of Connecting to the Internet Your device’s networking capabilities allow you to access the Internet or your corporate network through WLAN, GPRS, WCDMA or FDD_LTE (if SIM card supported). You can also add and set up a VPN or proxy connection. WLAN WLAN provides wireless Internet access over distances of up to 100 meters (300 feet). To use WLAN on your device, you need access to a wireless access point or “hotspot”.
Open a new window: From a Web page, press MENU and select ‘Windows’. The Current windows screen opens, showing the Web page you started from, plus a “new window”. Select ‘New window’. Your home page opens in a new window. To return to one of the other windows, press MENU and select ‘Windows’. Select the page you want to view. Manage bookmarks You can store as many bookmarks as you want on your phone. Press MENU and select ‘Bookmarks’. The Bookmarks screen opens. 1. Bookmark any page: Select ‘Add’.
following: 1. Before you can download Web applications, you must explicitly “allow” downloading from the Home > Settings screen: On the Home screen, then press and select Settings. Select ‘Security’, then select ‘Unknown sources’ check box. 2. All items downloaded form the Web are stored on your memory card, so be sure you have a card installed in your phone before you download from the Browser. 3. The Browser will only allow you to download items that are supported by an application installed on the phone.
5. When finished, close the USB drive window and eject the drive as required by your computer's operating system. Take a picture Captured pictures are saved to the “DCIM” folder on your memory card or the phone. Before you take a picture, wipe the sensor window (on the back cover) to remove any small amounts of oil. 1. To open the Camera, on the Home screen, touch and select Camera icon. 2. The Camera opens in capture mode. Frame your picture within the screen and hold the phone steady.
2. Share a picture: In full-screen view, press MENU and select Share. Select to share your picture via Messaging (MMS), or another application (if you have another application installed on your phone that supports sharing). 3. Set as wallpaper: In full-screen view, press MENU and select Set picture as. From the menu that opens select Wallpaper. Touch & hold an edge of the cropper to reveal the sizing arrows, then drag the edge in or out to size.
Your music is organized into four categories: Artists, Albums, Songs, and Playlists. Select a category to view the lists within each. Once in a category, keep selecting until you reach the music you want to play. For example, if you select the Artists category, you will see a list of artists in A-Z order. If you select an artist, the list opens to display that artist’s albums. Select an album, and the album’s song list displays.
1. Shuffle songs: Shuffle plays songs in random order. Touch to toggle shuffle on and off. When the con is grey, shuffle is off. 2. Repeat mode: Touch to step through repeat modes: repeat all songs, repeat current song, don’t repeat (grey icon). 3. Go to any point in song: Slide fingertip in progress bar to desired point in a song. 4. Playback control: from left to right icons: Go to beginning song, Pause/ resume play and Go to next of song.
call ringtone. 4. Now, when you go to Home > Settings > Audio profiles, and select a phone ringtone, your song will be listed as an option. Delete music from memory card All the music you play on your phone is stored on the inserted memory card. From your phone, you can delete music stored on the card: 1. From the Library screen, select the Artists, Albums, or Songs category. 2. Go to the screen that shows the artist, album, or song that you want to delete. 3. Touch & hold the item to open the context menu.
• Description can be as long as you like. • Select a calendar if you display more than one. • Set a default reminder time. • Set online presence: available or busy. • Select calendar privacy from Default (as defined when calendar was created), Private, or Public. When finished, select ‘Done’. Pressing BACK also saves the event. Tip: Create an event quickly in the Day or Week view by selecting an empty time slot. A new Event details screen appears. The ‘From’ field contains the selected time slot. 9.
play a maximum of five minutes. Vibrate: Select this check box to have your phone vibrate when it goes off. Once your alarm goes off, you will receive an alert with the options to Snooze (for 10 minutes) or Dismiss. Add more alarms To add more than three alarms, from the main Alarm Clock screen, press MENU and select ‘Add alarm’. Change clock display You can change the appearance of the clock displayed on the main Alarm Clock screen: 1. Go to the main Alarm Clock screen. 2.
to enter numbers and perform basic addition, subtraction, multiplication, and division. Use the Advanced panel to insert advanced operators or delimiters, such as sine, cosine, tangent, square root, parentheses, etc. 10 Play Store* This function is to the actual configuration of the mobile phone, please take to the actual mobile phone. Android Market provides you with direct access to software developers throughout the world.
appears. Important! If an application you are downloading requires either access to any of your data or control of any functions on your phone, before you proceed, you’ll see a screen that tells you what the application can access so you can give your permission. Be sure to read this carefully! Be especially cautious if an application has access to many functions or a significant amount of your data.
2. Select the item you want to open. The Item details screen appears. 3. Select ‘Open’ button at the bottom of the screen. Read security permissions for this item Items you download and install on your phone typically have access to functionality. You can view what an item has access to on your phone: 1. From the Android Market Home screen, press MENU and select ‘Downloads’. 2. Select the item you want to read about. The Item details screen appears. 3. Press MENU and select ‘Security’. 4.
1. From the Android Market Home screen, press MENU and select ‘Downloads’. Select the item to open its details screen. 2. Press MENU and select ‘Clear my review’. 3. Your rating and comments are removed. FCC Statement This equipment has been tested and found to comply with the limits for a Class B digital device, pursuant to part 15 of the FCC Rules. These limits are designed to provide reasonable protection against harmful interference in a residential installation.
RF Exposure Information The device has been evaluated to meet general RF exposure requirement. The device can be used in portable exposure condition without restriction. Specific Absorption Rate (SAR) information: This smart phone meets the government's requirements for exposure to radio waves. The guidelines are based on standards that were developed by independent scientific organizations through periodic and thorough evaluation of scientific studies.