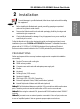
Introduction Hardware Installation ESS ™Audio Driver Installation SiS VGA DriverThe SOYO CD Quick BIOS Installation Setup SY-5SSM SY-5SSM/5 V1.
SPORTON INTERNATIONAL INC. Declaration of Conformity According to 47 CFR, Part 2 and 15 of the FCC Rules Declaration No.: D920207 1999/3/6 The following designated product EQUIPMENT: Main Board MODEL NO.: SY-5SSM which is the Class B digital device complies with 47 CFR Parts 2 and 15 of the FCC rules.
SOYO ™ SY-5SSM & SY-5SSM/5 Motherboard Pentium ® Class CPU (66&100MHz Host Bus) supported SiS530 AGP/PCI Motherboard Micro-ATX Form Factor Copyright © 1999 bySoyo Computer Inc. Trademarks: Soyo is a registered trademark of Soyo Computer Inc. All trademarks are the property of their owners. Product Rights: Product and corporate names mentioned in this publication are used for identification purposes only and may be registered trademarks or copyrights of their respective companies.
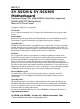
1 Introduction Congratulations on your purchase of the SY-5SSM or SY-5SSM/5 Motherboard. This Quick Start Guide describes the steps for installing and setting up your new Motherboard. This guide is designed for all users to provide the basic steps of Motherboard setting and operation. For further information, please refer to SY-5SSM & SY-5SSM/5 Motherboard User's Guide and Technical Reference online manual included on the CD-ROM packed with your Motherboard.
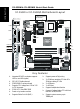
Introduction SY-5SSM & SY-5SSM/5 Quick Start Guide SY-5SSM or SY-5SSM/5 Motherboard Layout for model 5SSM only (1 MB Cache) featuring two P.B. SRAM. PS/2 KB PS/2 Mouse Connector Connector J1 2 4 6 8 10 JP30 USB 2 Socket7 USB 1 P.B. SRAM 64K X 64 ATX Power 13 5 7 9 246 SW1 13 5 IDE2 IDE1 PRT COM2 COM 1 P.B.
SY-5SSM & SY-5SSM/5 Quick Start Guide Installation To avoid damage to your Motherboard, follow these simple rules while handling this equipment: l Before handling the Motherboard, ground yourself by grasping an unpainted portion of the system's metal chassis. l Remove the Motherboard from its anti-static packaging. Hold it by the edges and avoid touching its components. l Check the Motherboard for damage. If any chip appears loose, press carefully to seat it firmly in its socket.
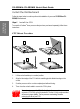
SY-5SSM & SY-5SSM/5 Quick Start Guide Install the Motherboard Hardware Installation Follow the steps below in order to perform the installation of your new SY-5SSM or SY5SSM/5 Motherboard. Step 1. Install the CPU To mount the Pentium® class processor that you have purchased separately, follow these instructions. CPU Mount Procedure 1 2 3 4 1. Lift the socket handle up to a vertical position. 2. Align the blunt edge of the CPU with the matching pinhole distinctive edge on the socket. 3.
SY-5SSM & SY-5SSM/5 Quick Start Guide Step 2. Set the CPU Voltage ( JP30) For CPUs that come with different voltages, please verify the correct voltage settings with your dealer before installation. Use the following table to set JP30 to the proper "voltage value", according to the specifications marked on your CPU: AMD K5 PR100 AMD K5 PR133 AMD K5 PR166 Voltage Voltage Setting: JP30 1-2 3-4 5-6 7-8 9-10 3.
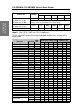
SY-5SSM & SY-5SSM/5 Quick Start Guide Hardware Installation Processor Voltage IDT X86 CPU C6/2-225 IDT X86 CPU 2-266 IDT X86 CPU 2-300 IDT X86 CPU C6/2-200 IDT X86 CPU 2-233 Rise mP6 PR266 Step 3. 3.52 V 1-2 open Voltage Setting: JP30 3-4 5-6 7-8 short short short 9-10 short The IDT X86 CPU C6/2 comes in several versions with different voltages. Please ask your dealer for the correct voltage. 3.3 V open short short open short 2.
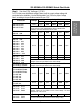
Processor Cyrix M II-333 Cyrix M II-350 Cyrix M II-366 Cyrix M II-400 Cyrix M II-433 Intel P54C P100 Intel P54C P133 Intel P54C P166 Intel P54C P200 Intel P55C P200 Intel P55C P233 IDT X86 CPU C6/2-200 IDT X86 CPU C6/2-225 IDT X86 CPU 2-233 IDT X86 CPU 2-266 IDT X86 CPU 2-300 Rise mP6 PR266 Bus Clock Multiplier 66 MHz 75 MHz 83MHz 90 MHz 100MHz 95 MHz 90 MHz 100MHz 66 MHz 66 MHz 66 MHz 66 MHz 66 MHz 66 MHz 66 MHz 75 MHz 66 MHz 100 MHz 100 MHz 66 MHz 100 MHz 4.0 x 3.5 x 3.0 x 3.0 x 2.5 x 3.0 x 3.5 x 3.
SY-5SSM & SY-5SSM/5 Quick Start Guide Step 4. Make Connections to the Motherboard Hardware Installation This section tells how to connect internal peripherals and power supply to the Motherboard. Internal peripherals include IDE devices (HDD, CD-ROM), Floppy Disk Drive, Front Panel Devices (ACPI LED, Internal Speaker, Reset Button, IDE LED, and KeyLock Switch.), Wake-On-LAN card, and other devices.
SY-5SSM & SY-5SSM/5 Quick Start Guide Step 5. Select the CPU Burst Mode (J1) Interleave Linear ® CPU Burst Mode J1 Setting Intel P54C/P55C Cyrix ™6x86/L/MX/M¢ º AMD ™K5/K6/K6-2/K6-III IDT X86 CPU, Rise mP6 When using Intel When using 1 1 or AMD CPUs. Cyrix type of 2 2 CPU. If you are using a Cyrix ™ 6x86/L/MX/M II series CPU, set the burst mode to Linear by shorting jumper J1, and follow the following steps to select the correct Linear burst mode in BIOS: 1.
SY-5SSM & SY-5SSM/5 Quick Start Guide Step 7. Enable/Disable the Onboard Sound (JP9) The onboard audio features of your Motherboard are controlled by jumpers JP9 Choose the available sound options among the following table: Hardware Installation Sound Settings JP9 Onboard Sound: Enable short Onboard Sound: Disable open Step 8. Clear CMOS Data (JP5) Clear the CMOS memory by momentarily shorting pin 2-3 on jumper JP5, and then by shorting pin 1-2 to retain new settings.
SY-5SSM & SY-5SSM/5 Quick Start Guide 3 Quick BIOS Setup After the hardware installation is complete, turn the power switch on, then press the key during the system diagnostic checks to enter the Award BIOS Setup program. The CMOS SETUP UTILITY will display on screen. Then, follow these steps to complete the quick BIOS setup. Select [LOAD SETUP DEFAULT] Select the “LOAD SETUP DEFAULT”menu and type “Y”at the prompt to load the BIOS optimal setup. Step 2.
SY-5SSM & SY-5SSM/5 Quick Start Guide The SOYO CD 4 The SOYO-CD will NOT autorun if you use it on an Operating System other than Windows 9x or NT. Your SY-SY-5SSM & SY-5SSM/5 Super 7 ™ Motherboard comes with a CD-ROM labeled "SOYO CD." The SOYO CD contains the user's manual file for your new Motherboard, the drivers software available for installation, and a database in HTML format with information on SOYO Motherboards and other products. Step 1.
SY-5SSM & SY-5SSM/5 Quick Start Guide Please note that if the Start Up program was unable to determine which SOYO Motherboard you own, the manual selection menu will pop up, as shown below. Then select the user's manual file that corresponds to your Motherboard model name and click OK. SOYO CD Manuals Please select your manual in the box below and click OK. 686 boards: 586 boards: 5SSM Back (Manual Selection Menu) The user's manual files included on the SOYO CD are in PDF (Postscript Document) format.
SY-5SSM & SY-5SSM/5 Quick Start Guide Driver Installation Please select the driver you want to install and click OK, You will have to restart your system after installation. Only the drivers that are relevant to your board are displayed initially.
SY-5SSM & SY-5SSM/5 Quick Start Guide Note: Once you have selected a driver, the system will automatically exit the SOYO CD to begin the driver installation program. When the installation is complete, most drivers require to restart your system before they can become active. If you want to see all the drivers available on the SOYO –CD, click the Display all drivers on the SOYO CD button. Do NOT install drivers that are not suitable for your board, otherwise your system may crash. Step 4.
SY-5SSM & SY-5SSM/5 Quick Start Guide 5 SiS VGA Driver Installation Introduction Your SY-5SSM or SY-5SSM/5 Motherboard is equipped with the SiS 530 chipset that offers extended graphics and text modes capabilities. To make use the advanced features of the SiS 530 chipset, you will need to install software drivers and application programs included on the CD-ROM. This section describes how to perform the SiS VGA driver installation for Microsoft Windows NT environment.
SY-5SSM & SY-5SSM/5 Quick Start Guide 9. 10. 11. 12. The [Select Device] dialog box will appear, showing the driver. Click on [OK] and the driver will be installed. Select [Close] or [Apply] button from display properties sheet. A message will appear stating you must restart the Windows 95 system, select [Yes] to restart. After restarting, Windows 95 will run on 640x480x256 color, 75NI. Selecting Resolution, Color Depth and Refresh Rate 5. 6. 7. 8.
SY-5SSM & SY-5SSM/5 Quick Start Guide 6 ESS ™ Audio Driver Installation Windows® 95/98 Sound-Driver Installation This section describes how to perform the ESS ™ audio driver installation in Windows® 95/98 environment. The Windows NT drivers can be installed automatically through the SOYO CD. Refer to page 16. After first installing Windows® 95/98, follow these steps: From the desktop, click [Start] menu and select [Control Panel] from [Settings] 1. group. 2. Select the [System] icon. 3.
SY-5SSM & SY-5SSM/5 Quick Start Guide How to contact us: n If you are interested in our products, please contact the SOYO sales department in the region you live. n If you require Technical Assistance, please contact our Technical Support in the region you live. SOYO prefers Email as communication medium, remember to always add to the email the country that you live in. SOYO Taiwan No. 21 Wu-Kung 5 Rd.
SY-5SSM & SY-5SSM/5 Quick Start Guide E-Mail: support@soyo.co.uk Sales: tel: 852-27109810 fax: 852-27109078 E-mail: soyo@hkstar.com SOYO Deutschland GmbH August-Wilhelm-Kuhnholz-Str. 15 D-26135 Oldenburg Technical Support: tel: 852-27109810 fax: 852-27109078 E-mail: soyo@hkstar.com Region Covered: Germany, Austria and Switzerland. (Zustandig fur Deutschland, Osterreich, Schweiz) Web Site: www.saat.de, www.soyosaat.com, www.soyo-saat.
Edition: November 1999 Version 2.4 SY-5SSM & SY-5SSM/5 V1.