Introduction Quick BIOS Setup Hardware Installation SY-6VBA 133 Motherboard The SOYO CD Quick Start Guide Tested To Comply With FCC Standards FOR HOME OR OFFICE USE C FC 100% POST CONSUMER RECYCLED PAPER
SOYO ™ SY-6VBA 133 Motherboard Pentium ® III, Pentium ® II & CeleronTM processors Via Apollo Pro133 AGP/PCI Motherboard 66/100/133 MHz Front Side Bus supported ATX Form Factor Copyright © 1999 bySoyo Computer Inc. Trademarks: Soyo is a registered trademark of Soyo Computer Inc. All trademarks are the property of their owners.
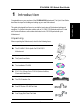
SY-6VBA 133 Quick Start Guide 1 Introduction This guide is designed for all users to provide the basic steps of Motherboard setting and operation. For further information, please refer to SY-6VBA 133 Motherboard User's Guide and Technical Reference online manual included on the CD-ROM packed with your Motherboard.
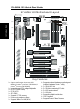
SY-6VBA 133 Quick Start Guide SY-6VBA 133 Motherboard Layout PS/2 KB Connector PS/2 Mouse Connector JP10 JP8 1 USB 1 USB 2 DIMM 1 DIMM 2 DIMM 3 DIMM 4 1 Slot 1 CPUFAN ® Introduction LED1 3 PRT FDC COM 1 COM 2 Via ATX Power 11 ® 82C693A JP9 1 AGP Slot PCI Slot #1 3V Lithium Battery ITE 8671 I/O Chipset 1 IR1 5 PCI Slot #2 JP2 JP5 1 PCI Slot #3 Via PCI Slot #4 ® 82C596B Speaker PCI Slot #5 JP7 + ISA Slot #1 828AC ISA Slot #2 Hardware Monitoring Keylock Power LED 1
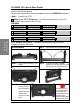
SY-6VBA 133 Quick Start Guide 2 Installation l Before handling the Motherboard, ground yourself by grasping an unpainted portion of the system's metal chassis. l Remove the Motherboard from its anti-static packaging. Hold it by the edges and avoid touching its components. l Check the Motherboard for damage. If any chip appears loose, press carefully to seat it firmly in its socket.
SY-6VBA 133 Quick Start Guide Install the Motherboard Follow the steps below in order to perform the installation of your new SY-6VBA 133 Motherboard. Step 1. Install the CPU Mark your CPU Frequency: Record the working frequency of your CPU that should be clearly marked on the CPU cover. FSB 66MHz 266MHz (66 x 4.0) 300MHz (66 x 4.5) 333MHz (66 x 5.0) 366MHz (66 x 5.5) 400MHz (66 x 6.0) 433MHz (66 x 6.5) 450MHz (100 x 4.5) 500MHz (100 x 5.0) 550MHz (100 x 5.5) 600MHz (100 x 6.0) 533MHz (133 x 4.
SY-6VBA 133 Quick Start Guide Note: Installing a heat sink and cooling fan on top of your CPU is necessary for proper heat dissipation. Failing to install these items may result in overheating and possible burn-out of your CPU. Make Connections to the Motherboard Step 2. This section tells how to connect internal peripherals and power supply to the Motherboard.
SY-6VBA 133 Quick Start Guide Step 3. Configure Memory Your board comes with four DIMM sockets, providing support for up to 1.5GB of main memory using unbuffered and registered DIMM modules from 8MB to 256/512MB. On this motherboard, DRAM speed can be set independent from the CPU front side bus speed. Depending on the DRAM clock speed setting in the BIOS setup (Chapter 3), appropriate memory modules must be used.
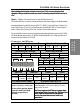
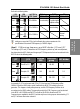
SY-6VBA 133 Quick Start Guide Refer to the following table: JP9 133/100# Short JP8 100/66# Short 1 2 Short Normal setting *Possible higher multiplier setting FSB = 66MHz Open Normal setting FSB = 100MHz 1 2 Open 1 2 PII,PIII PIII 100MHz FSB 133MHz FSB 1 2 1 2 Open PII, Celeron 66MHz FSB tell CPU its FSB Speed Normal setting FSB = 133MHz 1 2 settings on some Intel CPUs, but it will make the system operate out of its specifications if the actual FSB frequency is 100MHz higher.
SY-6VBA 133 Quick Start Guide Step 6. Set the CPU Frequency You do not need to set any jumper for the CPU frequency. Instead, CPU settings are changed through the BIOS [SOYO COMBO SETUP]. Please refer to Chapter 3 - Quick BIOS Setup for details on how to set the Slot 1 processor frequency. Step 7. External Suspend Button (JP1) Some cases come with a suspend button, insert the plug into JP1. In addition to this button, the system can also enter the suspend mode through your OS.
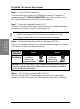
SY-6VBA 133 Quick Start Guide Step 10. Clear CMOS Data (JP5) Clear the CMOS memory by momentarily shorting pin 2-3 on jumper JP5 for at least 5 seconds, and then by shorting pin 1-2 to retain new settings. This jumper can be easily identified by its white colored cap. CMOS Clearing JP5 Setting Clear CMOS Data Short pin 2-3 for at least 5 seconds to clear the CMOS. Retain CMOS Data Short pin 1-2 to retain the new settings.
SY-6VBA 133 Quick Start Guide 3 Quick BIOS Setup This Motherboard does not use any hardware jumpers to set the CPU frequency. Instead, CPU settings are software configurable with the BIOS [SOYO COMBO SETUP]. The [SOYO COMBO SETUP] menu combines the main parameters that you need to configure, all in one menu, for a quick setup in BIOS. After the hardware installation is complete, turn the power switch on, then press the key during the system diagnostic checks to enter the Award BIOS Setup program.
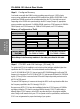
SY-6VBA 133 Quick Start Guide If you set this field to [Manual], you are then required to fill in the next two consecutive fields: (1) the CPU Host/PCI Clock, and (2) the CPU Ratio. (1) CPU Host/PCI Clock CPU Host / PCI Clock o66/33 o75/37 o78/39 o81/40 o83/41 o90/30 o95/31 o115/38 o124/41 o140/35 Under this item you find the frequencies your PCI slots run at.
SY-6VBA 133 Quick Start Guide (4) AGP Clock The AGP clock is derived from the CPU FSB frequency. It is divided by 1.0, 1.5 or 2.0 depending on the setting of JP2 and JP7: Please refer to page 9 for the JP2 and JP7 settings. (5) Vcore Voltage Adjust The CPU notifies the board of what core voltage it requires by its VID outputs. The on-board voltage regulator uses the VID code to set the core voltage. If the Vcore Voltage Adjust is set to normal, the Vcore will be exactly what the VID code specifies.
SY-6VBA 133 Quick Start Guide The SOYO CD 4 The SOYO-CD will NOT autorun if you use it on an Operating System other than Windows 9x or NT. Your SY-6VBA 133 Motherboard comes with a CD-ROM labeled "SOYO CD." The SOYO CD contains the user's manual file for your new Motherboard, the drivers software available for installation, and a database in HTML format with information on SOYO Motherboards and other products. Step 1.
SY-6VBA 133 Quick Start Guide Please note that if the Start Up program was unable to determine which SOYO Motherboard you own, the manual selection menu will pop up, as shown below. Then select the user's manual file that corresponds to your Motherboard model name and click OK. SOYO CD Manuals Please select your manual in the box below and click OK.
SY-6VBA 133 Quick Start Guide After installation of windows, you will need to install the VIA drivers. Follow the instructions below. Ø Click the Install drivers button to display the list of drivers that can be installed on your Motherboard. The start-up program displays the drivers available for the 6VBA 133. Driver Installation Please select the driver you want to install and click OK, Yu will have to restart your system after installation.
SY-6VBA 133 Quick Start Guide This driver will make the necessary changes to the Windows registry, in order to make sure that Windows has no problems recognizing your VIA chipset. Ø IRQ remapping utility (This driver is installed automatically) This utility will remap the IRQ lines to make sure that everything functions properly under Windows. Winbond hardware doctor for Windows 9x Your motherboard comes with a hardware monitoring IC.
SY-6VBA 133 Quick Start Guide The SOYO CD Note: If no HTML browser is installed on your system, the Start Up program will prompt you on whether or not you would like to install the Internet Explorer* browser. Click YES to install the HTML browser. After the installation is complete, please restart your system. Then re-run the SOYO CD and you will be able to browse the SOYO HTML database.
SY-6VBA 133 Quick Start Guide How to contact us: n If you are interested in our products, please contact the SOYO sales department in the region you live. n If you require Technical Assistance, please contact our Technical Support in the region you live. SOYO prefers Email as communication medium, remember to always add to the email the country that you live in. SOYO Taiwan No. 21 Wu-Kung 5 Rd.
SY-6VBA 133 Quick Start Guide E-Mail: support@soyo.co.uk Sales: tel: 852-27109810 fax: 852-27109078 E-mail: soyo@hkstar.com SOYO Deutschland GmbH August-Wilhelm-Kuhnholz-Str. 15 D-26135 Oldenburg Technical Support: tel: 852-27109810 fax: 852-27109078 E-mail: soyo@hkstar.com Region Covered: Germany, Austria and Switzerland. (Zustandig fur Deutschland, Osterreich, Schweiz) Web Site: www.saat.de, www.soyosaat.com, www.soyo-saat.de Vertrieb Mainboards, Notebooks und SoyoCom Produkte: E-Mail: sales@soyo.
Edition: September 1999 Version 1.