Introduction The SOYO CD Quick BIOS Setup Hardware Installation SY-6IZM/3 Motherboard Quick Start Guide Tested To Comply With FCC Standards FOR HOME OR OFFICE USE C FC 100% POST CONSUMER RECYCLED PAPER
SOYO ™ SY-6IZM/3 Motherboard Pentium ® III, Pentium ® II & CeleronTM processors 82440 ZX AGP/PCI Motherboard 3D Audio & AGP built-in 66 & 100 MHz Front Side Bus supported Micro-ATX Form Factor Copyright © 1998 by Soyo Computer Inc. Trademarks: Soyo is a registered trademark of Soyo Computer Inc. All trademarks are the property of their owners.
1 Introduction Congratulations on your purchase of the SY-6IZM/3 Motherboard. This Quick Start Guide describes the steps for installing and setting up your new Motherboard. This guide is designed for all users to provide the basic steps of Motherboard setting and operation. For further information, please refer to SY-6IZM/3 Motherboard User's Guide and Technical Reference online manual included on the CD-ROM packed with your Motherboard.
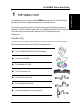
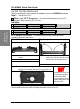
SY-6IZM/3 Quick Start Guide PS/2 KB PS/2 Mouse Connector Connector CPUFAN JP1 3 USB 1 1 FDC 1 USB 2 Slot 1 PRT COM 1 Intel 82443 ZX COM2 ATX Power JP3 3 1 1 IDE 2 IDE 1 VGA JP44 ATI WOL Header Game Port 3 Winbond LINE-OUT RAGE Pro 1 W83977EF -AW 1 IR1 JP7 5 DIMM 3 1 DIMM 1 MIC JACK DIMM 2 LINE-IN 1 3V Lithium Battery JP5 AC97 Codec J4 J5 1 4 PCI Slot #1 CHAFAN 1 Intel PCI Slot #2 YAMAHA 3 CMOS Clear Jumper 1 _ 82371EB Speaker YMF740-V + PCI Slot #3 Winbo
SY-6IZM/3 Quick Start Guide 2 Installation l Before handling the Motherboard, ground yourself by grasping an unpainted portion of the system's metal chassis. l Remove the Motherboard from its anti-static packaging. Hold it by the edges and avoid touching its components. l Check the Motherboard for damage. If any chip appears loose, press carefully to seat it firmly in its socket.
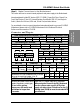
SY-6IZM/3 Quick Start Guide Install the Motherboard Follow the steps below in order to perform the installation of your new SY-6IZM/3 Motherboard. Step 1. Install the CPU Mark your CPU Frequency: Record the working frequency of your CPU that should be clearly marked on the CPU cover. FSB 66MHz 266MHz (66 x 4.0) 300MHz (66 x 4.5) 333MHz (66 x 5.0) 366MHz (66 x 5.5) 400MHz (66 x 6.0) 433MHz (66 x 6.5) 450MHz (100 x 4.5) 500MHz (100 x 5.0) 550MHz (100 x 5.5) 600MHz (100 x 6.
SY-6IZM/3 Quick Start Guide Make Connections to the Motherboard This section tells how to connect internal peripherals and power supply to the Motherboard. Step 2. Internal peripherals include IDE devices (HDD, CD-ROM), Floppy Disk Drive, Chassis Fan, Front Panel Devices (Turbo LED, Internal Speaker, Reset Button, IDE LED, and KeyLock Switch.), Wake-On-LAN card, VGA card, Sound Card, and other devices.
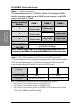
SY-6IZM/3 Quick Start Guide Step 3. Configure Memory Hardware Installation This Motherboard features 3 x DIMM for 168-pin 3.3V unbuffered DIMM modules, providing support for up to 256MB of main memory using DIMM modules from 8MB to 128MB.
SY-6IZM/3 Quick Start Guide Set the CPU Frequency You do not need to set any jumper for the CPU frequency. Instead, CPU settings are changed through the BIOS [SOYO COMBO SETUP]. Please refer to Chapter 3 - Quick BIOS Setup for details on how to set the Slot 1 processor frequency. Step 5. Enable/Disable Power-On by PS/2 Keyboard (JP1) You can choose to enable the Power-On by PS/2 Keyboard function by shorting pin 2-3 on jumper JP1, otherwise, short pin 1-2 to disable this function.
SY-6IZM/3 Quick Start Guide Enable/Disable Onboard VGA(JP7) The onboard VGA features of your Motherboard are controlled by jumper JP7.You can choose to enable or disable the available VGA function by setting JP7 accordingly. Step 9. l Leave JP7 open to enable the onboard VGA function. Then, you can plug your VGA device monitor, after the Motherboard is installed. (You do not need to install any VGA card.) l To disable the onboard VGA options short pin JP7.
SY-6IZM/3 Quick Start Guide Note on Over-clocking Capability 1. Turn off system power (If you use a ATX power supply, sometimes you have to press the power button for more then 4 seconds to shut down the system) 2. Set the JP3 to pin 2-3 short if you use a FSB 66MHz CPU 3. Press and hold down the key while turning on the system power. Keep holding down the key until you see the message of the CPU type and frequency (133MHz or 200MHz) appear on screen 4.
SY-6IZM/3 Quick Start Guide 3 Quick BIOS Setup This Motherboard does not use any hardware jumpers to set the CPU frequency. Instead, CPU settings are software configurable with the BIOS [SOYO COMBO SETUP]. The [SOYO COMBO SETUP] menu combines the main CPU parameters that you need to configure, all in one menu, for a quick setup in BIOS. After the hardware installation is complete, turn the power switch on, then press the key during the system diagnostic checks to enter the Award BIOS Setup program.
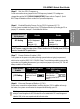
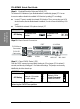
SY-6IZM/3 Quick Start Guide 4 The SOYO CD Your SY-6IZM/3 Motherboard comes with a CD-ROM labeled "SOYO CD." The SOYO CD contains the user's manual file for your new Motherboard, the drivers software available for installation, and a database in HTML format with information on SOYO Motherboards and other products. Step 1. Insert the SOYO CD into the CD-ROM drive The SOYO CD The SOYO CD will auto-run, and the SOYO CD Start Up Menu will display as shown below.
SY-6IZM/3 Quick Start Guide Please note that if the Start Up program was unable to determine which SOYO Motherboard you own, the manual selection menu will pop up, as shown below. Then select the user's manual file that corresponds to your Motherboard model name and click OK. SOYO CD Manuals Please select your manual In the box below and click OK. 6IZM/3 OK Back (Manual Selection Menu) The SOYO CD The user's manual files included on the SOYO CD can be read in PDF (Postscript Document) format.
SY-6IZM/3 Quick Start Guide The following drivers are available for Windows 95 (Driver Installation Menu) The SOYO CD The following drivers are available for Windows 98 (Driver Installation Menu) 15
SY-6IZM/3 Quick Start Guide A short description of all available drivers follows: Ø Intel Southbridge Drivers Because Windows 95 does not recognize the Southbridge of the newer Intel chipsets (TX, BX, ZX etc) this utility has to be run, it will update the necessary Windows files. (Only for Windows 95) Ø SOYO SpeedPro Busmaster Driver for Win 95/98 Without the busmaster drivers the CPU will need to be involved every time data is read from or written to the Harddisk.
SY-6IZM/3 Quick Start Guide Ø YAMAHA 740 Sound Drivers for Win95/98 and Win NT With this application program the user can make use of the on board sound chip. Before installing the YAMHA 740 Sound Drivers, you MUST first install the YAMAHA 740 drivers for Windows 9x or NT. Note: Once you have selected a driver, the system will automatically exit the SOYO CD to begin the driver installation program. When the installation is complete, most drivers require to restart your system before they can become active.
Edition: February 1999 Version 1.0 6IZM/3 SERIAL International Headquarters Soyo Computer Inc., (Taiwan) Tel: 886-2-2290-3300 Fax: 886-2-2298-3322 Web Site: http://www.soyo.com.tw E-mail: info@mail.soyo.com.tw USA Branch Office Soyo Tek Inc., (USA) Tel: (408) 452-7696 Fax: (408) 573-7696 Web Site: http://www.soyousa.com E-mail: sales@soyousa.com SOYO Europe Soyo Europe B.V., (Holland) Tel: 31-79-3637500 Fax: 31-79-3637575 Web Site: http://www.soyo-europe.com http://www.soyo.nl E-mail: Sales@soyo.