Quick Start Guide Realtek LAN Driver Installation The SOYO CD Quick BIOS Setup Hardware Installation Motherboard VGA Driver Installation SY-K7VEMPRO V1.
SOYO™ SY-K7VEMPRO V1.0 Motherboard Socket 462 for AMD® Athlon/DuronTM processors VIA VT8361 AGP/PCI Motherboard 200/266 MHz Front Side Bus supported Micro ATX Form Factor Copyright © 2002 by Soyo Computer Inc. Trademarks: Soyo is the registered trademark of Soyo Computer Inc. All trademarks are the properties of their owners. Product Rights: All names of the product and corporate mentioned in this publication are used for identification purposes only.
1 Introduction Congratulations on your purchase of the SY-K7VEMPRO V1.0 Motherboard. This Quick Start Guide illustrates the steps for installing and setting up your new Motherboard. This guide provides all users with the basic steps of Motherboard setting and operation. For further information, please refer to the SY-K7VEMPRO V1.0 Motherboard Users’ Guide that came with your Motherboard. Unpacking When unpacking the Motherboard, check for the following items: The SY-K7VEMPRO V1.
SY-K7VEMPRO V1.0 Quick Start Guide Introduction SY-K7VEMPRO V1.
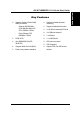
Key Features Supports Socket A (Socket 462) AMD® processors - - Supports onboard hardware monitoring Supports 200/266 MHz Front Side Bus Athlon /XP CPU (750MHz~ 2600+) Supports multiple-boot function Duron /Morgan CPU (650MHz~1.
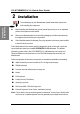
SY-K7VEMPRO V1.0 Quick Start Guide 2 Installation Hardware Installation To avoid damage to your Motherboard, please follow these simple rules while handling this equipment: Before handling the Motherboard, ground yourself by touching on to an unpainted portion of the system's metal chassis. Remove the Motherboard from its anti-static packaging. Hold the motherboard by the edges and avoid touching its components. Check the Motherboard for damage.
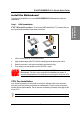
SY-K7VEMPRO V1.0 Quick Start Guide Install the Motherboard To perform the installation of your new SY-K7VEMPRO V1.0 Motherboard, follow the steps below: CPU Installation CPU Mount Procedure: To mount the AMD® Athlon/DuronTM processor that you have purchased separately, follow these instructions. 1 2 3 4 1. Lift the socket handle up to a vertical position. 2. Align the blunt edge of the CPU with the matching pinhole edge on the socket. 3.
SY-K7VEMPRO V1.0 Quick Start Guide CPU Fan Mount Procedure: To prevent scratch or damage on the Hardware Installation motherboard, please follow these instruction on how to mount the CPU fan properly. 1. Apply thermal paste to the die of the CPU. 2.Carefully mount the fan on top of the CPU and clip-on the first lock. 1 3.Clip-on the second lock and please make sure not to damage/scratch the board.
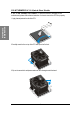
SY-K7VEMPRO V1.0 Quick Start Guide 4. The fans power connector should be connected to CPUFAN1. 3 CPUFAN1 DIMM2 DIMM1 Hardware Installation 1 Note: If the fan is defective or Power connector is not connected to CPUFAN1, the system will enable FOC function see below for more information on FOC function. FOC ( Fan-Off Control ) The newly designed SOYO “FOC” is based on the concept of total protection for CPU, which is very different from currently seen on the market.
SY-K7VEMPRO V1.0 Quick Start Guide Hardware Installation the CPU fan pins, get their revolution information and send it to the BIOS. (2) Auto Power Off System: If the BIOS gets the information of CPU fan revolution, it goes on working normally. If not, it will inform the system and have the power supply disconnected immediately. Thus, the CPU is protected from over heating. Note: The following must be observed to secure the normal functioning of “Fan-Off Control”: 1. CPU fan with sensor pins must be used.
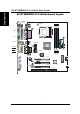
SY-K7VEMPRO V1.0 Quick Start Guide Connections to the Motherboard This section tells how to connect internal peripherals and the power supply to the Motherboard. The internal peripherals consist of IDE devices (HDD, CD-ROM), Floppy Disk Drive, Chassis Fan, Front Panel Devices (Internal Speaker, Reset Button and IDE LED Switch.), Wake-On-LAN card, VGA card, Sound Card, and other devices. For more details on connecting internal and external peripherals to your new SY-K7VEMPRO V1.
SY-K7VEMPRO V1.0 Quick Start Guide ATX Power Supply: ATX PW Attach the ATX Power cable to this connector. (This motherboard requires an ATX power supply, an AT power supply can NOT be used.) Hardware Installation Step 4. Configure Memory Your board comes with two DIMM sockets, providing support for up to 1GB of main memory using unbuffered DIMM modules from 32MB to 512MB. PC100/133 DIMM module is required on this motherboard.
SY-K7VEMPRO V1.0 Quick Start Guide 3 Quick BIOS Setup This Motherboard does not require any hardware jumpers to set the CPU operating frequency. After completion of hardware installation, turn the power switch on, then press the key while the system diagnostic is checking to enter the Award BIOS Setup program. The CMOS SETUP UTILITY will be displayed on screen. Then follow these steps to configure the CPU settings. Step 1. Select [Standard CMOS Features] Step 2.
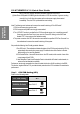
SY-K7VEMPRO V1.0 Quick Start Guide 4 The SOYO CD The SOYO-CD will NOT autorun if you use it on an Operating System other than Windows 9x or NT. Your SY-K7VEMPRO V1.0 Motherboard comes with a CD-ROM labeled "SOYO CD." The SOYO CD contains (1) the user's manual file for your new Motherboard, (2) the drivers software available for installation, and (3) a database in HTML format with information on SOYO Motherboards and other products. Step 1.
The user's manual files included on the SOYO CD are in PDF (Postscript Document) format. In order to read a PDF file, the appropriate Acrobat Reader software must be installed in your system. Note: The Start Up program automatically detects if the Acrobat Reader utility is already present in your system, and otherwise prompts you on whether or not you want to install it. You must install the Acrobat Reader utility to be able to read the user's manual file.
SY-K7VEMPRO V1.0 Quick Start Guide Click the Install Drivers button to display the list of drivers software that can be installed with your Motherboard. The Start Up program displays the drivers available for the particular model of Motherboard you own. We recommend that you only install those drivers.
SY-K7VEMPRO V1.0 Quick Start Guide the VIA Power Management function. IRQ remapping utility (This driver is installed automatically) VIA PCI IRQ Miniport Driver is to be installed under Windows 98 only, it sets the system's PCI IRQ routing sequence. VIA 8361 Onboard Display Driver for Win 98 In order to be able to make use of the integrated VGA function in your VIA chipset, you will need to install this driver first. For Win 98 only.
SY-K7VEMPRO V1.0 Quick Start Guide installation and return to the main menu. Note: Once you have selected a driver, the system will automatically exit the SOYO CD to begin the driver installation program. When the installation is complete, most drivers require to restart your system before they can become active. Step 3. Check the Latest Releases Click the 'Check the latest Releases' button to go the SOYO Website to automatically find the latest BIOS, manual and driver releases for your motherboard.
SY-K7VEMPRO V1.0 Quick Start Guide 5 Realtek LAN Driver Installation Install the Realtek LAN Drivers under windows NT4.0 1. Double click the Network icon in the control panel. The Network properties windows will appear. Click on the Devices tab and press the Add button. 2. Select "Unlisted or Updated Drivers" from the list of drivers in the Add window by placing the mouse pointer over it and clicking the left mouse button. Press the OK button. 3.
SY-K7VEMPRO V1.0 Quick Start Guide Quick Trouble shoot tips What to check when you encounter : Boot-up issue The system do not power-up, no beeping sound heard and the CPU fan does not turn on. 1. check if the power cord is plug to the power source 2. check if the power is connected to the M/B 3. check if the case power button is connected to the M/B power button connector (see connectors and plug-ins in the Quick start guide for more info) 4. make sure the power supply is not defective.
SY-K7VEMPRO V1.0 Quick Start Guide 3. 4. 5. 6. clear CMOS battery. (JP5 connector, see Quick start guide for more info on how to clear the CMOS) make sure the power supply you have on your system support the M/B specification. Example. If you have a P4 M/B, you need to use a P4 power supply. if you already checked the power supply specification, change the power supply it might be defective. remove the M/B from the case and test the system. The M/B might be shorted to the case.
SY-K7VEMPRO V1.0 Quick Start Guide My system is not stable under Windows Operating System with VIA chipset M/B 1. do all the “My system intermittently locks up, very unstable” instruction above 2. re-install the VIA 4 in 1 in normally mode 3. re-install the operating system BIOS issue Where can I find the BIOS revision of my mainboard? It will be displayed on the up-left corner on the screen during boot-up.
SY-K7VEMPRO V1.0 Quick Start Guide Audio issue How can I disable the on-board Audio? Go to the SOYO Combo Feature in the BIOS setup, then set the "Onchip sound" or "AC97 Audio" to disable. Please also make sure ‘Legacy Audio’ is disable if there is one. I cannot get the sound working on my system. 1. check if the speaker wire is connected to the line out connector in the M/B 2. check if the speaker power is powered on 3. install the audio driver supplied on our driver disc. 4.
SY-K7VEMPRO Quick Start Guide How to contact us: If you are interested in our products, please contact the SOYO sales department in the region you live. If you require Technical Assistance, please contact our Technical Support in the region you live. SOYO prefers Email as communication medium, remember to always add to the email the country that you live in. TAIWAN Hong Kong SOYO COMPUTER INC. SOYO ASIA LTD. No. 21 Wu-Kung 5 Rd., Hsin Chuang City, Taipei Hsien, Taiwan, R.O.
Edition: November 2002 Version 1.0 SY- K7VEMPRO V1.