REQUIRED TOOLS AND MATERIALS: • 2 Capable Adults Pool System Owners Manual Customer Service Center • N53 W24700 South Corporate Circle • Sussex, WI 53089 • U.S.A. • Tape Measure Adult Assembly Required. • Wood Board (scrap) This manual, accompanied by sales receipt, should be saved and kept on hand as a convenient reference, as it contains important information about your model. • Phillips Screwdriver • Sawhorse or Support Table • Hammer • Safety Glasses • Step Ladder - 8ft. (2.
Assemblage exclusivement réservé à un adulte. Zusammenbau nur durch Erwachsene ALLE Verpackungsmaterialien sofort wegwerfen. Il montaggio va eseguito da persone adulte. Système de piscine Manuel d’utilisation Service clientèle • N53 W24700 South Corporate Circle • Sussex, WI 53089 • É.-U. Schwimmbeckensystem Gebrauchsanleitung Kundendienstzentrale • N53 W24700 South Corporate Circle • Sussex, WI 53089 • U.S.A.
OUTILS ET MATÉRIEL REQUIS: BENÖTIGTE WERKZEUGE UND MATERIALIEN: HERRAMIENTAS Y MATERIALES REQUERIDOS: • Deux (2) adultes capables • Zwei (2) zur Ausführung dieser Arbeit fähige Erwachsene • Dos (2) adultos capaces • Mètre • Maßband • Cinta de medir • Planche en bois (chute) • Holzstück (Ausschuß) • Tabla de madera (un trozo) • Tournevis cruciforme • Kreuzschlitzschraubenzieher • Destornillador Phillips • Chevalet de sciage ou table • Sägebock oder Stütztisch • Caballete o mesa de apoyo • M
SAFETY INSTRUCTIONS FAILURE TO FOLLOW THESE SAFETY INSTRUCTIONS MAY RESULT IN SERIOUS INJURY OR PROPERTY DAMAGE AND WILL VOID WARRANTY. Owner must ensure that all players know and follow these rules for safe operation of the system. To ensure safety, do not attempt to assemble this system without following the instructions carefully. Check entire box and inside all packing material for parts and/or additional instruction material.
SICHERHEITSHINWEISE EIN MISSACHTEN DIESER SICHERHEITSHINWEISE KANN ZU SCHWEREN VERLETZUNGEN ODER SACHSCHÄDEN FÜHREN UND MACHT DIE GARANTIE UNWIRKSAM. Der Eigentümer muss sicherstellen, dass alle Spieler diese Regeln für einen sicheren Betrieb des Systems kennen und befolgen. Aus Sicherheitsgründen darf dieses System nur unter sorgfältiger Beachtung der Anleitung zusammengebaut werden.
NOTE: REMARQUE: HINWEIS: NOTA: Board style will vary. Le style de panneau variera. Korbwandausführung variiert. El estilo del tablero variará. IMPORTANT! Remove all contents from boxes. Be sure to check inside pole sections, hardware and additional parts are packed inside. IMPORTANT! Videz entièrement les boîtes. Veillez à vérifier l'intérieur des sections de poteau. La quincaillerie et des pièces supplémentaires sont emballées à l'intérieur. STOP! WICHTIG! Die Kartons vollständig auspacken.
NOTICE TO ASSEMBLERS Adult Assembly Required. Dispose of ALL packaging materials promptly. ALL basketball systems, including those used for DISPLAYS, MUST be assembled and ballasted with sand or water according to instructions. Failure to follow instructions could result in SERIOUS INJURY. It is NOT acceptable to devise a makeshift weight system. AVIS AUX PERSONNES CHARGÉES DU MONTAGE Assemblage exclusivement réservé à un adulte. Jetez TOUT le matériel d'emballage dans les plus brefs délais.
Get to know the basic parts of your basketball system...
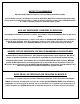
05/06 ID# M770304 In the U.S.: 1-888-713-5488 In the U.S.: 1-800-772-5346 ID#: 556790 05/05 In the U.S.: 1-800-558-5234 Canada: 1-800-284-8339 In the U.S.: 1-800-334-9111 • DO NOT HANG on the rim or any part of the system including backboard, support braces or net. • During play, especially when performing dunk type activities, keep player's face away from the backboard, rim and net. Serious injury could occur if teeth/face come in contact with backboard, rim or net.
13 DÉPLACEMENT DU SYSTÈME MOVING SYSTEM 1. Tout en tenant le poteau, tournez le système de basketball vers l'avant jusqu'à ce que les roues s'enclenchent sur le sol. 1. While holding pole, rotate basketball system forward until wheels engage with ground. 2. Amenez le système à l'endroit désiré. 2. Move basketball system to desired location. 1 2 3 1 3. Carefully rotate basketball system upright. 2 3 4. Reattach ground restraint and check system for stability. 201261 4.
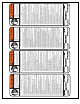
PARTS LIST - See Hardware Identifier Item Qty. Part No. Description 1 2 3 4 5 6 7 8 9 10 11 12 13 14 15 16 17 18 Item Qty. Part No. Description 1 600059 Tank 1 205424 Wheel Axle 2 266200 Wheel 1 FR938328 Bottom Pole Section 1 FR908439 Top Pole Section 2 206938 Pushnut, Black 1 20062701 Wheel Bracket 1 266301 Plug Cap 1 201625 Bolt, Hex Head, Yellow Dichromate, 5/16-18 x 3.
g x TEILELISTE - Siehe Teileschlüssel Nr. Anz. Teilenummer Beschreibung 1 2 3 4 5 6 7 8 9 1 1 2 1 1 2 1 1 1 600059 205424 266200 FR938328 FR908439 206938 20062701 266301 201625 10 11 12 13 6* 2 1 1 1 2 10* 4 1 1 203218 936410 203099 201261 FR201261 203156 203100 203063 201190 902006 14 15 16 17 18 Nr. Anz.
HARDWARE IDENTIFIER (BOLTS AND SCREWS) IDENTIFICATION DES PIÈCES (BOULONS ET VIS) BEFESTIGUNGSTEILESCHLÜSSEL (BOLZEN UND SCHRAUBEN) IDENTIFICADOR DE HERRAJE (PERNOS Y TORNILLOS) #9 (1) #20 (4) #40 (2) #14 (2) #22 (2) #41 (2) #26 (1) HARDWARE IDENTIFIER (NUTS) IDENTIFICATION DES PIÈCES (ÉCROUS) BEFESTIGUNGSTEILESCHLÜSSEL (MUTTERN) IDENTIFICADOR DE HERRAJE (TUERCAS) #12 (1) #16 (4) #15 (10)* #6 (2) #29 (1) 13 05/06 ID# M770304
HARDWARE IDENTIFIER (OTHER) IDENTIFICATION DES PIÈCES (AUTRES) BEFESTIGUNGSTEILESCHLÜSSEL (SONSTIGE TEILE) IDENTIFICADOR DEL HERRAJE (OTROS) #10 (6)* #19 (4) #35 (1) 39 (2*) #21 (2) #2 (1) #25 (1) #36 (1) ID# M770304 05/06 #27 (1) 14 #28 (1)
Pole Set Up Selection Sélection d'une configuration de poteau Wahl des Stangenaufbaus Selección de la instalación del poste NOTE: REMARQUE: HINWEIS: NOTA: Use 2-Pole set-up if pool is set-up as shown. Utilisez une configuration à deux sections si la piscine est comme illustré. Bei dem abgebildeten Schwimmbeckensystem den Stangenaufbau mit 2 Stangen verwenden.
SECTION A: ASSEMBLE THE POLE(S) SECTION A : ASSEMBLAGE DU OU DES POTEAUX BAUABSCHNITT A: MONTAGE DER STANGE/STANGENTEILE SECCIÓN A: MONTAJE DEL(LOS) POSTE(S) ONE POLE ASSEMBLY CONFIGURATION À UNE SECTION DE POTEAU MONTAGE BEI VERWENDUNG VON EINER STANGE MONTAJE DE UN POSTE TWO POLE ASSEMBLY CONFIGURATION À DEUX SECTIONS DE POTEAU MONTAGE BEI VERWENDUNG VON ZWEI STANGEN MONTAJE DE DOS POSTES Correctly identify pole. Identifiez correctement la section de poteau. Die benötigte Stange zurechtlegen.
TWO POLE ASSEMBLY ONLY CONFIGURATION À DEUX SECTIONS DE POTEAU UNIQUEMENT NUR FÜR AUFBAU BEI VERWENDUNG VON ZWEI STANGEN SÓLO MONTAJE DE DOS POSTES While maintaining alignment, bounce bottom pole section (4) into top section (5) using a wood scrap as shown until the top pole no longer moves toward the pole identification sticker on the bottom pole.
SECTION B: ASSEMBLE THE POLE(S) & EXTENSION ARM TO BASE: ONE & TWO POLE ASSEMBLY SECTION B : ASSEMBLAGE DES SECTIONS DE POTEAU ET DU BRAS D'EXTENSION SUR LE SOCLE : CONFIGURATION À UNE OU DEUX SECTIONS DE POTEAU. BAUABSCHNITT B: ANBRINGEN DER STANGE/STANGENTEILE UND DES VERLÄNGERUNGSARMS AM SOCKEL: MONTAGE BEI VERWENDUNG VON EINER STANGE/VON ZWEI STANGEN SECCIÓN B: MONTE EL(LOS) POSTE(S) Y EL BRAZO DE EXTENSIÓN EN LA BASE: MONTAJE DE UNO Y DOS POSTES.
1. Install wheel axle (2) through wheel carriage (7) and secure wheels (3) onto wheel axle (2) with pushnuts (6) as shown. Insert pole assembly into tank assembly as shown. Secure pole (4) to tank and wheel carriage as shown. A deep socket is recommended. Enfilez l’axe des roues (2) dans le train de roulement (7) et installez les roues (3) sur l’axe (2) avec les écrous (6), comme illustré. Insérez l’ensemble du poteau dans le réservoir, comme illustré.
2. Secure flat end of tank struts (11) to pole using bolt (9), washers (10), and nut (12), as shown. 11 Fixez l'extrémité plate des contrefiches du réservoir (11) au poteau à l’aide du boulon (9), des rondelles (10) et de l’écrou (12), comme illustré. Das flache Ende der Tankverstrebungen (11) mit Schraube (9), Unterlegscheiben (10) und Mutter (12) wie gezeigt an der Stange befestigen.
4. Attach extension arm (18) to pole using U-bolt (22), washers (19), nuts (16), as shown. Install pole cap (17) as shown. Attachez le bras d'extension (18) au poteau à l'aide du boulon en U (22), des rondelles (19) et des écrous (16), comme illustré. Installez le capuchon de poteau (17), comme illustré. Den Verlängerungsarm (18) mit der Bügelschraube (22), den Unterlegscheiben (19) und Muttern (16) wie gezeigt an der Stange befestigen. Die Stangenkappe (17) wie gezeigt aufsetzen.
C: ATTACH THE BOARD ANDRIM RIM -- ONE & TWO ASSEMBLY SECTION C:SECTION ATTACH THE BOARD AND ONE ANDPOLE TWO POLE ASSEMBLY SECTION C : FIXATION DU PANNEAU ET DU CERCEAU - CONFIGURATION À UNE OU DEUX SECTIONS DE POTEAU BAUABSCHNITT C: ANBRINGEN VON KORBWAND UND KORBRAND - MONTAGE BEI VERWENDUNG VON EINER STANGE/VON ZWEI STANGEN SECCIÓN C: INSTALE EL TABLERO Y EL BORDE - MONTAJE DE UNO Y DOS POSTES This is what your system will look like when you’ve finished this section.
Insert T-bolt (26) into rim bracket (25) as shown. Attach backboard and rim bracket (25) to the extension arm (18) using bolts (20), spacers (21) and nuts (15) as shown. Attach struts (37) to extension arm and then to board as shown. Keep u-bolt (38) and support clamp (36) loose until proper board alignment is achieved. Then, tighten completely. 1. Insérez le boulon à T (26) dans le support de cerceau (25), comme illustré.
2. Install Slam Jam Rim to Backboard A. Fit rim (24) securely into bracket (25) as shown. Allow T-bolt (26) to slip through center hole in rim (24). B. Install reinforcement bracket (27) onto T-bolt (26) as shown. C. Install spring (28) onto T-bolt (26) as shown. D. Install special nut (29) and washer (35) onto T-bolt (26). E. Tighten nut (29) until flush with end of T-bolt (26). Installez le cerceau Slam Jam sur le panneau. A. Calez bien le cerceau (24) dans le support (25), comme illustré.
2.
3. Instructions for filling with water: Roll completed assembly to desired position. Fill tank with water (approx. 31 gallons / 117 Liters) Tighten cap (8) securely into place. Instruction de remplissage avec de l'eau : Faites rouler l’ensemble jusqu’à la position désirée. Remplissez le réservoir d'eau (117 litres environ). Serrez le bouchon (8) à fond en position. 1 8 Anleitung zum Befüllen mit Wasser: Den fertigen Aufbau an die gewünschte Position rollen. Den Tank mit Wasser (ca. 117 l) füllen.
WARNING! / AVERTISSEMENT! WARNUNG! / ¡ADVERTENCIA! Cap (8) MUST be tightened COMPLETELY and SECURELY to prevent leakage. CHECK WATER LEVEL BEFORE EACH USE! Le bouchon (8) DOIT être serré À FOND pour éviter les fuites. VÉRIFIEZ LE NIVEAU D'EAU AVANT AVANT CHAQUE UTILISATION ! Der Schraubverschluss (8) MUSS VOLLSTÄNDIG und FEST aufgeschraubt werden, um Lecks zu verhindern. DEN WASSERSTAND VOR JEDEM GEBRAUCH ÜBERPRÜFEN! La tapa (8) DEBE estar COMPLETA y SEGURAMENTE apretada para evitar fugas.
1. Apply the height adjustment and moving label (13) to the front of the pole as shown. Collez l'étiquette d'échelle de hauteur et de déplacement (13) sur l'avant du poteau, comme illustré. Höhenverstell- und Transportaufkleber (13) wie gezeigt an der Vorderseite der Stange anbringen. Aplique la etiqueta de ajuste de la altura y de movimiento (13) en la parte frontal del poste, como se muestra. NOTE: REMARQUE: HINWEIS: NOTA: Peel protective film from surface of acrylic backboard prior to use.