
User manual


33
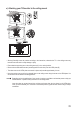
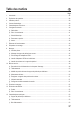
b) Using the remote control
Donotoperatetheceilingmountuntilyouhavenishedmountingitinaccordancewiththeinstructions.
Only adjust the mount using the built-in motor, otherwise the moving mechanism may become entangled
or incorrectly stowed.
1
3
5
6
8
9
10
11
12
7
4
2
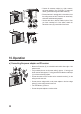
1 mem1 button
2 OK button
3 button (no function)
4 button
5 1 button
6 LED
7 IRLEDindicator
8 SET button
9 2 button
10 button
11 button (no function)
12 mem2 button
c) Calibrating the starting position of the ceiling mount
• You will hear a beep when you connect the ceiling mount to the mains. If you have installed the ceiling mount on
a horizontal surface, the horizontal position is the starting position. If you have installed the ceiling mount on a
sloping ceiling or other non-horizontal surface, you will need to calibrate the angle of the starting position. Proceed
as follows:
• Press and hold the 1button(5)ontheremotecontrol(H)for5seconds.Repeatthisstep5times.Theceilingmount
will automatically set the current position as the starting position.
You only need to calibrate the ceiling mount if you have mounted it to a sloping surface.
• To reset the starting position to the horizontal position, press and hold the OK button (2). You will hear a beep when
the starting position has been reset.
d) Controlling the ceiling mount
• Press the button (4) to move the monitor upwards.
• Press the button (10) to move the monitor downwards.
• Press the OK button to stop the monitor at the current position.