OWNER’S MANUAL Starlet Series Starlet 4 / Starlet 6 / Starlet 9 SpeakerCraft ® Line Source In-Wall Speakers
Starlet Owner’s Manual TABLE OF CONTENTS GETTING STARTED ........................................................................................................................................ 2 SPEAKER PLACEMENT .................................................................................................................................3-4 Unique Characteristics of the Starlet Series ....................................................................................................................
Page 2 Starlet Owner’s Manual GETTING STARTED Your Starlet 4, 6 or 9 speakers are individually packed with the following: • Back Box/Driver Assembly • Bezel/Flange Assembly • Cardboard Cut-Out Template and Paint Mask • Accessory Pack (See Diagram 1) • Outer Bracket • Inner Bracket • Foam Support Block • Screws: Two M4 x 20mm for Outer/Inner Bracket Two Hex Head M4 x 45mm Screws per Driver (8 for Starlet 4, 12 for Starlet 6 and 18 for Starlet 9) • 3mm Hex Head M4 Driver Bit (for electric screwdriver) Also
Starlet Owner’s Manual Page 3 SPEAKER PLACEMENT SpeakerCraft highly recommends the use of a qualified custom installation specialist when installing your Starlet speakers. Please note that all Starlet models require a separate powered subwoofer. In addition, the Starlets 6 and 9 are bi-amplified and require precise electrical adjustment with a voltmeter and test CD. If this sounds intimidating please consult an expert.
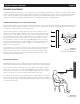
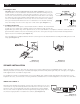
Page 4 Starlet Owner’s Manual DECIDING DISTANCE APART Consider how far apart the speakers should be. To do this, think of your listening area as a triangle with each leg of the triangle being equal. This equilateral triangle is the most distance you should have between your speakers relative to the normal listening position.
Starlet Owner’s Manual Page 5 INSTALLATION PREPARATION NEW CONSTRUCTION Starlets are designed to be installed into a standing wall, therefore no new construction bracket is supplied. There are some considerations for new construction to create the best possible sound: 1. Double Thick Drywall: The clamp between the back box and front baffle is designed for 1⁄2" drywall (or any wall material in 1⁄2").
Page 6 Starlet Owner’s Manual d. Cutting the Hole CAUTION: This is the most important part of the entire installation. If you are not certain whether or not an obstruction exists behind the desired mounting area, you should conduct an obstruction survey by cutting small holes every 10" or 12" in the center of the cut-out area. Cut at a 45˚ angle towards the inside of the hole.
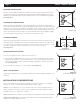
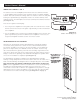
Starlet Owner’s Manual Page 7 WIRING THE STARLETS 6 and 9 The Starlets 6 and 9 are bi-amplified, which means that one terminal is wired to a single amplifier channel and the other terminal is wired to a separate amplifier channel. Thus both terminals are always used in the Starlets 6 and 9. The end plate bearing the SpeakerCraft logo and product name is the woofer terminal, and is marked “woofers”. The blank plate is the tweeter terminal, and is marked “tweeters”.
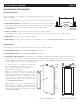
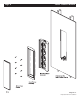
Page 8 Starlet Owner’s Manual Diagram 17: Exploded View of Installation
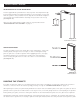
Starlet Owner’s Manual Page 9 INSTALLATION IN A 2x6 OR DEEPER WALL A Foam Support Block is provided in the Accessory Pack. This simple block helps keep the Back Box/Driver Assembly from falling into the wall cavity of a 2x6 wall while the speaker is being installed. Peel the tape off the foam block and place it onto the back of the Back Box/Driver Assembly on any location near the top.
Page 10 Starlet Owner’s Manual SPEAKER ADJUSTMENTS STARLET 4 ADJUSTMENTS They Starlet 4 does not require any special woofer or tweeter adjustments. STARLETS 6 and 9 LEVEL ADJUSTMENTS Even experienced listeners have a difficult time adjusting the bi-amp levels for the Starlets 6 and 9 by ear, so SpeakerCraft has developed a simple procedure for setting the level of the high and low frequency sections. When adjusted in this way, the sound suddenly gains focus and resolution.
Starlet Owner’s Manual Page 11 A few notes, based on our experience: 1. It is best to set these levels on recessed volume controls, such as those on the SpeakerCraft BB series of amplifiers, as this adjustment is a one time, “set and forget” procedure. 2. All pink noise should be identical, but it isn’t. The noise on SpeakerCraft’s SCT-1.0 Test CD is known to work well in setting the levels. 3. Digital voltmeters can be problematic with pink noise.
Page 12 Starlet Owner’s Manual LIMITED LIFETIME WARRANTY SpeakerCraft Inc. warrants to the original retail purchaser only that this SpeakerCraft product will be free from defects in materials and workmanship, provided the speaker was purchased from a SpeakerCraft Authorized Dealer.
940 Columbia Avenue, Riverside, CA 92507 (800) 448-0976 Fax (951) 787-8747 www.speakercraft.