
Installation Sheet


INSTALLATION INSTRUCTIONS
SBS-2142
Sensor Kitchen Faucet
92-SBS-2142-03
800-537-2107
www.speakman.com
NEED HELP?
For additional assistance or service please contact:
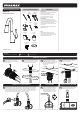
TOOLS & SUPPLIES NEEDED
Pencil
Eye Protection
Phillips
Screwdriver
Drill Mounting
Hardware
(included)
Measuring
Tape
Adjustable
Wrenches
5 Gallon
Bucket
Drill Bit
Aerator Wrench
(included)
IMPORTANT
MAINTENANCE:
Your new product is designed for years of
trouble-free performance. Keep it looking new
by cleaning it periodically with a soft cloth. Avoid
abrasive cleaners, steel wool, and harsh
chemicals as these will dull the finish and void
your warranty.
See Maintenance section of this document for
additional information.
SAFETY TIPS:
Be sure to read and understand all instructions
before beginning installation.
Inspect all connections after installation.
Cover the drain to avoid loss of parts.
Be sure to wear proper eye protection.
NOTE:
This installation manual covers several
models of Faucets. While the appearance of
your product may differ from those shown, the
installation method is the same.
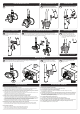
1
Verify the Rubber Washer is seated in the
base of the Faucet. If not, place the
Rubber Washer over hoses and align to
base of Faucet.
2
Place Hoses and Wiring, one at a time
through the mounting deck. If installing an
optional Deck Plate, position Hoses and
Wiring through the Deck Plate first.
3
Partially thread the Screws into the
Mounting Nut as shown. From below,
install Rubber Washer, Metal Washer, and
secure with Mounting Nut. Align Faucet to
desired position and hand tighten
Mounting Nut.
4
MOUNTING THE FAUCET
Align the Mounting Nut so the Screws are
aligned front to back. Tighten Screws to
secure Faucet into position.
A
B
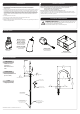
CONNECTION TO WATER SUPPLY
5
Locate the 2 Inlet Hoses that contain Inlet Adapters. Make connections to existing HOT and
COLD Supply Stops. The Inlet Hoses are 9/16”-24 UNF and will accept a 3/8” Compression
Fitting. First loosen connection between Adapter (A) and Hose End (B) so each can rotate.
Wrench tighten Adapters to Supply Stops then wrench tighten Hose Ends to the Adapters . The
Hoses are interchangeable for HOT and COLD connections. Desired connection can be
determined later in the “Temperature Adjustment” section of the manual.
6
1 Minute
FLUSH SYSTEM
Locate the remaining Hose that has a
female end as shown below. Place this
Hose into a bucket. Turn on HOT and
COLD water supplies. Open Faucet
Handle and allow water to run from the
Hose and into the bucket for 1 minute.
7
DRY CONNECTION ONLY!
DO NOT USE ANY THREAD SEALANT ON THIS CONNECTION
CONNECT HOSE TO SOLENOID
Turn OFF water supplies. Assemble the
previously flushed Hose to the Inlet of the
Solenoid. Wrench tighten connection.