
Installation Guide


5
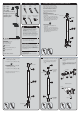
• Install Pipe (2) into Ball Valve (5).
• Assemble Elbow (1) to Pipe (2) being
sure to orient Elbow (1) so that the outlet
is facing down.
• Assemble Shower Head (14) to Elbow (1).
6
Assemble the Lever Handle Assembly (16)
to Ball Valve (5) using Nylo-Hex Nut (17),
being sure to orient the Handle as shown
below.
STANDARD INSTALLATION
• Insert the slot in the Pull Rod (20) over
the Lever Handle Assembly (16) and
insert Pin (18).
• Secure Pin (18) with Cotter Pin (19).
ADA INSTALLATION
• Insert the slot in the Pull Rod Extension
(26) over the Lever Handle Assembly
(16) and insert Pin (18).
• Secure Pin (18) with Cotter Pin (19).
OR
*
7 FOR ADA INSTALLATION ONLY.
Assemble Pull Rod (20) to Pull Rod
Extension (26) using Machine Screw (27)
and Nylo-Hex Nut (28).
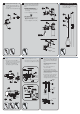
8
• Thread Pipe (21) into Drain/Supply Cross
(12).
• Thread entire Bowl Assembly (22) to
Pipe (21), being sure Bowl is level, plumb,
and horizontal when completely secured.
• Install Paddle Handle (24) to Ball
Valve (23) using Nylo-Hex Nut (25).
9
• Assemble male end of Flex Hose (15)
to Ball Valve (23) (Detail View 9a).
• Assemble female end of Flex Hose (15) to
Drain/Supply Cross (12) (Detail View 9b).
Detail View 9a
Detail View 9b
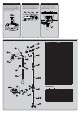
10
• Connect an uninterruptible potable water
supply with a minimum of 30psi flowing
pressure to Water Inlet (8) (10). Failure
to use potable water can result in further
injury.
• Connect an adequate drain to Drain
Outlet (12) that complies with all local
plumbing codes.
• Turn on water supply and check
connections for leaks.
• To test the Eye/Face Wash, and for
subsequent operation, push the Paddle
Handle forward 90°. The unit will operate
until the Paddle Handle is manually pulled
back to the OFF position.
• To test the Shower, and for subsequent
operation, pull the Pull Rod down. The
unit will operate until the Pull Rod is
manually pushed back to the OFF position.
Standard
Water
Inlet
Alternate
Water
Inlet
Drain Outlet
EYE/FACEWASH
ACTIVATION
EMERGENCY
SHOWER
ACTIVATION