
Installation

SPEAKMAN
®
400 Anchor Mill Rd. New Castle, DE 19720 Phone: 800-537-2107 Fax: 800-977-2747
10/31/18 www.speakman.com 92-SEF-1800-16
Step 4: Trim Package -
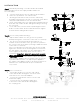
a. From above sink, place the trim flange over the valve spindles.
b. Screw trim collar onto the valve body and tighten. The flange should be
secure at this point. If not, back off the flange nut that was assembled in
step 1 and reassemble the trim.
c. Slip sleeves onto valve spindles.
d. Position the handles and secure using the lock washer and screw.
e. Position the red index button on the handle for the hot water valve
and press into place. Position the blue index button on the handle
for the cold water valve and press into place.
Step 5: Unit Flushing -
a. After the assembly is complete, turn the hot and cold
water supplies on and check for leaks.
b. Activate the faucet to flush both the hot and cold sides
of fixture. Check all connections for leaks.
c. Install the aerator into the faucet outlet.
d. At this time activate faucet and then activate the eyewash
by pulling the handle and assure proper spray formation
and no leaks.
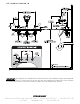
ALTERNATE INSTALLATION FOR DEDICATED TEPID WATER SUPPLY
The unit is designed so the eyewash has a dedicated supply line. This
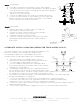
allows the eyewash to have a tepid water supply. Attach
the tepid water supply to the center adapter as shown in
the figure and your cold water supply to the cold valve body.
a. Attach the elbows, tees and pipe nipples to the hot
and cold inlet of the thermostatic mixing valve with checks.
b. Use Teflon tape on all threaded connections.
c. See the installation and maintenance manual provided
for the SE-370 Emergency Eye Wash Valve for the required
installation recommendations.
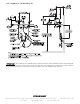
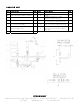
d. The drawing on page 3 provides the roughing in dimensions
for mounting the unit. The valve should be mounted less than
18” from the sink surface. This allows enough clearance for the supply hoses to reach the inlets. Verify
the supply hoses reach the connections before mounting the valve.
e. Mount the thermostatic mixing valve to the wall and fasten the valve to the wall using ½ pipe
hangers with wall plates (not supplied).
f. Connect the (2) supply hoses (male end) to the mixing valve tee and wrench tighten.
Connect the other end of the hoses (with rubber washer) to the widespread valve bodies,
making sure the hot is to hot & the cold is too cold and wrench tighten.
g. Connect the center outlet of the thermostatic mixing valve to the eyewash inlet using the TW hose
supplied and wrench tight.
h. Connect the hot and cold water supply lines to the tees on the thermostatic mixing valve