
Installation Guide
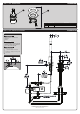

INSTRUCTIONS FOR MODELS
92-G04-111563-01
For additional assistance or service please contact:
SPEAKMAN
®
800-537-2107
customerservice@speakman.com
www.speakman.com
G04-111563
STAND ALONE MANUAL OVERRIDE
* MODEL SHOWN WITH SPEAKMAN SF-9100
GOOSENECK SENSOR FAUCET. WHILE YOUR
PRODUCTS MAY DIFFER IN APPEARANCE TO ITEM
SHOWN, IT WILL INSTALL WITH IN THE SAME
MANNER.
TOOLS AND SUPPLIES
Phillips
Screwdriver
Adjustable
Wrench
5 Gallon
Bucket
Warranty information can be found at:
www.speakman.com
WARRANTY
MAINTENANCE
Cover your drain to prevent loss of parts. Be sure to
wear eye protection while cutting pipe.
SAFETY TIPS
IMPORTANT
• Be sure to read instructions thoroughly before
beginning installation.
• Do not over-tighten any connections or damage
may occur.
Your new Speakman Product is designed for years of
trouble-free performance. Keep it looking new by
cleaning it periodically with a soft cloth. The use of harsh
chemicals and abrasives may damage the finish and
void the product warranty. Please be sure to only use
approved cleaners. Please contact Speakman for any
clarification of acceptable cleaners.
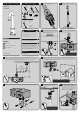
1
Remove Mounting Nut (1), Metal Washer (2),
and Rubber Washer (3) from Manual Override
Valve Assembly and slide them down to the
base of the Hoses. Then pull the Hose Ends
through one at a time. Verify that the Rubber
Gasket (4) is in position and aligned to the
base of the Valve Assembly.
2
Place Manual Override hoses thru the
appropriate hole in the counter top one at a
time. Align the valve assembly so the Rubber
Access Plug (1) is facing the rear and install
Valve Assembly through mounting hole.
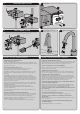
3
From below, reinstall the Rubber Washer (1),
Metal Washer (2), and Mounting Nut (3). Hand
tighten until snug. Final tighten by using a Phillips
Screwdriver to turn each screw clockwise.
4
Install the Sensor Faucet onto the desired mounting
surface following the Faucet Installation Guide.
SHOWN WITH SPEAKMAN SF-9100
GOOSENECK SENSOR FAUCET.
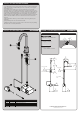
5
Verify that all Rubber Seals are present in the swivel connections. Connect Tee #1(with check) (1) on the
“OUTLET” of the Solenoid Box. Then connect Tee #2 (without check) (2) to the “INLET” of the Solenoid Box.
INLET
TEE #2
TEE #1
OUTLET
6
Connect the Manual Override "INLET" Hose to
Tee #2. Wrench Tighten.
IMPORTANT
Dry Connection Only!
Do not use any
sealant on this
connection.
7
Connect the Manual Override "OUTLET" Hose to
Tee #1. Wrench Tighten
IMPORTANT
Dry Connection Only!
Do not use any
sealant on this
connection.
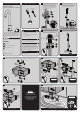
8
Connect the Faucet Inlet Hose (1) from your
Sensor Faucet model to the Swivel Nut on Tee #1.
SHOWN WITH SPEAKMAN SF-9100
GOOSENECK SENSOR FAUCET.
FAUCET
INLET
HOSE
NOTE:
Complete Mounting
and Electrical
Connections of the
Solenoid Box following
the Installation Manual
included with your
Sensor Faucet.
9
Flush the supply line for 1 min. then connect the Cold/Mixed Water Inlet (not supplied) (1) to Tee #2.
Wrench tighten all connections.
SHOWN WITH SPEAKMAN SF-9100 GOOSENECK SENSOR FAUCET.
IMPORTANT
Flush Inlet Water Supply
Line into a Bucket for 1
Minute prior to making
connection.
INLET WATER
SUPPLY LINE
9/16-24 UNEF