
Installation Guide
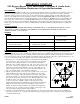

PAGE 3 10/13
92-3098 R-2
OPERATION INSTRUCTIONS
Important- Both hot and cold water supplies must be FULL on for the valve to operate properly.
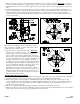
Rotate the valve handle clockwise to the desired temperature. To shut the valve OFF, rotate the handle counter clockwise. Volume
control/diverter models have an additional lever handle located at the top of the wall plate. The center position (12 o’clock) turns
both the shower and tub discharge off. Clockwise rotation of this handle turns the shower discharge on and controls the discharge
volume from the shower outlet of the valve. Counter clockwise rotation of this handle turns the tub discharge on and controls the
discharge volume from the tub outlet of the valve. On volume control/diverter model, make sure the main valve handle is turned to
the OFF position when the shower/bath is not in use.
MAINTENANCE (CARE and CLEANING)
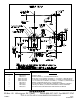
The shower/bath valve is washerless and requires no routine maintenance. The valve uses a cartridge that has a piston type
balancing module & a ceramic regulating module. There are no seat washers or packing to repair. For servicing the valve, see the
instructions below. The gleaming finish of your SPEAKMAN Regency/Royale valve can be cleaned by using mild soap and warm
water. Dry immediately with a soft, clean cloth for best results.
SERVICE INSTRUCTIONS
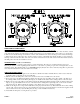
1) Shut off the hot & cold water supplies to the valve. Remove handle index button & handle. Remove index screw & index (If
applicable). Remove wall plate screws (2) & wall plate.
2) With the valve in the OFF position, remove the (4) valve bonnet screws. Carefully remove the bonnet
3) If necessary remove the balancing/regulating cartridge from the valve body by pulling on the valve spindle or the blue cap of
the cartridge. Make sure the lower rubber quad rings (2) are installed in the bottom of the cartridge and not in the valve body.
4) Replace the necessary parts with new parts. When replacing the balancing/regulating cartridge, make sure that the rubber quad-
rings (2) are properly installed in the recesses on the bottom of the cartridge. These quad-rings seal over the hot & cold inlet
holes inside the body. When replacing the cartridge, refer to Figure 5 for proper positioning of cartridge.
5) Make sure the large bonnet o-ring seal is installed and seated properly in the valve body. Reassemble the valve bonnet, making
sure the “UP” on the bonnet is in the up position. Tighten the (4) bonnet screws. Turn ON the hot & cold water supplies. Check
valve for leaks. If necessary, adjust the TLS plate (See Step 5 of the installation instructions).
6) Reassemble the trim parts, reversing the above procedure.