
Installation

INSTRUCTIONS FOR MODELS
92-SB-DECK-01
For additional assistance or service please contact:
SPEAKMAN
®
800-537-2107
customerservice@speakman.com
www.speakman.com
SB-DECK
HELPFUL TOOLS & SUPPLIES:
TOOLS AND SUPPLIES
Plumber’s
Putty
Silicone
Caulk
Caulk Gun
Level
Warranty information can be found at:
www.speakman.com
WARRANTY
MAINTENANCE
Cover your drain to prevent loss of parts. Be sure to
wear eye protection while cutting pipe.
SAFETY TIPS
IMPORTANT
• Be sure to read instructions thoroughly before
beginning installation.
• Do not over-tighten any connections or damage
may occur.
Your new Speakman Product is designed for years of
trouble-free performance. Keep it looking new by
cleaning it periodically with a soft cloth. The use of harsh
chemicals and abrasives may damage the finish and
void the product warranty. Please be sure to only use
approved cleaners. Please contact Speakman for any
clarification of acceptable cleaners.
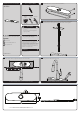
1
Ensure the Rubber Gasket (1) is properly seated within the Deck Plate (2).
2
Place Hoses through Deck Plate first. Then place Hoses, one at a time, thru hole in mounting surface.
Lower Faucet into position. Ensure a proper seal with the Rubber Gasket to the mounting surface.
3
Before securing the Faucet from below, align the Deck Plate to the desired location. Position Spout
and Deck Plate so that they are aligned horizontally. Then secure Faucet from below.
SHOWN WITH SPEAKMAN CHELSEA SB-2142 PULL DOWN KITCHEN FAUCET.
4
Use Plumber’s Putty or Caulk to seal the edge of the Deck Plate. Continue the installation of your Faucet
following the Faucet Installation Manual of your model.
SHOWN WITH SPEAKMAN CHELSEA SB-2142 PULL DOWN KITCHEN FAUCET.
SB-DECK ROUGH-IN DIAGRAM
SPEAKMAN
®
ALL DIMENSIONS ARE IN INCHES (MILLIMETERS) UNLESS OTHERWISE SPECIFIED.
DIMENSIONS SUBJECT TO CHANGE WITHOUT NOTICE.
1
5
16
"
34mm
2
3
4
"
69mm
10
1
2
"
267mm
5
16
"
8mm