
Installation


7 of 17
04/16 92-2692-R11
INSTALLATION
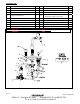
Step 1: Gooseneck Eyewash Mounting-
a. Place the gasket and deck plate onto the sink bowl or counter
top. Slip the grooved ø2.20” base washer 45-0782 onto the
gooseneck and slip through center hole of sink.
b. The eyewash swivels through 200° of rotation. Position the base
of the gooseneck eyewash so the setscrew hole in the base is
pointing towards the back of the sink or countertop.
Note- For rigid gooseneck, position the gooseneck and tighten
the setscrew in the mounting base. From below the sink slip the
cup washer onto the shank and use the nut to tighten the
assembly down onto the sink or countertop. Important-
Lubricate gooseneck eyewash shank lower O-ring.
c. Next insert the rubber seal into the base adapter and screw the
adapter onto the shank of the gooseneck eyewash until it
bottoms out (Tape may be applied to the shank). If the adapter
needs to be positioned for hose attachment, it can be backed off
up to a max 1/2 turn.
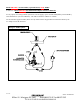
d. Apply tape or sealant and connect the tee and nipples so that the tee outlets are accessible.
1. Attach hot water main supply through the hose to HOT inlet port of Mixer.
2. Attach Base Tee Adaptor to eyewash inlet cold port of the gooseneck assembly.
3. Attach cold water main supply through the hose to the TEE on eye wash inlet.
4. Connect the same TEE to the COLD inlet port of Mixer with another hose.
5. Connect the solenoid outlet port to the side inlet port of the gooseneck faucet, using enclosed Solenoid
adapter and wall mounting bracket. Ensure that the opposite side of the gooseneck inlet is capped off.
6. Connect the solenoid inlet port to the outlet of the Mixer valve.
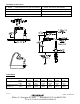
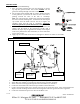
Step 2:
Valve Hose Installation Instructions
-
Faucet Inle
t
Solenoid Outle
t
Mixer Outle
t
E
y
ewash
Solenoid
Connector
Power Mod
Connector