
Installation


psi bar gpm L/min in. cm.
30 2.07 2.14 8.1 12 30.5
40 2.76 2.25 8.5 13 33.0
50 3.45 2.49 9.4 15 38.1
60 4.14 2.70 10.2 18 45.7
70 4.83 2.95 11.2 21 53.3
80 5.52 3.09 11.7 24 61.0
FLOWING
PRESSURE
FLOW RATE
PLUME
DISTANCE "A"
SEF-2001
psi bar gpm L/min in. cm.
30 2.07 2.15 8.1 17 43.2
40 2.76 2.24 8.5 18 45.7
50 3.45 2.47 9.3 20 50.8
60 4.14 2.71 10.3 23 58.4
70 4.83 2.95 11.2 27 68.6
80 5.52 3.13 11.8 29 73.7
SEF-2001-8
FLOWING
PRESSURE
FLOW RATE
PLUME
DISTANCE "A"
Eyewash Flow Data
A
NOTE: If plume heights are low, check to ensure that your Supply Valves
are fully open. If there is a noticeable height difference between the two
plumes, remove the Aerators and Flow Controls and remove any debris
that would inhibit the flow of water.
2
1
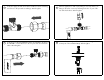
The spout was designed to swivel from left to right. If a
non-swivel Spout is preferred, remove Top Cover from Body.
Remove allen head Set Screw from position (1) as seen below.
Center the Spout between the handles and install the previously
removed Set Screw into position (2) and tighten (DO NOT
OVERTIGHTEN). Replace Cap.
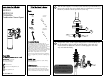
Turn on HOT and COLD handles of Faucet and allow water to run
for one minute to flush any debris from Faucet. Install the Aerator
with the supplied Aerator Wrench.
15
16