
Instruction manual


• To avoid electrical shock, do not open the case of this product.
• Only use a regulated DC 12V Power supply to operate this product.
• Do not overload electrical outlets or extension cords. This can result in a fire or
electrical shock.
• Keep this product away from strong magnetic fields.
• Do not expose this product in direct sunlight or strong reflected rays.
• Refer servicing to qualified personnel only.
• Do not change or modify this product. This will void the warranty.
•
•
•
•
•
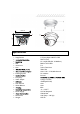
1. Loosen the t
wo locking screw
s①,
using the s
upplied hex-head wrench and remove
the mounting base.
2. Attach the mounting base② to a suitable solid surface, such as a wall or ceiling. On
partitioning locate a wall stud or ceiling joist. Secure the mounting base using the
supplied screws③. Fit the camera④ to the mounting base ② and fix in to position
using the two locking screws①, secure them with the hex-head wrench.
3. How to set the angle of view:
Loosen the two locking screws①, using the supplied hex-head wrench,
and
set
the
desired camera angle by moving the camera right /left and
up/d
own.
4. Connect the video connector (BNC) of the camera cable to the incoming video
cable. The other end of the video cable should be connected to a DVR or Monitor.
Plug the camera power connector (red DC jack) into the DC12V regulated power
no deyalpsid eb lliw erutcip eht dna ylppus rewop eht no hctiwS .ylppus
a monitor.
Precautions
Features
Installation
•
•
•
•
•
1/3” Sony Super-HAD™ CCD
540 TV Lines Super High Resolution
Compact Size - Only 1.89” In Diameter!
Vandal Resistant Housing
Cast Aluminium Construction
Integrated
Integrated 10pc IR LEDs
3.4mm Fixed Lens
Impressive Picture Quality
Weatherproof (IP66 Rated)
12V DC Required