
4-CHANNEL TRIPLEX NETWORK DVR DVR-T4IP USER MANUAL

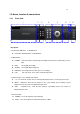
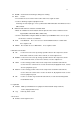
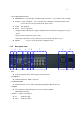

Table Of Contents
- 1. SYSTEM OVERVIEWS
- 1.1 Packing list
- 1.2 Features & specifications
- 1.3 Name, function & connections
- 1.4 INSTALLATION
- 2. Basic operation procedures
- 3. Main Setup screen
- 3.1 Camera Setup menu
- 3.2 Record Setup menu
- 3.3 Event Setup Menu
- 3.4 Playback Setup
- 3.5 Display Setup screen
- 3.6 Network Setup screen
- 3.7 System Setup screen
- 3.8 Backup
- 3.9 System Information
- 3.10 Search Menu
- 3.11 PLAYBACK
- 3.12 Miscellaneous Menu
- 4. DVR-T4IP Client program
- 4.1 Overview of DVR-T4IP
- 4.2 Installation & execution of program
- 4.3 RAMS (Remote Access & Monitoring System)
- 4.3.1 Screen and button
- 4.3.2 Connecting to DVR
- 4.3.3 Channel On/Off
- 4.3.4 UniPlayer link
- 4.3.5 Full-screen display
- 4.3.6 Program setup
- 4.3.7 DVR recording
- 4.3.8 DVR playback search
- 4.3.9 DVR playback search
- 4.3.10 DVR backup
- 4.3.11 DVR Setting
- 4.3.12 Still image Capture
- 4.3.13 Watermark insertion
- 4.3.14 Printing still image
- 4.3.15 Motion picture recording
- 4.3.16 D-Zoom
- 4.3.17 PAN/TILT, ZOOM/FOCUS
- 4.3.18 HDD Information
- 4.3.19 Check the program version
- 4.3.20 S/W upgrade of DVR
- 4.3.21 Close program
- 4.4 UniPlayer
- 4.4.1 Screen and button
- 4.4.2 Search
- 4.4.3 Searching by directory
- 4.4.4 Still Image Capture
- 4.4.5 Input water mark
- 4.4.6 Printing still image
- 4.4.7 D-Zoom Function
- 4.4.8 Moving picture file playback, playing, pause, temporarily pause, move by interval of frame, fast forward Playing
- 4.4.9 Water mark drawing
- 4.4.10 Panorama
- 4.4.11 Check the program version.
- 4.4.12 Close Program
- 4.5 MultiViewer
- 4.6 Quick Installer
- 5. Appendix
17
ZOOM: Zoom In/Out on the images during Live Viewing.
FRZ : Freeze.
- Press button once to freeze the frame at live mode. Press again to return.
- To take a still image capture at playback mode.
-Exchange of video input type : Press power button with FRZ button from NTSC to Pal or
PAL to NTSC.
MISC/SH: Miscellaneous functions or Shuttle Hold.
- MISC: To substitute for the five buttons that are placed on the remote control but on the
keypad (NET, OSD, Audio Mute, HDD, LOG).
- SH: Press button while using the Shuttle to hold the speed.SEARCH: Press once to open
the menu to search for recorded files.
PTZ: Pan/Tilt/Zoom. Press once to access the Pan/Tilt/Zoom/Focus control mode.
Press again to exit.
MENU: Press button to access Main Menu. Press again to return.
5. Direction/select button
UP: Used to move the cursor up; change possible values in the setup menu; under
PTZ control sub menu, used to move camera; or used to adjust focus.
DOWN: Used to move the cursor up; change possible values in the setup menu; under
PTZ control sub menu, used to move camera; or used to adjust focus.
LEFT: Used to change possible values in the setup menu. Under PTZ control menu,
used to move the camera left or used to do Zoom Out; At playback mode, used to
decrease playback speed.
RIGHT: Used to change possible values in the setup menu. Under PTZ control menu,
used to move the camera left or used to do Zoom In; At playback mode, used to
increase playback speed.
OK: Used as a selection key. Under PTZ control menu, used to be interchanged P/T
mode with Z/F mode
6. Jog/Shuttle
Shuttle: Multi-speed forward/reverse playback. Under Network Setup sub menu,
used to input parameters fast.
Jog: Frame by frame search.
7. IR receiver
Remote control signal receiver