
4-CHANNEL TRIPLEX NETWORK DVR DVR-T4IP USER MANUAL
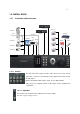
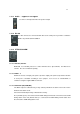
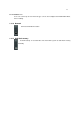
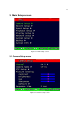
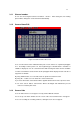
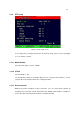
Table Of Contents
- 1. SYSTEM OVERVIEWS
- 1.1 Packing list
- 1.2 Features & specifications
- 1.3 Name, function & connections
- 1.4 INSTALLATION
- 2. Basic operation procedures
- 3. Main Setup screen
- 3.1 Camera Setup menu
- 3.2 Record Setup menu
- 3.3 Event Setup Menu
- 3.4 Playback Setup
- 3.5 Display Setup screen
- 3.6 Network Setup screen
- 3.7 System Setup screen
- 3.8 Backup
- 3.9 System Information
- 3.10 Search Menu
- 3.11 PLAYBACK
- 3.12 Miscellaneous Menu
- 4. DVR-T4IP Client program
- 4.1 Overview of DVR-T4IP
- 4.2 Installation & execution of program
- 4.3 RAMS (Remote Access & Monitoring System)
- 4.3.1 Screen and button
- 4.3.2 Connecting to DVR
- 4.3.3 Channel On/Off
- 4.3.4 UniPlayer link
- 4.3.5 Full-screen display
- 4.3.6 Program setup
- 4.3.7 DVR recording
- 4.3.8 DVR playback search
- 4.3.9 DVR playback search
- 4.3.10 DVR backup
- 4.3.11 DVR Setting
- 4.3.12 Still image Capture
- 4.3.13 Watermark insertion
- 4.3.14 Printing still image
- 4.3.15 Motion picture recording
- 4.3.16 D-Zoom
- 4.3.17 PAN/TILT, ZOOM/FOCUS
- 4.3.18 HDD Information
- 4.3.19 Check the program version
- 4.3.20 S/W upgrade of DVR
- 4.3.21 Close program
- 4.4 UniPlayer
- 4.4.1 Screen and button
- 4.4.2 Search
- 4.4.3 Searching by directory
- 4.4.4 Still Image Capture
- 4.4.5 Input water mark
- 4.4.6 Printing still image
- 4.4.7 D-Zoom Function
- 4.4.8 Moving picture file playback, playing, pause, temporarily pause, move by interval of frame, fast forward Playing
- 4.4.9 Water mark drawing
- 4.4.10 Panorama
- 4.4.11 Check the program version.
- 4.4.12 Close Program
- 4.5 MultiViewer
- 4.6 Quick Installer
- 5. Appendix
27
2.9 Client Program
2.9.1 RAMS (Remote Access & Monitoring System)
Remotely access, monitor, and operate the DVR for real-time live viewing, playback, backup,
on-the-fly recording, and control over the LAN/WAN
Upgrade the S/W(Kernel, Ramdisk) of DVR
Install the RAMS program as referred to in section 4.2 of Operation Manual.
Execute RAMS program and register selected DVR’s IP address & Port number from the DVR
list.
After selecting the target DVR, enter “admin” for ID and “111111” for default password. This
will enable you to access the DVR.
2.9.2 UniPlayer
A viewer with functions for recording, capturing, & backing up files.
2.9.3 MultiViewer
To monitor multiple DVR, both locally and remotely. (Up to 16 Channels: for example,
4x4CH DVR, or 16x1CH DVR)
2.9.4 Quick Installer
To setup configuration template for quick & easy, multiple unit setup using RS-232 or network
To upload/download DVR menu setting from/to DVR as file form using pc.