
4-CHANNEL TRIPLEX NETWORK DVR DVR-T4IP USER MANUAL
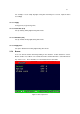
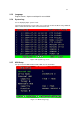
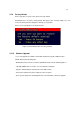
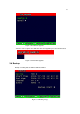
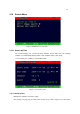
Table Of Contents
- 1. SYSTEM OVERVIEWS
- 1.1 Packing list
- 1.2 Features & specifications
- 1.3 Name, function & connections
- 1.4 INSTALLATION
- 2. Basic operation procedures
- 3. Main Setup screen
- 3.1 Camera Setup menu
- 3.2 Record Setup menu
- 3.3 Event Setup Menu
- 3.4 Playback Setup
- 3.5 Display Setup screen
- 3.6 Network Setup screen
- 3.7 System Setup screen
- 3.8 Backup
- 3.9 System Information
- 3.10 Search Menu
- 3.11 PLAYBACK
- 3.12 Miscellaneous Menu
- 4. DVR-T4IP Client program
- 4.1 Overview of DVR-T4IP
- 4.2 Installation & execution of program
- 4.3 RAMS (Remote Access & Monitoring System)
- 4.3.1 Screen and button
- 4.3.2 Connecting to DVR
- 4.3.3 Channel On/Off
- 4.3.4 UniPlayer link
- 4.3.5 Full-screen display
- 4.3.6 Program setup
- 4.3.7 DVR recording
- 4.3.8 DVR playback search
- 4.3.9 DVR playback search
- 4.3.10 DVR backup
- 4.3.11 DVR Setting
- 4.3.12 Still image Capture
- 4.3.13 Watermark insertion
- 4.3.14 Printing still image
- 4.3.15 Motion picture recording
- 4.3.16 D-Zoom
- 4.3.17 PAN/TILT, ZOOM/FOCUS
- 4.3.18 HDD Information
- 4.3.19 Check the program version
- 4.3.20 S/W upgrade of DVR
- 4.3.21 Close program
- 4.4 UniPlayer
- 4.4.1 Screen and button
- 4.4.2 Search
- 4.4.3 Searching by directory
- 4.4.4 Still Image Capture
- 4.4.5 Input water mark
- 4.4.6 Printing still image
- 4.4.7 D-Zoom Function
- 4.4.8 Moving picture file playback, playing, pause, temporarily pause, move by interval of frame, fast forward Playing
- 4.4.9 Water mark drawing
- 4.4.10 Panorama
- 4.4.11 Check the program version.
- 4.4.12 Close Program
- 4.5 MultiViewer
- 4.6 Quick Installer
- 5. Appendix
62
3.7.5 Language
English, Korean, Japanese and Spanish are available.
3.7.6 System Log
It is for displaying major system events.
The items that manage by Log are Video Loss, Power On, Power Off, Menu entry, HDD Full,
failure of FTP transmission, failure of E-mail transmission.
Figure 3-40 System Log screen
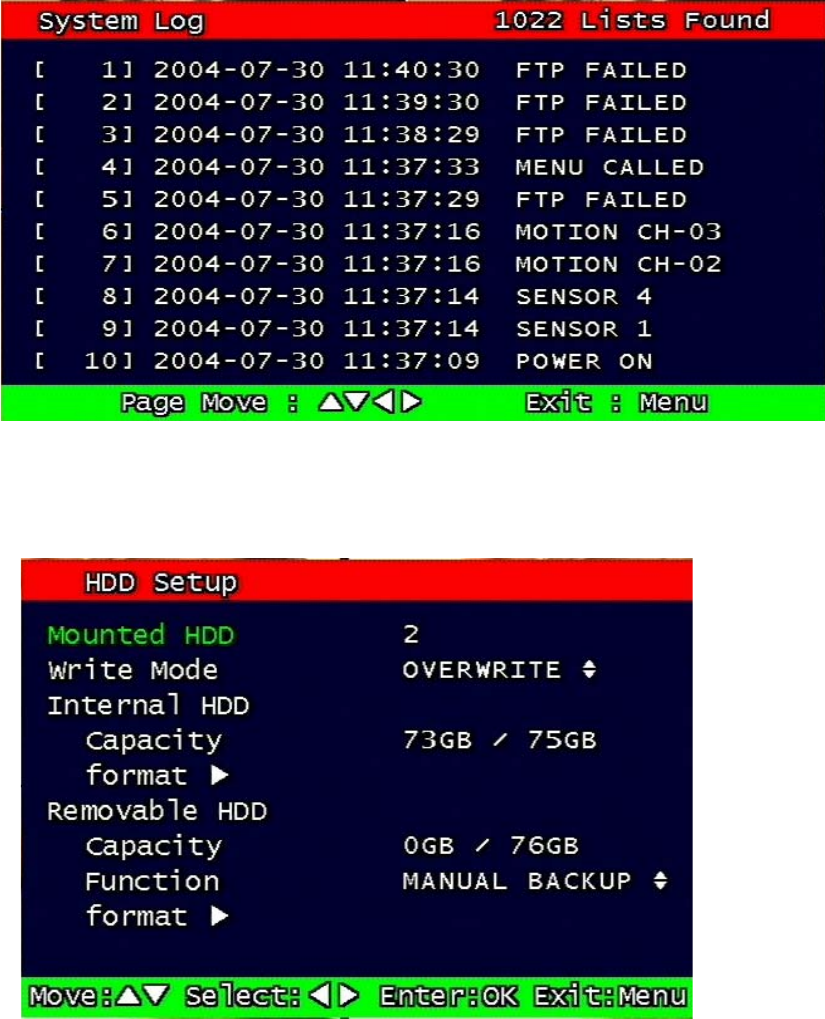
3.7.7 HDD Setup
Set up for Internal HDD and Removable HDD, See the information.
Figure 3-41 HDD Setup image