LPRB922 License Plate Capture Camera Installation Guide Speco Technologies is constantly developing product improvements We reserve the right to modify product design and specifications without notice and without incurring any obligation Rev. 3/15/10 Speco Technologies 200 New Highway, Amityville, NY 11701 1-800-645-5516 www.specotech.
1. Notice of Use Follow all instructions. All requirements should be followed before using this camera. SPECO TECHNOLOGIES is not responsible for any technical or typographical errors and reserves the right to change this manual without notice. Keep this document for future reference. Please make sure the power source is 12V DC/24 V AC. Only connect to the camera to these required power systems. The camera must be installed on a solid mounting surface.
2. Product Overview The LPRB922 is a high-performance plate-capture camera, equipped with a 1/3” SONY™ CCD. Outfitted with powerful 850 nm IR, the LPRB922 works perfectly even in total darkness to deliver clear plate images. Its varifocal IR-corrected lens keeps it in focus day and night, optimizing performance even in very low light conditions.
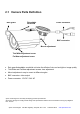
Camera Dimensions: Speco Technologies is constantly developing product improvements We reserve the right to modify product design and specifications without notice and without incurring any obligation Rev. 3/15/10 Speco Technologies 200 New Highway, Amityville, NY 11701 1-800-645-5516 www.specotech.
2.
2.2 Specifications Image system NTSC Signal system Image Sensor 1/3" SONY CCD Effective pixels 768 (H) x 494 (V) Electric 2:1 Interlace V: 59.94Hz Scanning system H: 15.734KHz Sync system Internal Horizontal resolution 600 TV lines f=9mm ~ 22mm, F1.4 DC iris varifocal IR-corrected lens External adjustments (zoom and focus) Built-in lens Horizontal: 32.1° (wide) ~ 13.1° (tele) View angle Vertical: 23.3° (wide) ~ 9.8° (tele) Gamma correction Minimum illumination S/N ratio 0.
3. Mounting Specifications & Installation Instructions Please follow the mounting specifications to install the LPRB922 camera. 3.1 Package Contents Item LPRB922 camera rubber pad 3 insulation tubes guide pattern sticker 3 self-tapping screws 3 plastic anchor printed material Description camera assembly static electricity protection static electricity protection mounting template for mounting camera for cement ceiling mounting installation guide, notice card 3.2 Mounting Specifications 1. 2. 3. 4. 5.
6. The horizontal angle should be less than 40 degrees. This camera is designed to cover only one lane (less than 3 meters). 7. If using with a DVR, make sure the DVR has the de-interlace feature and the frame rate is above 15 fps for optimal effect. To ensure an optimal view, please adjust the lens under the conditions we suggest. 8. 3.3 Camera Installation 1. Mark hole positions: use the mounting template to mark hole positions on the desired location.
2. loosen the right screw 3. rotate the mount adjustment 1. loosen the left screw 3. Install the camera: Lock the 3 self-trapping screws to fasten the camera. For static electricity protection, please use the rubber pad to cover the metal mount adjustment and put 3 insulation caps through the metal screws when locking the 3 self-trapping screws into the desired location.
4. Adjust the lens: loosen the Tele/Wide or Far/Near screw counterclockwise and then adjust it according to your needs. After adjustment, be sure to lock it tightly to prevent water leaking into the body of the camera. Warning! To avoid water leaking, do not loosen these 2 screws. 5. Warning! To avoid damage to the lens, do not adjust the Tele/Wide or Far/Near screw beyond the marked lines.