
User's Manual


FAQ
NVR User Manual
104
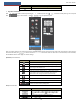
connecting the IP cameras directly. In this situation, if you directly connect one IP camera to PoE5, PoE6, PoE7 or PoE8, the IP camera will be displayed
in the camera list automatically; if you connect it to PoE1, PoE2, PoE3 or PoE4, it won’t be displayed in the camera list by showing resource conflict;
if you just need to connect it to PoE1, PoE2, PoE3 or PoE4, you should first delete the IP camera which occupies the PoE port resource and then
reconnect it to the PoE port.
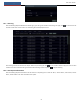
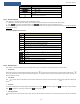
Take the 8 CH NVR with 8 PoE ports as another example. The resource distribution of the 8 CH IP cameras is shown in the picture below and the
adding rules of the IP cameras are similar to the rules mentioned in the above. Please refer to the above for details.
b. Please make sure that the internal Ethernet port and the IP camera which directly connects to the PoE port through ONVIF protocol are in the
same network segment.
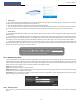
The internal Ethernet port and the IP camera which directly connects to the PoE port through ONVIF protocol should be in the same network segment,
or you will fail to add the IP camera. Log in the IP camera’s web client and then enable DHCP (obtain an IP address automatically); or manually
change the IP address of the IP camera to make it in the same network segment with the internal Ethernet port.
c. Check whether the number of the added IP camera is the maximum.
If the number of the added IP camera is the maximum, the system will show you the message that the IP camera number is beyond the maximum
when you directly connect another IP camera to the available PoE port and thus you will fail to add the IP camera.
Q7. The IP camera which directly connects to the PoE port of the NVR through ONVIF protocol is shown in the camera list, but there is no image
output, why?
Please make sure the username and password of the IP camera are correct. The IP camera’s username and password can be modified through the
two ways mentioned as below.
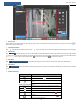
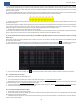
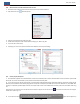
① Click “Edit Camera” in the Camera module of the setup panel to go to the interface as shown below. Click to modify the username and
password of the IP camera (enter the correct username and password of the IP camera in the popup window and then click “OK” button).
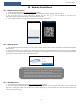
② Go to the live view interface and then click in the preview window of the IP camera to edit the IP camera’s username and password.
Q8. The system cannot record, why?
a. Make sure the HDD was formatted prior to use.
b. The record schedule has not been set in manual record mode. Please refer to 7.1.2 Schedule Settings for details.
c. Maybe HDD is full and thus the NVR is not able to record. Check HDD information from Disk Management and if required, please enable the
recycle function (please see 7.1.3 Advanced Configuration for details).
d. There is no disk but cameras in the disk group, so please add at least one disk to the group. Refer to 7.4.2 Storage Mode Configuration for details.
e. The HDD could have gone bad. Please change another one.
Q9. Fail to access the NVR remotely through IE.
a. Please make sure the IE version is IE8 or above.
b. Please check whether the PC has enabled the firewall or installed the antivirus software. Please try to access the NVR again after you disable
the firewall and stop the antivirus software.
c. Allow & block list may have been set in Account and Authority setting. The PC of which the IP address is in the block list or out of the allow list
cannot access the NVR remotely.