INSTRUCTION MANUAL PIR Sensor Camera CVC5100BPVF / CVC5100BPVFW CVC5200BPVF / CVC5200BPVFW
◑ Contents...................................................... 1 ◑ Precautions ................................................. 2, 3 ◑ Safety Instructions ...................................... 4 ◑ Package Contents....................................... 5 ◑ Camera Installation ..................................... 6-8 ◑ .............................................. 9, 10 ◑ Camera Dimension ..................................... 11 ◑ Features ......................................................
Only use the camera under conditions where temperatures are between -10°C and +50°C. Be especially careful to provide ventilation when operating under high temperatures. It can cause malfunctions to occur. Severe lighting change or flicker can cause the camera to work improperly. Severe lighting change or flicker can cause the camera to work improperly. This is one of the most important parts of the camera. Be careful not to leave fingerprints on the lens cover.
CAUTION CAUTION CAUTION RISK OF ELECTRIC SHOCK DO NOT OPEN RISK OF ELECTRIC SHOCK RISK OF DOELECTRIC NOT OPENSHOCKCAUTION:TO REDUCE THE RISK OF ELECTRIC SHOCK DO NOT OPEN DO NOT REMOVE COVER(OR BACK). CAUTION:TO REDUCE THE RISK OF ELECTRIC SHOCK USER-SERVICEABLE PARTS INSIDE. CAUTION:TO REDUCE THE RISK OF ELECTRIC NO SHOCK DO NOT REMOVE COVER(OR BACK). DO NOT REMOVE COVER(ORREFER BACK).SERVICING TO QUALIFIED SERVICE PERSONNEL. NO USER-SERVICEABLE PARTS INSIDE. NO USER-SERVICEABLE PARTS INSIDE.
S a f e t y I n s t r u c t i o n s P r e c a u t i o n s f o r u s e ◑ ◑ There are no user serviceable parts inside ◑ Do not disassemble this camera other than to make initial adjustments ◑ Use a UL approved regulated 24 volt AC or 12 volt DC power supply rical shock ◑ ◑ Please insure that your installation area can support the weight of the camera P l e a s e h a n d l e t h i s c a m e r a c a r e f u l l y : ◑ Do not use a strong or abrasive detergent when cleaning the camera ◑
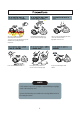
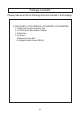
Package Contents Please make sure that the following items are included in the Package: 1) CVC5100BPVF, CVC5100BPVFW, CVC5200BPVF, CVC5200BPVFW • 1 Video Test Connector, Power Jack • 1 3Axis Bracket Round Base Adaptor • 2 Wrenches • Set Screw - 4 Tapping Screws 4x25 - 4 Hexagon Socket Screws M5x10
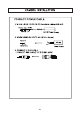
CAMERA INSTALLATION Compatibility 1) CVC5100BPVF, CVC5100BPVFW, CVC5200BPVF, CVC5200BPVFW CVCJBB INTJBS INTCM
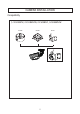
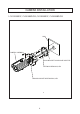
CAMERA INSTALLATION 1.
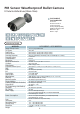
PIR Sensor Weatherproof Bullet Camera DC Auto Iris Varifocal Lens(2.8mm-12mm) ■ CVC5100BPVF ■ CVC5100BPVFW 600TV Lines DC Auto Iris Varifocal Lens(2.
PIR Sensor Weatherproof Bullet Camera DC Auto Iris Varifocal Lens (5mm-50mm) ■ CVC5200BPVF ■ CVC5200BPVFW 600TV Lines DC Auto Iris Varifocal Lens(5mm-50mm) True Day / Night Capability ICR-IR Cut Filter Removable White LEDs * 6pcs IR LEDs * 24pcs SPECIFICATIONS MODEL Image Pick-Up Device TV System Total Pixels Effective Pixels Scanning Frequency Scanning System Synchronization Resolution Minimum Illumination S/N Ratio Video Output Electronic Shutter Speed OSD SSDR BLC Day & Night Gain Control White Balance
CAMERA INSTALLATION 1) CVC5100BPVF, CVC5100BPVFW, CVC5200BPVF, CVC5200BPVFW 11.22” 3.93” dia 5.90” 3.54” 3.93” 3.70” 5.19” 10.
- The built-in high sensitivity COLOR CCD produces a clear image even in 0Lux(B/W, IR-LED ON)or lower illumination. - By adopting a diagonal 6mm(1/3") 410,000 (NTSC) pixel, 470,000(PAL) pixel SONY CCD, the camera produces clear picture quality with a horizontal resolution of 600 TV lines for color and a horizontal resolution of 700TV lines for BW mode. - The high-performance W-V DSP chip effectively removes low-light gain noise and ghosting to provide clear images even in dark environments.
O S D C o n t r o l B u t t o n 1. Type A, Type B, Type C of OSD button could be used when it needs to OSD control. 2. Type D is extra Option (wired Remote controller) ▲ Up button: Moves the cursor upwards. Use this button to select an item or adjust the parameters. ▼ Down button: Moves the cursor downwards. Use this button to select an item or adjust the parameters. ◀ Left button: Moves the cursor to the left. Use this button to select or adjust the parameters of the selected item.
● M e n u S e t u p 1 . P r e s s t h e F u n c t i o n S e t u p s w i t c h . - M a i n s e t u p m e n u i s d i s p l a y e d o n t h e m o n i t o r s c r e e n . MAIN SETUP 1.LENS 2.EXPOSURE 3.WHITE BAL 4.SSNR 5.BACKLIGHT 6.DNR3 7.DAY/NIGHT 8.SPECIAL 9.EXIT DC ATW OFF OFF ON AUTO SAVE 2 . S e l e c t a d e s i r e d f u n c t i o n u s i n g t h e F u n c t i o n S e t u p s w i t c h .
- F O C U S A D J : T o a d j u s t t h e D C l e n s f o c u s c o r r e c t l y , y o u m u s t a c t i v a t e t h e F o c u s S e t t i n g s m o d e u n d e r e a c h l e n s m e n u . A c t i v a t e t h e F o c u s S e t t i n g s m o d e , a d j u s t t h e l e n s f o c u s , a n d t h e n d e a c t i v a t e t h e s e t t i n g s m o d e . ☞ NOTE ■ If color rolling occurs when using a DC lens, set Shutter to Fixed (---).
◆ A G C ( A U T O G A I N C O N T R O L ) : T h e h i g h e r t h e g a i n l e v e l , t h e b r i g h t e r t h e s c r e e n - b u t t h e h i g h e r t h e n o i s e . * O F F : D e a c t i v a t e s t h e A G C f u n c t i o n . * L O W : A l l o w s a u t o m a t i c g a i n c o n t r o l f r o m 5 . 3 d B t o 3 2 d B .
※ S e l e c t o n e o f t h e f o l l o w i n g 5 m o d e s , a s a p p r o p r i a t e f o r y o u r p u r p o s e . ◆ A T W : S e l e c t t h i s w h e n t h e c o l o r t e m p e r a t u r e i s b e t w e e n 1 , 7 0 0˚ K a n d 1 1 , 0 0 0˚ K . ◆ O U T D O O R : S e l e c t t h i s w h e n t h e c o l o r t e m p e r a t u r e i s b e t w e e n 1 , 7 0 0˚ K a n d 1 1 , 0 0 0˚ K .
● B a c k l i g h t S e t t i n g U n l i k e c o n v e n t i o n a l c a m e r a s , t h e C V C 5 1 0 0 B P V F a n d C V C 5 2 0 0 B P V F a r e d e s i g n e d t o d e l i v e r a d i s t i n c t i v e s u b j e c t a n d b a c k g r o u n d a t t h e s a m e t i m e , e v e n w h e n t h e s u b j e c t i s b a c k l i g h t , b y u s i n g t h e f e a t u r e s o f t h e p r o p r i e t a r y W - V D S P c h i p . 1 .
BLC SETUP LEVEL TOP BOTTOM LEFT RIGHT HLC SETUP LOW 38 109 54 121 LEVEL MIDDLE LIMITS NIGHT ONLY MASK COLOR BLACK MASK TONE 1 TOP 5 BOTTOM 120 LEFT 5 RIGHT 172 Press Set to Return Press Set to Return ☞ NOTE ■ Because there can be a difference in the effectiveness of HLC according to the amount of light area in the screen, optimize the installation angle for the best HLC performance. ■ NIGHT ONLY mode.
3 . S e t t h e D N R 3 m o d e t o ' O N ' a n d p r e s s t h e F u n c t i o n S e t u p s w i t c h . T h e n y o u c a n a d j u s t t h e n o i s e r e d u c t i o n l e v e l . ☞ NOTE ■ You cannot set the DNR3 to ‘ON’ or ‘OFF’ when the AGC mode of the EXPOSURE menu is ‘OFF’. ■ When adjusting the noise reduction level in the DNR3 mode, remember that the higher the level set, the more the noise level will be reduced, as will the brightness of the image.
◆ A U T O : T h e m o d e i s s w i t c h e d t o ' C o l o r ' i n a n o r m a l e n v i r o n m e n t , b u t s w i t c h e s t o ' B / W ' m o d e w h e n a m b i e n t i l l u m i n a t i o n i s l o w . T o s e t u p t h e s w i t c h i n g t i m e f o r A U T O m o d e , p r e s s t h e F u n c t i o n S e t u p s w i t c h .
2 . S e l e c t a d e s i r e d m o d e u s i n g t h e F u n c t i o n S e t u p s w i t c h . SPECIAL 1.IMAGE ADJ 2.CAM TITLE 3.SYNC 4.MOTION DET 5.PRIVACY 6.DIS 7.COMM ADJ 8.LANGUAGE 9.RETURN OFF INT OFF OFF OFF ENGLISH ◆ I M A G E A D J .
☞ NOTE ■ ■ If you increase the SHARPNESS level too high, the picture may become distorted or noise may appear. ◆ C A M T I T L E : I f y o u e n t e r a t i t l e , t h e t i t l e w i l l a p p e a r o n t h e m o n i t o r . 1 ) I f t h e S P E C I A L m e n u s c r e e n i s d i s p l a y e d , u s e t h e F u n c t i o n S e t u p s w i t c h s o t h a t t h e a r r o w i n d i c a t e s ' C A M T I T L E ' .
☞ NOTE ■ When using AC power at 60Hz(NTSC), 50Hz(PAL), frequency, you can use the L/L type synchronization. ■ ◆ M O T I O N D E T : T h i s p r o d u c t h a s a f e a t u r e MOTION DET t h a t a l l o w s y o u t o o b s e r v e m o v e m e n t o f 1.SENSITIVITY AREA1 o b j e c t s i n 8 d i f f e r e n t a r e a s o n t h e s c r e e n , 2.AREA MODE ON a n d t h e w o r d s ' M O T I O N D E T E C T E D ' a p p e a r 3.SEL POS L-TOP 4.
1 ) W h e n t h e S P E C I A L m e n u s c r e e n i s d i s p l a y e d , p r e s s t h e F u n c t i o n S e t u p s w i t c h s o t h a t t h e a r r o w i n d i c a t e s ' P R I V A C Y ' . 2 ) S e t u p t h e m o d e u s i n g t h e F u n c t i o n S e t u p s w i t c h . - A R E A : Y o u c a n s e l e c t u p t o 1 2 P R I V A C Y a r e a s .
● T r o u b l e S h o o t i n g P R O B L E M Northing appears on the screen. P O S S I B L E C A U S E ☞Check the power cable, power supply output and video connection between the camera and monitor. ☞Are the camera lens or the lens glass dirty? The image on the screen is dim. Clean the lens / glass with a soft clean cloth. ☞Adjust the monitor controls, as required. ☞If the camera is facing a very strong light, change the camera position. ☞Adjust the lens focus.
▶ M E M O 2 8
▶ M E M O 2 9
▶ M E M O 3 0
200 New Highway Amityville, NY 11701 631-957-8700 1 800 645 5516 www.specotech.