
Quick Start Guide
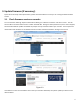

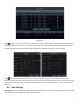
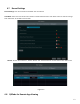
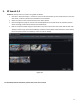
Table Of Contents
- 1.1 Check Unit and Accessories
- 1.2 Connections
- 2.1 Enter a password
- Note: You will be prompted to set a Password and security questions upon initial bootup. see Fig 2-1
- 2.2 Enter answers for two security questions.
- 3.1 Check firmware version on recorder
- 3.2 Updating Firmware
- 4. EZ Setup
- 4.1 General Settings – Date & Time
- 4.2 EZ Network Setup
- 4.3 UPnP Configuration
- 4.4 DDNS Settings
- 4.5 EZ Camera Setup
- 4.6 Disk Settings
- 4.7 Record Settings
- 4.8 QRCode for Remote App Viewing
- 4.9 Web Browser Access
- 4.10 Playback
- 5. EZ Search 2.0

13
5. EZ Search 2.0
EZ Search - Quickly search an instance using video thumbnails
• Click Start→Search and Export →EZ search. There are two view modes: by time and by camera. In the time
view mode, a maximum of 64 camera thumbnails can be showed.
• Select one camera in the interface and then click “Open” button.
• Click the image box to play the record in the small playback box on the left side of the interface (the box
which has image inside indicates that the record data exist).
• Refer to the picture below. Drag the color blocks on the time scale to select the record data and then click
“Backup” button to pop up the “Record Backup” window as shown below. Select the device name, backup
format and path and then click “Backup” button to start the backup.
Figure 5-1
For detailed operation information, please refer to the user’s manual.