
Quick Start Guide
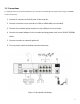

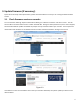

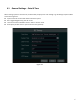
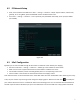
Table Of Contents
- 1.1 Check Unit and Accessories
- 1.2 Connections
- 2.1 Enter a password
- Note: You will be prompted to set a Password and security questions upon initial bootup. see Fig 2-1
- 2.2 Enter answers for two security questions.
- 3.1 Check firmware version on recorder
- 3.2 Updating Firmware
- 4. EZ Setup
- 4.1 General Settings – Date & Time
- 4.2 EZ Network Setup
- 4.3 UPnP Configuration
- 4.4 DDNS Settings
- 4.5 EZ Camera Setup
- 4.6 Disk Settings
- 4.7 Record Settings
- 4.8 QRCode for Remote App Viewing
- 4.9 Web Browser Access
- 4.10 Playback
- 5. EZ Search 2.0

5
3.2 Updating Firmware
1. Copy the upgrade software into the USB storage device.
2. Insert the USB storage device into the USB interface of the NVR.
3. Click Start→Settings→System→Maintenance→Upgrade to go to “Upgrade” interface. Select the USB device in
“Device Name” option and go to the path where the upgrade software exists. Select the upgrade software and
then click “Upgrade”. The system may automatically restart during upgrading. Please wait for a while and do not
power off the NVR during upgrading.
After firmware is updated, the unit will restart. You can now remove the USB disk from the unit.
4. EZ Setup
After the system boots up, the EZ Setup wizard is displayed. See Figure 4. If not, right click, and select EZ Setup.
Figure 4
Tip: Check the “Enable EZsetup next time” box to display the EZ Setup wizard every time the device is rebooted.