
Quick Start Guide
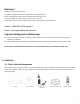
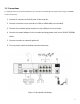

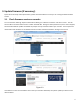

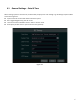
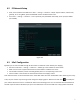
Table Of Contents
- 1.1 Check Unit and Accessories
- 1.2 Connections
- 2.1 Enter a password
- Note: You will be prompted to set a Password and security questions upon initial bootup. see Fig 2-1
- 2.2 Enter answers for two security questions.
- 3.1 Check firmware version on recorder
- 3.2 Updating Firmware
- 4. EZ Setup
- 4.1 General Settings – Date & Time
- 4.2 EZ Network Setup
- 4.3 UPnP Configuration
- 4.4 DDNS Settings
- 4.5 EZ Camera Setup
- 4.6 Disk Settings
- 4.7 Record Settings
- 4.8 QRCode for Remote App Viewing
- 4.9 Web Browser Access
- 4.10 Playback
- 5. EZ Search 2.0

8
4.4 DDNS Settings
The DDNS is used to control the dynamic IP address through domain name. Speco Technologies provides free DDNS
service with US-based servers. You can access to the NVR easily if the DDNS is enabled and configured. Click Start→
Settings→Network→DDNS to go to the interface as shown below. The default DDNS type will be "specoddns.net". The
default domain name will be shown, you can use this for your domain name or input your own. If invalid or taken,
please select another domain name. Click on test to check if ok. If so, you may now go to [your domain
name].specoddns.net with Internet Explorer and access your recorder remotely.
4.5 EZ Camera Setup
The NVR supports plug and play for Speco IP cameras through the built-in PoE ports.
Add Camera. Click “Refresh” to refresh the list of online IP cameras which are in the same local network with NVR and
then click to add the searched camera. Click “Add All” to add all the cameras in the list. Click to delete the
added camera. Click “Delete All” to delete all the added cameras. See Figure 4-2.