
Quick Start Guide
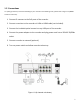
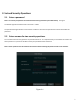
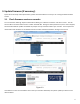
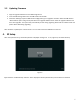
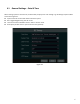

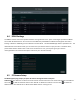
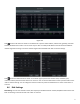
Table Of Contents
- 1.1 Check Unit and Accessories
- 1.2 Connections
- 2.1 Enter a password
- Note: You will be prompted to set a Password and security questions upon initial bootup. see Fig 2-1
- 2.2 Enter answers for two security questions.
- 3.1 Check firmware version on recorder
- 3.2 Updating Firmware
- 4. EZ Setup
- 4.1 General Settings – Date & Time
- 4.2 EZ Network Setup
- 4.3 UPnP Configuration
- 4.4 DDNS Settings
- 4.5 EZ Camera Setup
- 4.6 Disk Settings
- 4.7 Record Settings
- 4.8 QRCode for Remote App Viewing
- 4.9 Web Browser Access
- 4.10 Playback
- 5. EZ Search 2.0

9
Figure 4-2
Click to edit an IP camera as shown on the below left. Input the new IP address, subnet mask, gateway, username
and the password of the camera. You can check “Sync to IPC” to modify the IP address of the IP camera via different
network segments for being in the same network segment with the NVR. Click “OK” to save the settings.
Click to edit the added camera as shown on the above right. Input the new camera name, IP address, port,
username and the password of the camera. You can click “Test” to test the effectiveness of the input information. Click
“OK” to save the settings. You can change the IP camera name only when the added camera is online. Click “Next” to
continue.
4.6 Disk Settings
Disk Settings. You can view the disk number, disk capacity of the NVR and serial number, Read/Write status of the disk.
Click “Formatting” to format the disk. Click “Next” to continue.