
Quick Start Guide
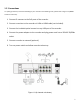
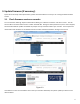
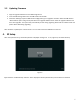
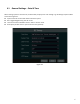

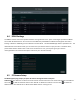
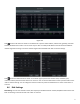
Table Of Contents
- 1.1 Check Unit and Accessories
- 1.2 Connections
- 2.1 Enter a password
- Note: You will be prompted to set a Password and security questions upon initial bootup. see Fig 2-1
- 2.2 Enter answers for two security questions.
- 3.1 Check firmware version on recorder
- 3.2 Updating Firmware
- 4. EZ Setup
- 4.1 General Settings – Date & Time
- 4.2 EZ Network Setup
- 4.3 UPnP Configuration
- 4.4 DDNS Settings
- 4.5 EZ Camera Setup
- 4.6 Disk Settings
- 4.7 Record Settings
- 4.8 QRCode for Remote App Viewing
- 4.9 Web Browser Access
- 4.10 Playback
- 5. EZ Search 2.0

2
1.2 Connections
To quickly get started, connect the following to your recorder in the following order, please refer to Figure 1-2 (N8NRL
shown for reference).
1. Connect IP cameras to the PoE ports of the recorder.
2. Connect a monitor to the recorder via VGA or HDMI cable (not included).
3. Connect the included optical mouse into any USB port of the recorder.
4. Connect the power adapter to the recorder and plug power cord into a 120VAC 50/60Hz
outlet.
5. Connect recorder to network (optional)
6. Turn on power switch and allow recorder to boot up.
Figure 1-2 (8 channel unit shown)