
Owner manual

English
19
The Position field will be automatically completed by
the software after you have saved the entry.
Here again, you may create several entries and use the
one matching your base’s current configuration.
3. Setting a base to deliver corrections to a static IP address:
• Choose the appropriate device so you can set
Network=“TCP/IP Network” (or “UDP/IP Network”).
• Through the TCP/IP Network drop-down list displayed
fu
rther down on the screen, select the name of the
base corresponding to your base configuration.
If the TCP/IP Network list is blank, tap on next to
it. In the Name drop-down list, overwrite “<New>” with
the name of the base. Then enter its IP address and IP
port.
NOTE: For each new base entry, first select “<New>”
from the Name drop-down list, and then enter the base
parameters. Reciprocally, when you want to delete a
base entry, first select its name from the Name drop-
down list and then tap on the Delete button.
• Tap to validate the new base entry and return to the
RTK tab. The name of that new base is now the current
selection in the TCP/IP Network field.
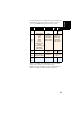
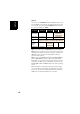
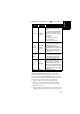
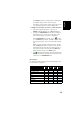
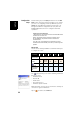
Message Type:
The table below indicates all the possible message types each
receiver model can generate.
Corrections
EPOCH
50
ProMark
220
ProMark
800
ProFlex
800
ATOM
• • •
ATOM Compact
• • •
ATOM Super Compact
• • •
CMR
• • • •
CMR+
• • • •
RTCM 2.3
• • • •
RTCM 3
• • • •
RTCM DGPS
• • •
DBEN
• •