MobileMapper 20 ® Getting Started Guide
Copyright Notice Copyright 2013 Trimble Navigation Limited. All rights reserved. Product purchase price paid by you, at Spectra Precision’s option, upon your return of the Product in accordance with Spectra Precision’s product return procedures then in effect. Trademarks All product and brand names mentioned in this publication are trademarks of their respective holders.
OF ANY KIND, BY EITHER SPECTRA PRECISION OR ANYONE WHO HAS BEEN INVOLVED IN ITS CREATION, PRODUCTION, INSTALLATION, OR DISTRIBUTION, INCLUDING, BUT NOT LIMITED TO, THE IMPLIED WARRANTIES OF MERCHANTABILITY AND FITNESS FOR A PARTICULAR PURPOSE, TITLE, AND NONINFRINGEMENT. THE STATED EXPRESS WARRANTIES ARE IN LIEU OF ALL OBLIGATIONS OR LIABILITIES ON THE PART OF SPECTRA PRECISION ARISING OUT OF, OR IN CONNECTION WITH, ANY PRODUCT.
Table of Contents First-Time Use .................................................................................... 1 Unpacking ..................................................................................... 1 Inserting the Battery Into the Receiver.............................................. 1 Turning the Receiver On.................................................................. 2 Using the AC Adapter to Charge the Battery ...................................... 3 Using the Quick Toolbar ......
Unpacking Inserting the Battery Into the Receiver English First-Time Use Open the receiver box and unpack the following items: • Receiver • Battery • Universal AC adapter • USB cable • Hand strap • Lanyard • Stylus Follow the instructions below: • Turn over the receiver. • Using the top end of the stylus (or a coin), rotate the two screws to open the trap door: turn the left-hand one clockwise by a quarter turn, and the right-hand one anticlockwise, also by a quarter turn. • Pull the trap door open.
English • Then push the door against the receiver case and rotate the two screws back in their initial positions to seal the battery compartment. Turning the Receiver On • Press the Power key [1] for a couple of seconds until you feel a vibration in your hand, then release the key. [1] Let the receiver run its boot sequence. Wait until the screen displays the Windows Embedded Hand Held Home screen. At this stage, you may be asked to initialize the receiver (screen alignment, etc.).
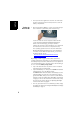
Follow the instructions below. • Prepare the AC adapter: – Remove the protective cover [1] by pushing the button then sliding the cover forward. [1] [2] [3] – Choose the plug that fits your country’s AC outlet standard (see [2]) and slide it into the AC adapter [3]. (A “click” must be heard when fully inserted.) • Take the USB cable provided [4]. Connect the end fitted with a standard USB connector to the AC adapter.
English • To read the battery charging status using the Quick Toolbar, refer to the instructions in Turning the Receiver On on page 2 (see also Using the Quick Toolbar on page 4). Using the Quick Toolbar Windows offers a quick toolbar allowing you to quickly access frequently used functions (zoom, Bluetooth, WiFi, phone, sound volume, battery power and clock). • Tap on the title bar at the top of the screen. The quick toolbar appears just underneath.
Power Management Another way of saving the battery is to allow the receiver to switch automatically to Suspend mode after a certain period of inactivity. • Press the Windows key and tap successively on Settings, System and Power. • Tap on the Advanced tab. This tab allows you to ask for the receiver to switch automatically to Suspend mode if it stays idle for the period of time you choose.
English Regional Settings It’s a good idea to customize your receiver so that it complies with a number of local preferences, such as country’s currency, decimal point representation, time and date formats, etc. • Press the Windows key and tap successively on Settings, System and Regional Settings. • On the Region tab, select your country. • Use the other tabs to set your local settings: – Number format – Currency choice – Time and date formats • Tap OK to save the settings and return to the Today screen.
Tracking satellites with your receiver requires that you use the receiver outdoor and hold it in an appropriate manner. The receiver will have the best view of the sky when you hold it at an angle of around 45 degrees from horizontal and not too close to your body. You can check that your receiver is tracking enough satellites by running the GNSS Toolbox, and more particularly the GNSS Status function (see GNSS Status on page 11).
Receiver Description English Front View Power Key Use the Power key [1] to turn on or off the receiver. To turn on the receiver, press the Power key [1] until you can feel a vibration in your hand, meaning the receiver has started a power-on procedure. You can then release the key. To turn off the receiver press the Power key [1] until a sound is heard and a warning message pops up on the screen asking you to confirm the power shutdown request. Tap Yes on the screen.
A microphone is used by the voice recorder. Keep the small aperture [7] clear when recording a vocal comment. Built-in GPS Antenna The receiver incorporates a built-in GPS antenna [8]. The receiver should be held properly to optimize satellite reception. Earpiece As a multi-media device, the receiver includes an earpiece [9], which can be used by any voice-based software application.
Battery Compartment English [18] [19] The receiver makes use of a rechargeable Li-Ion battery pack. Loosen the quarter-turn screws [15] [16] using the stylus (or a coin) to access the battery compartment [17]. The two screws use opposite directions of rotation for opening and closing the trap door. The battery compartment can also accommodate a SIM card [18] and a micro SD card [19].
GNSS Toolbox is used to control and monitor important functions in your receiver. These are listed and detailed below. • GNSS Settings: Constellations and frequencies used in the receiver. • GNSS Status: Views GNSS reception monitoring screens. • Reset: Resets the receiver. • About: Provides the software version of GNSS Toolbox. GNSS Settings • Open the GNSS Toolbox and tap on GNSS Settings.
English If SBAS is used, the screen also shows the position status (SDGPS). The unit used to express the current altitude (meters or feet) depends on the region (language and country) you selected in Start, Settings, System, Regional Settings. • The Satellites tab displays a polar diagram showing the locations in the sky of the tracked satellites. Different colors are used to display the numbers of the visible satellites: – Yellow characters: GPS satellites used – Grey characters: Visible SBAS satellites.
Power Modes The receiver has three power modes: • Shutdown: The receiver is off. • On: The receiver is fully powered • Suspend: In this mode, the screen content and backlight are turned off to save power and the use context is saved. When quitting the Suspend mode, the use context is restored instantly. Typically this mode is used in the field to allow a quick restart after a pause.
English Icon Meaning Battery high: Remaining power ranges between approximately 75 and 100% of full charge. Approx. 50-75% remaining Approx 25-50% remaining Approx. 10-25% remaining Battery low: Remaining power is less than 5%. Receiver powered from external source (AC adapter, computer via USB line) At any time you can read more in detail the battery status by pressing the Windows key and then selecting Settings, System, Power (see screen example).
Extracting the Battery from the Compartment Lever the battery out of its compartment using the stylus or a flat screwdriver. (The flat end of the stylus is inserted in the groove located on the bottom side of the battery, as shown below.) Likewise, extracting the SIM card or micro SD card from the battery compartment requires the use of a spiky-tipped tool to pull the card out of its slot. USB Connection By default, the mini-USB connector is set to allow a connection to a computer using Active Sync.
English system, install new applications directly from the computer, etc. If you want to make a different use of the receiver’s USB output, press the Windows key, go to Settings>Connections> USB to PC and change the settings accordingly. Wireless Communication The receiver incorporates three wireless communication devices: • Bluetooth • WiFi • GSM/GPRS Modem The three devices can be controlled from the Wireless Manager icon (press the Windows button and go to Settings>Connections>Wireless Manager).
GSM/GPRS Module Provided the appropriate SIM card has previoulsy been inserted in the battery compartment, the GSM/GPRS modem allows you to: • Make a phone call (modem used in GSM mode) • Establish an Internet connection (modem used in GPRS mode). Motion Sensor Enabling Automatic Screen Rotation By default, the receiver screen is used in portrait format. Rotating the receiver by 90° will not cause the screen format to switch to landscape format.
Scrolling through Your Picture Gallery English By setting the motion sensor as a switch, you can easily go through all your pictures or audio files, just using the hand that holds the receiver, leaving your other hand free. After you have opened the MyPictures folder for example and tapped on the first picture to view it, you just need to shake the receiver briefly to view the next one, and so forth until all the pictures in the folder have been viewed.
Renaming a Picture • With the “My Pictures” folder open, tap on the desired picture. This opens a new window showing the picture. • Tap Menu and Properties. • Rename the file and tap OK. Rotating a Picture • With the “My Pictures” folder open, tap on the desired picture (or tap on View in the task bar). This opens a new window showing the picture. • Tap Menu and Edit. • Tap Rotate in the task bar. This rotates the image 90° clockwise. Repeat the operation until the image has the right orientation.
Deleting a Picture English • With the “My Pictures” folder open, tap and hold the desired picture. • Select Delete in the context-sensitive menu. • Tap Yes to confirm file deletion. Changing Picture Settings • Press the Windows key and tap Pictures & Videos. This opens the “My Pictures” folder. • Tap Camera to turn on the camera. Wait a couple of seconds until the center of the window displays the viewfinder of the camera. • Tap on the screen to re-activate the task bar, tap Menu, then Resolution.
• Tap Camera to turn on the camera. Wait a couple of seconds until the center of the window displays the viewfinder of the camera. • Tap anywhere on the screen to make the task bar visible at the bottom of the screen • When you are ready to film, tap Menu and then Video. • Press the Enter button to start filming.
Deleting a Video English • With the “My Pictures” folder open, tap and hold the desired video file. • Select Delete in the context-sensitive menu. • Tap Yes to confirm file deletion.
• • • • • • • • • Press on the Windows key. Scroll down until you see the Compass icon. Tap on the Compass icon to open the Compass utility. Tap on the Calibration tab. Put the receiver down on a table to give it a horizontal position (see picture [1] below). Tap on the Start button located in the task bar to start the calibration process. First horizontal calibration is ready to go. Slowly rotate the receiver by a couple of turns while keeping it horizontal (see picture [1] below).
Platform Specifications English GNSS Characteristics Accuracy Specifications Processor Operating System 20 channels • GPS L1 C/A • SBAS: WAAS/EGNOS/MSAS • External antenna connector • NMEA Output All specified values are horizontal RMS, handheld accuracy performance achieved in good conditions (open sky) with PDOP < 3 and more than seven satellites in view. • Real-time SBAS: < 2 m typical • Post-processed: < 50 cm typical • ARM9™ • Clock frequency: 600 MHz • Microsoft Windows Embedded Hand Held.
User Interface • Receiver size: 169 x 88 x 25 mm • Receiver weight, alone: 310 g • Receiver weight (batteries included): 380 g English Physical Characteristics Keyboard: • Alphanumeric virtual keyboard • Four-direction Scroll and Enter button, Zoom In/Out keys + context-sensitive keys • Illuminated keyboard with touch screen • Virtual keyboard Display: • Color TFT, VGA, high-resolution display, sunlight readable, with touch screen, LED backlight • Size: 3.
English • Post-processing • ESRI ArcPad software bundle (USA only) Standard Accessories 26 • • • • Stylus Hand strap Universal AC adapter USB cable.
Index Accessories 26 Adjusting backlight 5, 6, 16, 17, 18 Alignment 2 B Battery compartment 10 Battery life 25 Battery status icon 13 Bluetooth 24 Burst 20 C Calibration (screen) 2 Camera 18 Camera lens 9 Camera settings 20 D Delete picture 20 Delete video file 22 Display screen 25 E Earpiece 9 Environmental characteristics 25 External antenna 9 External antenna input 9 G GNSS reception characteristics 24 GNSS settings 11 GNSS status 11 GNSS Toolbox 11 GPS antenna (built-in) 9 H Holding the receiver p
MobileMapper® 20 Getting Started Guide Contact Information: AMERICAS EUROPE, MIDDLE EAST & AFRICA ASIA-PACIFIC Spectra Precision Division 10368 Westmoor Drive, Westminster, CO 80021, USA Spectra Precision Division Rue Thomas Edison ZAC de la Fleuriaye, BP 60433 44474 Carquefou Cedex, FRANCE Spectra Precision Division 80 Marine Parade Road #22-06, Parkway Parade Singapore 449269, Singapore www.spectraprecision.com ©2013 Trimble Navigation Limited. All rights reserved.