
Instruction Manual


19
Internal Radio
• Unless already done, please follow all the steps described
in section General Parameters on page 16 before
proceeding with the steps below.
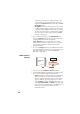
• Still on the Rover Setup page, read the content of the
Internal Radio Port D pane. Normally, the content of the
read-only Connection field has been updated when opening
the Rover Setup page to report the type of internal radio
module currently used by the receiver (ADL Foundation).
Just check that this field reads the name of the expected
type of radio.
• Click on the Power On option to ask for radio power-up.
• At the bottom of the page, in the Differential Port pane,
select the Automatic option to let the receiver detect the
incoming differential stream automatically.
NOTE: Automatic is the recommended choice for the
Differential Port setting because in this case, you don’t
need to define the ports receiving the two possible
differential streams.
• Click on the Configure button to let the Web Server load all
your new parameters to the receiver. As a result, the radio
module is powered up.
Now that the radio is on, proceed with the last settings
required on the radio side.
• Click on the Connections menu and then on the Radio sub-
menu.
•In the Internal Radio pane, set the following parameters:
– Power: (it is now necessarily “On” as you have turned
on the radio in a previous step to make its
configuration possible.)
Choose whether the radio should be turned on
automatically or manually:
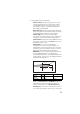
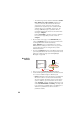
Internal
Radio
ProFlex 800
RTK Corrections
(UHF radio link)
BaseRadio