ProMark Field Software ™ Getting Started Guide From V3.5.
Copyright Notice Copyright 2012-2013 Trimble Navigation Limited. All rights reserved. Product purchase price paid by you, at Spectra Precision’s option, upon your return of the Product in accordance with Spectra Precision’s product return procedures then in effect. Trademarks All product and brand names mentioned in this publication are trademarks of their respective holders.
OF ANY KIND, BY EITHER SPECTRA PRECISION OR ANYONE WHO HAS BEEN INVOLVED IN ITS CREATION, PRODUCTION, INSTALLATION, OR DISTRIBUTION, INCLUDING, BUT NOT LIMITED TO, THE IMPLIED WARRANTIES OF MERCHANTABILITY AND FITNESS FOR A PARTICULAR PURPOSE, TITLE, AND NONINFRINGEMENT. THE STATED EXPRESS WARRANTIES ARE IN LIEU OF ALL OBLIGATIONS OR LIABILITIES ON THE PART OF SPECTRA PRECISION ARISING OUT OF, OR IN CONNECTION WITH, ANY PRODUCT.
Table of Contents Introduction to ProMark Field ........................................................ 1 Installing ProMark Field ................................................................ 3 Installation Procedure .............................................................. 3 Entering the Activation Code..................................................... 4 Getting Started With ProMark Field ................................................ 5 Connecting the External Antenna .......................
Logging with Offsets ................................................................... 50 Point Offset........................................................................... 50 Line Offset ............................................................................ 50 Setting an RTK Base .................................................................. 51 Installing Geoids ........................................................................ 55 Adding Background Maps...............................
ProMark Field is a software program designed for generalpurpose land survey applications. ProMark Field runs on Microsoft Windows Mobile or Windows Embedded Handheld. ProMark Field allows you to determine positions of points with centimeter precision through one of two types of projects: • Post-processed Project: Centimeter-accurate positions for your surveyed points will be computed at the office by specific post-processing software (GNSS Solutions) after raw data have been collected in the field.
English a full description of each of the surveyed points (name, coordinates, solution status, PDOP, number of satellites used, etc.) will be saved to the job file. In a real-time RTK project, the coordinates of all the surveyed points saved to the job file will feature centimeter accuracy. In a post-processed project, they will only be meter accurate.
This section describes how to install ProMark Field from the CD provided, using an office computer. If Windows XP (or older OS version) is used on your computer, you first need to install Microsoft Active Sync on your office computer. If Windows Vista or Windows 7 is used, you don’t normally need to install an additional program on your computer.
English • On receiver side, tap OK after successful installation of Spectra Precision TTSBase.CAB. • Go back to your computer and click OK to close the message window and proceed. The installer on the computer then runs the same sequence as the previous one, this time to copy Spectra Precision Required Data.CAB to the receiver. • Again, a message on the computer tells you to check the receiver screen.
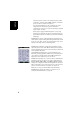
Connecting the External Antenna Connect your external antenna to the receiver. The following icon appears at the bottom of the screen, indicating that the antenna is properly connected to the receiver. If the external antenna is missing or not properly connected, then the message “No external antenna” will pop up on the screen. Launching ProMark Field Tap Start>ProMark Field or tap ProMark Field on the Home screen. The main ProMark Field window is described below.
English “BASE” permanently displayed if the receiver is used as a base, otherwise position computation status if the receiver is used as a rover. In the latter case, the position computation status may take one of the following values: Status Autonomous DGPS SDGPS FLOAT FIXED Operating Mode GPS only Conventional Differential GPS using corrections from a beacon or a base. SBAS Differential RTK, subfoot accuracy RTK, centimeter accuracy – Column #2: Current value of PDOP.
Stakeout... Initialize Calibration Zoom In Zoom Out Job Configuration Options Status About Exit Function Use this option to stop the current logging. Use this option to pause the current logging. RTK only. Use this function to be guided to points you are requested to go to. Alternately, can be used for navigation purposes, whether in real-time RTK or post-processed projects. Use this option to choose one of the available methods to speed up the initialization process. RTK only.
English • [16]: Takes you to the Microsoft Home screen by minimizing the ProMark Field window. Tap on the ProMark Field icon ( ) at the bottom of the screen to return to ProMark Field. Dragging the Map on the Screen Use one of the following two methods. • Press the ESC key to move the arrow symbol representing your current position back to the center of the map screen. Following this action, the whole screen is updated to reflect the map shift. • Drag the stylus in the desired direction.
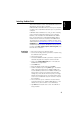
4. Tap on the Feature Codes tab. Use this tab to name all types of points you will be surveying with your receiver (e.g. pavement, fence, etc.). Then as you work in the field, it will be easy for you to associate a feature code with each of the points you will be surveying. Tap on the Add button to add a new feature code and then tap OK to validate the new entry. Repeat this operation as many times as necessary.
English When enabled, vocal information is provided when the receiver delivers its first position solution, and every time the position status changes state. In stake out, vocal instructions (distance and direction to point) are regularly provided to guide you to the stakeout point until you get to that point. When raw data are collected in static mode, vocal information is given to indicate a change to the current value of the observation timer (see Rover Collecting Raw Data in Static on page 23). 7.
English Creating a New Job During your First ProMark Field Session After entering the activation code, ProMark Field displays the map screen. Do the following to create a new job. 1. Tap Menu>Job>New... 2. Enter the following parameters: • Name: Enter a name for your job using the Microsoft virtual keyboard, or the large ProMark Field keyboard, if enabled. • Location: Choose the storage medium where to store the job file.
English 4. Choose the World Geodetic System or the country where your field operations will take place. 5. In the field just underneath, choose the datum used 6. In the field just underneath, choose the projection used. 7. Choose the vertical datum in the last field. The default possible choices are: – Ellipsoid: Each altitude or height value is simply determined with respect to the selected ellipsoid (second field above).
Attribute Type Additional Information Needed Maximum number of Text Entering comment, etc. characters. Choosing an option (menu item) that All possible menu Menu suits the attribute for the collected items for this attridata. bute. Attaching a picture to the collected Image data. Voice Recording voice comment Max. number of digNumeric Entering a number. its and decimal places. Entering the current logging date Date (mm/dd/yy).
English Defining a User System • Tap on the New button. • Select the type of projection you wish to use in your coordinate system. Depending on that choice, you will have to enter a certain number of parameters. Remember every time you create a new projection and you have to enter the latitude and longitude of origin, or the central meridian, these must be expressed in degrees with eight decimal places (ddd.dddddddd).
After opening the job in ProMark Field, do the following: • Select Menu>Job>Points. A two-column table appears listing all the points contained in the job. The first column provides the point ID and the second, the point description (if any).
English There is an additional procedure to delete points from a job, based on the use of the map screen: • Adjust the map screen (zoom, drag) to make visible on the screen the point you want to delete. • Tap on the point. This opens a new window showing its properties. • Tap on Delete in the lower-left corner of the window. The point is instantly deleted from the job (no user confirmation required).
Table columns: Parameters Coordinate system used Site ID Description Coordinates (X, Y, Z and/or Lat, Lon, Alt) Delta X, Y, Z (ECEF) Number of satellites Position solution status (Autonomous, DGPS, SDGPS, FLOAT or FIXED) GLONASS status (Y or N) HRMS & VRMS values Date & time Occupation time Antenna height value Antenna height measurement type (slant or not, “1” if slant) Offsets (distance and bearing) When a job is open in ProMark Field, all the points contained in that job can be seen on the map screen a
Importing/Exporting Jobs English Exporting Jobs The list of points held in a csv job file can be exported to a user-defined text file or to DXF format. Shp jobs can only be exported to DXF. With the job open in ProMark Field, do the following: • Tap Menu > Job > Export. • Enter a name for the text file that will be created by the Export function. • Choose a location and a folder where to store the file once generated. • Tap Save.
File example using the comma separator: Follow the instructions below to import a list of points from a text file: • Tap Menu > Job > Import. ProMark Field lists all the text files stored on your platform. • Tap the name of the text file you would like to import. This opens a new window on which you can customize the import function. • Select the type of information you would like ProMark Field to pick for each point from the text file.
Running a Post-Processed Project English Choosing the Survey Type/Mode and the System Setup Use the Survey tab on ProMark Field’s Options menu for this setting. Read the table below to choose the survey type and mode and the system setup suitable for your project. Your Project Setup Receiver and antenna mounted on a tripod: Collecting Raw Data on One Point: You want to collect raw data at the same location throughout the project. The receiver is used either as a base or a rover.
On a Tripod (static survey): • Place the receiver in its field bracket and mount the assembly onto one the tripod’s legs. • Insert the antenna vertical extension (a short pole provided along with the receiver) at the top of the tripod. • Secure the antenna provided at the top of this short pole. • Connect the antenna to the receiver antenna input using the coaxial cable provided. • Install the tripod over the chosen point (the reference point for a base, the surveyed point for a rover).
English Base Collecting Raw Data • Set up the base at its planned location as explained in Typical Setups on page 21. Measure the antenna height according to the slant measurement method, using the HI tape provided: – Insert the end of the tape into one of the three height marks located at the edge of the antenna radome (as shown). – Unfold the tap until you place the tip located at the other end of the tape on the reference point.
Rover Collecting Raw Data in Static • Set up the rover as explained in Typical Setups on page 21 and measure the antenna height according to the slant measurement method, using the HI tape provided: – Insert the end of the tape into one of the three height marks located at the edge of the antenna radome (as shown). – Unfold the tap until you place the tip located at the other end of the tape on the surveyed point. – Read the graduation directly on the tape: This is the slant antenna height.
English • On the GNSS tab, make sure the “Internal” GNSS receiver is selected. Ignore the Port field. • Tap on the Antenna tab, • Enter the antenna height you have just measured and select “Slant”, corresponding to the measurement method used. • Select the antenna type used.
• When you estimate that enough data have been recorded, taking into account the value of the Range Achieved, tap Stop. NOTE: You may tap on the Log button again and resume data logging for the same Site ID name (or for a different name). This will create a new raw data file (G file), which by default will be the only one to be seen as a static observation when imported in GNSS Solutions. In the job file (csv file), this will result in two points collected.
English • • • • If you are using a fixed-height pole, just enter this height. if you are using a height-adjustable pole or bipod, read the graduation on this device, and then enter the read value in the Antenna Height field. Select the antenna type used.
Rover Collecting Raw Data in Continuous Kinematic In Continuous Kinematic, the rover is moved along a line, marking points at regular intervals of time or distance, and simultaneously and continuously collecting raw data. • Set up the rover as explained in Typical Setups on page 21. • Turn on the receiver, run ProMark Field and create a job as explained in Creating a New Job on page 11. • On the Options menu, select “Continuous Kinematic” and “Post-processing” on the Survey tab, then tap OK.
English • • • • graduation on this device, and then enter the read value in the Antenna Height field. Select the antenna type used. On the Recording tab, make sure the Record raw data for post-processing function is enabled, check that the storage medium used to store the collected data is the one you really want to use (it is a good practice to use a Storage Card) and choose the recording interval (default: 1 second).
• • Quick Start to Post-Processing Raw Data Assuming raw data files (G files) were collected directly on SD Cards, one by the base, another by the rover, do the following: • Copy the G files from the rover and the base to your computer. • With Spectra Precision Survey Office (SPSO): – Run SPSO. – On the start page, click on Start new project. – Click OK. – Drag and drop the G files from the base, then from the rover, onto the Plan View.
English • With GNSS Solutions: – Run GNSS Solutions – Select Create a New Project. – Name the project. – Click on Modify Default Settings and choose a coordinate system. – In the Import dialog box that shows up after selecting the coordinate system, select Import Raw Data From Files or ProMark/ProFlex Devices. – In the Browse dialog box, select the G files you want to import and tell GNSS Solutions whether you want a local copy of these files or not. – Click Open.
G85X2B11.157 NOTE 2: The ProMark Field job file is of no use in the postprocessing step. However, when defining control points in GNSS Solutions, the job file may be useful as a separate memo, for example to copy the coordinates of the point where the base was declared to be installed (cf. Site tab and Site ID field). NOTE 3: There is no implicit “connection” between a raw data file logged by a receiver and the job file that was open at that time.
Using Your Rover in a Real-Time RTK Project English Choosing the Survey Type and Mode Use the Survey tab on ProMark Field’s Options menu for this setting. Read the table below to choose the survey type and mode suitable for your project. Your Project Setup Logging Points: You want to collect centimeter-accurate positions Receiver and antenna in real time on each of the mounted on a pole or bipod: surveyed points.
Red +DC IN* Black GND, 0.5 A Orange +DC OUT** Black White Yellow Green Blue GND, 2 A UHF_RTS UHF_RX UHF_TX UHF_CTS POGO Connector *: DC power input (12-28 V DC/2 A external battery) **: DC power output to UHF radio (12 V DC/0.5 A) Step-by-step procedure: • Turn on the receiver, run ProMark Field and create a job as explained in Creating a New Job on page 11. • Go to Menu>Options. On the Survey tab, select “Real-time” as the survey mode.
English • Tap on the Link tab and select the device through which RTK corrections will be received. Make the required settings depending on the choice of device made (modem or radio). See table below. Device Settings Type (U-Link, License-Free Europe, License-Free UHF Radio America or Satel Easy), baud rate, advanced Tap on the Dial button, then enter the base phone GSM (CSD) modem number.
Logging Points • Set up the rover as explained in Choosing the Survey Type and Mode on page 32. • Turn on the receiver, run ProMark Field and create a job as explained in Creating a New Job on page 11. • On the Options menu, select “Stop & Go Kinematic” and “Real-time” on the Survey tab, then tap OK. • Think about which initialization method you will be using at the beginning of the project and take the corresponding steps: – On the Fly: Nothing special needs to be done.
English – Statically: You will stay static for a while on a point of your choice. • • • • • • • • • • • Tap Menu and select Configuration... Select “Rover” from the Configuration drop-down list. Tap Settings. On the GNSS tab, make sure the “Internal” GNSS receiver is selected. Ignore the Port field. Tap on the Antenna tab, Select “Vertical” and enter the antenna height, which in this case corresponds to the pole or bipod length. If you are using a fixed-height pole, just enter this height.
Logging Points along a Line • Set up the rover as explained in Choosing the Survey Type and Mode on page 32. 37 English • Taking care to keep the pole upright and the antenna unmasked, go to the first point of your project. • Tap Log. This opens the Attributes tab on the logging screen. With a csv job open, in the Site ID field, type the name of that point. If you use a purely numerical value for this field, then ProMark Field will automatically increment the Site ID name after each site occupation.
English • Turn on the receiver, run ProMark Field and create a job as explained in Creating a New Job on page 11. • On the Options menu, select “Continuous Kinematic” and “Real-time” on the Survey tab, then tap OK. • Think about which initialization method you will be using at the beginning of the project and take the corresponding steps: – On the Fly: Nothing special needs to be done. – From Known Point: Go to the known point and place the rover antenna exactly over this point.
• Wait until the receiver returns the “FIXED” indication in the status bar. • Taking care to keep the pole upright and the antenna unmasked, go to the start point of the line. • Tap Log. This opens the Attributes tab on the logging screen. With a csv job open, in the Site ID field, type the name of the start point of the line. If you use a purely numerical value for this field, then ProMark Field will automatically increment the Site ID name. Optionally, add a description in the field underneath.
English A warning message will be displayed at this stage if the position accuracy does not meet your acceptance criteria (see Tolerances tab in Setting General Parameters on page 8). • When you reach the end of the line, select Menu > Stop. You may use the Pause/Resume function in the Menu when the line is discontinuous. While in pause, ProMark Field stops logging points according to the chosen time or distance rate.
• Wait until the receiver returns the “FIXED” indication in the status bar. • Tap Menu>Stakeout. • Select the first target from the displayed list. The map screen then indicates the path to take you to that point. 41 English • Select “Rover” from the Configuration drop-down list. • Tap Settings. • On the GNSS tab, make sure the “Internal” GNSS receiver is selected. • Tap on the Antenna tab, • Select “Vertical” and enter the antenna height, which in this case corresponds to the pole or bipod length.
English [8] [1] [2] [3] [7] [4] [5] [6] [1]: Selected stakeout point (target). [2]: Direct path to the stakeout point from your location. [3]: Your current location. [4]: Instructions to help you get closer to the target: • West/East, North/South if North up is selected (see Menu>Options, View tab), • Or Right/Left, In/Out if Course up is selected on the View tab.
(See also screen example.) A warning message may be displayed repeatedly during this sequence if the position accuracy does not meet your acceptance criteria (see Tolerances tab in Setting General Parameters on page 8). – Tap OK to close the window. • Select Menu > Stakeout to select the next stakeout point or quit the stakeout function.
English working area. The higher the number of points known in the local system, the higher the redundancy and the more accurate the determination of the unknown local system. Once the local system is determined and used, all the points logged afterwards will be expressed in that system. In this kind of project, the calibration step should then be performed in the first place. Using the Calibration function is a two-step procedure: 1.
• With the antenna pole still perfectly positioned over the point, tap OK to log the two sets of coordinates for that point. • Go to the next known point and stay static on that point. • Repeat the previous three steps until all your known points have been logged. As you go forward in the procedure, ProMark Field starts determining the local system, updating the residual columns as new points are added.
English physically located on this point and you have previously selected it in the list. You can view the Hor. correction and Ver correction tabs showing the characteristics of the local system, as currently determined by the process. • When you are pleased with the results of the process (i.e. all residuals are zero or close to zero), then you can make the local system the new coordinate system used in the job by tapping OK.
Changing the storage medium requires that you temporarily disable the Record raw data for post-processing function and validate the configuration of the base or rover with this function disabled. When coming back to the settings of the base or rover, you will then be allowed to change the storage medium on the Recording tab. Don’t forget to re-enable the Record raw data for post-processing function afterwards.
Initialization English Post-Processed Projects In a rover, the initialization step is recommended at the beginning of the data collection phase to make sure GNSS Solutions will have enough data to post-process the field data and deliver the expected level of accuracy. Two initialization methods are possible in this case: Initialization Method What You Are Supposed To Do It is assumed that you are using your own base.
This step is recommended in real-time RTK projects to reduce the time needed before the rover can provide its first “fixed” position solution (i.e. “FIXED” position status displayed on the screen). Four initialization methods are possible: Initialization Method What You Are Supposed To Do It is assumed that you are using your own base. Start your project with the rover antenna placed at the end of the initializer bar (installed at the base).
Logging with Offsets English Point Offset N β d Line Offset Left d Right d 50 Use this function when you cannot position the antenna exactly over the desired point. The offset is defined as a bearing (β) and a horizontal distance (d) to that point from your current location. Set the horizontal distance back to 0 to cancel the point offset.
POGO Cable P/N 111659 Red +DC IN* Black GND, 0.5 A Orange +DC OUT** Black White Yellow Green Blue GND, 2 A UHF_RTS UHF_RX UHF_TX UHF_CTS POGO Connector *: DC power input (12-28 V DC/2 A external battery) **: DC power output to UHF radio (12 V DC/0.5 A) Device used to send out corrections: • If you are using a cellular modem, make sure you have purchased and inserted the SIM card that will allow the modem to fulfill this task.
English • Turn on the receiver, run ProMark Field and create a job as explained in Creating a New Job on page 11. • Go to Menu>Options. On the Survey tab, select “Real-time” as the survey mode. The Type parameter may be set to any of the available two choices. • Tap OK. • Tap Menu and select Configuration... • Select “Base” from the Configuration drop-down list • Tap Settings. • On the GNSS tab, make sure the “Internal” GNSS receiver is selected.
English See table below. Device Settings UHF radio Type, baud rate, advanced GSM (CSD) modem None Direct IP parameters: Network connection • Name, host, port via GSM (GPRS) modem Or NTRIP parameters: • Name, host, port • Password, station External cell phone See Handheld Platform for ProMark Getting Started via Bluetooth Guide, Advanced Features section. Other external device Port, baud rate NOTE: You can create as many NTRIP and Direct IP configurations as necessary.
English • • • • 54 For easy reference, ProMark Field automatically provides the name, folder and location of the raw data file the receiver will now be creating. NOTE: Changing the storage medium requires that you temporarily disable the Record raw data for post-processing function and validate the configuration of the base with this function disabled. When coming back to the settings of the base, you will then be allowed to change the storage medium on the Recording tab.
Spectra Precision makes available a collection of geoids for use in many countries around the world. This collection is hosted on the Spectra Precision website and is regularly updated. To download a geoid, use the link Geoids (models & tools) in the welcome menu of your application software CD. In absence of the CD, you can still list and download the available geoids using your web browser to connect to the following URL: http://resources.ashtech.com/GEOIDS.
English Through the above URL, you can also install the Extract Tool on your computer (see bottom of the menu on the left). Use this tool to limit the geographical extent of the selected geoid to your working area. This may be useful to reduce the space occupied by the geoid file on your receiver. The extracted geoid (also a *.geo file) should then be copied to My Device \Program Files\Geoids Data\ on the receiver.
Background maps can be displayed on the map screen to help you better locate the different features found in the working area. Two types of background maps are supported: • Background maps in vector format (OSM files) • Background maps in raster format (ecw, bmp, gif, tif, jpg or jp2 files) In order to be used in MobileMapper Field, a background map must be properly georeferenced. OSM files are “naturally” georeferenced due to their very nature. (To create an OSM file go to http:// www.openstreetmap.
English • Tap in the Type field and select the format of the file containing the background map: – ECW Enhanced Compression Wavelet (ecw) – Bitmap (bmp) – GIF (gif) – GeoTIFF (tif) – JPEG (jpg) – JPEG2000 (jp2) – Open StreetMap (osm) MobileMapper Field then browses all the folders in search of all the image files stored in the receiver meeting the current Type selection. • Tap on the name of the image file you want to add. This automatically adds the file to the list of background maps.
Georeferencing an image file means defining at least three reference points giving the position of the image in space. Defining a reference point means entering its precise X-Y-Z or Lat-Lon-Height coordinates depending on the coordinate system used in the currently open job. The larger the number of reference points you define, the more evenly distributed these points over the entire image, the better the georeferencing of the image.
English • It is highly recommended to place the original image file used to create the background map in the same folder as the job file using it. Observing this rule will simplify the download procedure. • When georeferencing an image, the original image file is unchanged and three new files are created: Created files .prj Designation Coordinate system used Auxiliary data. “xx” in the extension stands for .
Enabling/Disabling the E-Compass • Tap Menu>Options. • Tap on the right-arrow button several times until you unveil the E-compass tab. • Tap on the E-compass tab. • Set the Use electronic compass to determine orientation button to enable or disable the E-compass. The compass calibration is described in the section below.
English Recommendations for E-Compass Calibration The E-compass being a very sensitive sensor, Spectra Precision recommends you adhere to the following recommendations. • Calibration should always be performed: – Outdoor, not indoor. – On a flat horizontal surface, not in your hands. – In the same operating conditions (i.e. same backlight level, with/without SD card) as those you will work in later when you collect your data.
Setting an External Device • Tap Menu>Options. • Tap on the right-arrow button several times until you unveil the External Devices tab. • Tap on the External Devices tab. • Tap on the Connect button. • Select the device used from the Device type field. • Set the virtual port number (Port) and baud rate (Baud rate) used to let your receiver communicate with this device. • Tap OK to enter your settings and return to the map screen. 63 English • Using the E-compass is recommended for static occupations.
Index Symbols English *.
O U Offset 37, 39 On the Fly 35, 36, 38, 39, 40, 41, 49 OSM (OpenStreetMap) 57 Use electronic compass to determine orientation 61 Use RTCM data for coordinate transformation 35 P V Pause 7 Pause/resume 29, 40 POGO cable 33, 51 Point offset 50 Points list 7, 14 Pole (kinematic surveys) 21 Post-processed project 1 Projection 12 Virtual antenna 22, 52 Vista 3 Voice guidance 1, 7, 42 VRMS 6 R Yes/No 13 Range achieved 24 Raw data collection along a line 27 Real-time RTK project 1 Recording 36, 38, 41 R
ProMark™ Field Software Getting Started Guide Contact Information: SPECTRA PRECISION DIVISION 10355 Westmoor Drive, Suite #100 Westminster, CO 80021, USA www.spectraprecision.com Rue Thomas Edison ZAC de la Fleuriaye, BP 60433 44474 Carquefou Cedex, FRANCE ©2012-2013 Trimble Navigation Limited. All rights reserved. Spectra Precision is a Division of Trimble Navigation Limited. Spectra Precision and the Spectra Precision logo are trademarks of Trimble Navigation Limited or its subsidiaries.